专题分为五大块:
- Paging3 的结构组成
- Flow 与 Paging3
- 下拉刷新
- 上拉刷新离奇 Bug
- 上游数据缓存
Demo 会还原开发迭代的过程,不会直接一步到位。
1、Paging3 加载数据流程
(P105)Paging3 的简介详情可参考官方文档 Paging 库概览,这里简单介绍下架构:
- 代码库层(Repository):主要使用 PagingSource 组件,也有可能用到 RemoteMediator 组件:
- PagingSource 定义数据源以及如何从该数据源检索数据。PagingSource 对象可以从任何单个数据源(包括网络来源和本地数据库)加载数据
- RemoteMediator 对象会处理来自分层数据源(例如具有本地数据库缓存的网络数据源)的分页,它的作用主要是协调从网络数据源获取数据并将其存储到本地数据库中
- ViewModel 层:
- Pager 组件提供公共 API,基于 PagingSource 和 PagingConfig 构造响应式流中公开的 PagingData 实例
- PagingData 会连接 ViewModel 与 UI,PagingData 对象是用于存放分页数据快照的容器。它会查询 PagingSource 对象并存储结果
- UI 层:Paging 库在本层的主要组件是 PagingDataAdapter,是用于处理分页数据的 RecyclerView 适配器。此外可以使用 AsyncPagingDataDiffer 组件构建自定义适配器
2、编码前准备工作
(P106)编码前的准备工作包括项目的配置以及公共框架的搭建。
2.1 项目配置
首先,项目配置要搞定模块的 build.gradle:
plugins {
	// 增加 kapt 插件,Paging 会用到
    id 'kotlin-kapt'
}

android {
    // Execution failed for task ':flow-paging3:kaptGenerateStubsDebugKotlin'.
    //> 'compileDebugJavaWithJavac' task (current target is 1.8) and 'kaptGenerateStubsDebugKotlin'
    // task (current target is 17) jvm target compatibility should be set to the same Java version.
    compileOptions {
        sourceCompatibility JavaVersion.VERSION_17
        targetCompatibility JavaVersion.VERSION_17
    }
    // Execution failed for task ':flow-paging3:kaptGenerateStubsDebugKotlin'.
    //> 'compileDebugJavaWithJavac' task (current target is 1.8) and 'kaptGenerateStubsDebugKotlin'
    // task (current target is 17) jvm target compatibility should be set to the same Java version.
    kotlinOptions {
        jvmTarget = '17'
    }
    // 开启 viewBinding 和 dataBinding
    viewBinding {
        enabled = true
    }
    dataBinding {
        enabled = true
    }
}

dependencies {
    def constraint_version = "2.1.3"
    implementation 'androidx.constraintlayout:constraintlayout:$constraint_version'

    def kotlin_version = "1.8.0"
    implementation "androidx.core:core-ktx:$kotlin_version"

    def material_version = "1.5.0"
    implementation "com.google.android.material:material:$material_version"

    def appcompat_version = "1.4.1"
    implementation "androidx.appcompat:appcompat:$appcompat_version"

    def coroutines_version = "1.4.2"
    implementation "org.jetbrains.kotlinx:kotlinx-coroutines-core:$coroutines_version"
    implementation "org.jetbrains.kotlinx:kotlinx-coroutines-android:$coroutines_version"

    def lifecycle_version = "2.2.0"
    implementation "androidx.lifecycle:lifecycle-livedata-ktx:$lifecycle_version"

    def swipe_refresh_layout_version = "1.1.0"
    implementation "androidx.swiperefreshlayout:swiperefreshlayout:$swipe_refresh_layout_version"

    def retrofit_version = "2.9.0"
    implementation "com.squareup.retrofit2:retrofit:$retrofit_version"
    implementation "com.squareup.retrofit2:converter-gson:$retrofit_version"

    def okhttp_version = "3.4.1"
    implementation "com.squareup.okhttp3:logging-interceptor:$okhttp_version"

    def activity_version = "1.7.0"
    implementation "androidx.activity:activity:$activity_version"
    implementation "androidx.activity:activity-ktx:$activity_version"

    def paging_version = "3.0.0-alpha03"
    implementation "androidx.paging:paging-runtime:$paging_version"

    def picasso_version = "2.71828"
    implementation "com.squareup.picasso:picasso:$picasso_version"
}
注意的点:
- Paging 会用到 ‘kotlin-kapt’ 这个插件,因此需要添加
- 由于当前使用的 AS 版本支持的最低 Gradle 版本是 7.X 版本,这些版本需要的最低 JDK 版本高于 JDK 8,所以在设置中使用了 将 Build Tools -> Gradle -> Gradle JDK 版本设置为 17。在开启 kapt 插件后,compileOptions 与 kotlinOptions 内对 JDK 的设置也要保持一致,否则会报出注释上的错误
- 依赖部分要引入 activity-ktx,因为它提供了扩展方法 viewModels 可以用于便捷初始化 ViewModel 对象
然后是 AndroidManifest 配置网络相关的权限:
<manifest xmlns:android="http://schemas.android.com/apk/res/android">

    <uses-permission android:name="android.permission.INTERNET" />

    <!-- 如果网络请求没用到 HTTP 协议,则不用配置 networkSecurityConfig -->
    <application
         android:networkSecurityConfig="@xml/network_security_config"
    </application>
</manifest>
network_security_config.xml 是一个允许 HTTP 的配置:
<?xml version="1.0" encoding="utf-8"?>
<network-security-config>
    <base-config cleartextTrafficPermitted="true" />
</network-security-config>
最后要配置 gradle.properties:
# Enables the AndroidX Jetifier, which replaces usages of support library classes
# 允许第三方库使用 AndroidX,否则编译不通过
android.enableJetifier=true
实际上没配这个属性项目也能正常运行,原因是该配置设为 true 会开启 Jetifier 工具,该工具用于将 Android Support Library 依赖到 AndroidX 的工具,它可以确保第三方库和自身项目中的所有依赖都使用 AndroidX 包。如果你的项目都直接用的 AndroidX 而没有 Android Support Library,那就不用进行上述配置。
2.2 项目框架搭建
主要是跑通 Retrofit 网络请求。
课程使用的是讲师搭建的本地服务器返回电影列表信息,由于我们用不了该服务器,所以使用 WanAndroid 的【项目列表数据】代替。之所以使用该接口,是因为它的返回内容是有图片的,与课程中展示的效果相近。该接口的规格如下:
某一个分类下项目列表数据,分页展示
https://www.wanandroid.com/project/list/1/json?cid=294

方法:GET
参数:
	cid 分类的id,上面项目分类接口
	页码:拼接在链接中,从1开始。
注:该接口支持传入 page_size 控制分页数量,取值为[1-40],不传则使用默认值,一旦传入了 page_size,后续该接口分页都需要带上,否则会造成分页读取错误。
可以直接访问:https://www.wanandroid.com/project/list/1/json?cid=294
我们对该接口进行了测试,发现一些情况,做如下说明:
- cid 参数并不起作用,即便不传也返回同样的数据,所以后续我们创建 Retrofit 接口方法时不会传这个参数
- 页码就是地址中在 list 之后的数字,页码从 1 开始,而不是 0
- 每一页的大小 page_size 是以参数形式拼接在地址后面的,比如想指定一页有 10 条数据,那么就请求 https://www.wanandroid.com/project/list/1/json?page_size=10
接下来我们让分页数量为 1,看一下 JSON 的数据结构:
{
  "data": {
    "curPage": 1,
    "datas": [
      {
        "adminAdd": false,
        "apkLink": "",
        "audit": 1,
        "author": "sskEvan",
        "canEdit": false,
        "chapterId": 294,
        "chapterName": "完整项目",
        "collect": false,
        "courseId": 13,
        "desc": "joke_fun_flutter仿写自段子乐app,项目整体基于GetX实现路由跳转、依赖注入、状态管理。网络请求基于Dio+Retrofit。已实现以下功能:段子推荐列表(纯文字、多图片、视频)、段子发布、发现(仿抖音划一划功能)、搜索、评论(支持楼中楼)、登陆、个人详情、资料编辑、乐豆、关注、主题色切换...",
        "descMd": "",
        "envelopePic": "https://www.wanandroid.com/blogimgs/2f859d26-e80a-4f08-a62a-f1c8236333cf.png",
        "fresh": false,
        "host": "",
        "id": 27962,
        "isAdminAdd": false,
        "link": "https://www.wanandroid.com/blog/show/3619",
        "niceDate": "2024-01-29 22:12",
        "niceShareDate": "2024-01-29 22:12",
        "origin": "",
        "prefix": "",
        "projectLink": "https://github.com/sskEvan/joke_fun_flutter",
        "publishTime": 1706537538000,
        "realSuperChapterId": 293,
        "selfVisible": 0,
        "shareDate": 1706537538000,
        "shareUser": "",
        "superChapterId": 294,
        "superChapterName": "开源项目主Tab",
        "tags": [
          {
            "name": "项目",
            "url": "/project/list/1?cid=294"
          }
        ],
        "title": "flutter仿段子乐app",
        "type": 0,
        "userId": -1,
        "visible": 1,
        "zan": 0
      }
    ],
    "offset": 0,
    "over": false,
    "pageCount": 289,
    "size": 1,
    "total": 289
  },
  "errorCode": 0,
  "errorMsg": ""
}
根据该结构,可以创建项目的一系列 Model 类(不要说成实体 Entity,因为实体是数据库概念,一般为数据库使用所创建的 Data Class 或者 JavaBean 才称为实体):
data class Projects(
    val `data`: ProjectData,
    val errorCode: Int,
    val errorMsg: String
)

data class ProjectData(
    val curPage: Int,
    @SerializedName("datas")
    val projectList: List<Project>,
    val offset: Int,
    val over: Boolean,
    val pageCount: Int,
    val size: Int,
    val total: Int
)

data class Project(
    val adminAdd: Boolean,
    val apkLink: String,
    val audit: Int,
    val author: String,
    val canEdit: Boolean,
    val chapterId: Int,
    val chapterName: String,
    val collect: Boolean,
    val courseId: Int,
    val desc: String,
    val descMd: String,
    val envelopePic: String,
    val fresh: Boolean,
    val host: String,
    val id: Int,
    val isAdminAdd: Boolean,
    val link: String,
    val niceDate: String,
    val niceShareDate: String,
    val origin: String,
    val prefix: String,
    val projectLink: String,
    val publishTime: Long,
    val realSuperChapterId: Int,
    val selfVisible: Int,
    val shareDate: Long,
    val shareUser: String,
    val superChapterId: Int,
    val superChapterName: String,
    val tags: List<Tag>,
    val title: String,
    val type: Int,
    val userId: Int,
    val visible: Int,
    val zan: Int
)

data class Tag(
    val name: String,
    val url: String
)
其中 ProjectData 类对应的是 JSON 的 “data”,其子属性 “datas” 表示项目列表数据,由于在代码使用 datas 含义并不明确,因此在代码中将 “datas” 重命名为 projectList,但是为了不影响反序列化,需要将其在 JSON 中的字段名 “datas” 通过 @SerializedName 注解标明。
然后就是 Retrofit 的接口方法,选择页号也页大小作为参数:
interface ProjectApi {

    /**
     * 虽然 WanAndroid API 文档上给出的查询项目列表的地址是:
     * https://www.wanandroid.com/project/list/1/json?cid=294
     * 但是测试时发现,cid 并不起作用,即使不写也返回同样的数据,因此发送
     * 请求时就不带 cid 了,只使用页号 page_number 和每页大小 page_size
     */
    @GET("project/list/{page_number}/json")
    suspend fun getProjects(
        @Path("page_number") page: Int,
        @Query("page_size") page_size: Int
    ): Projects
}
最后创建 Retrofit 对象并提供创建 API 接口对象的方法:
object RetrofitClient {

    private val TAG = this::class.java.simpleName

    private val instance: Retrofit by lazy {
        val httpLoggingInterceptor = HttpLoggingInterceptor {
            Log.d(TAG, it)
        }.also { interceptor -> interceptor.level = HttpLoggingInterceptor.Level.BODY }

        Retrofit.Builder()
            .baseUrl("https://www.wanandroid.com/")
            .addConverterFactory(GsonConverterFactory.create())
            .client(OkHttpClient.Builder().addInterceptor(httpLoggingInterceptor).build())
            .build()
    }

    fun <T> createApi(clazz: Class<T>): T {
        return instance.create(clazz) as T
    }
}
2.3 Paging 框架配置
先搭建一个 Paging 相关的代码框架,框架搭好后再慢慢实现功能。
Repository 部分搭建
(P107)PagingSource 与 Pager 配置
结合第 1 节的 Paging 框架图来看,先来搭建 Repository 部分,创建 PagingSource 的子类 ProjectPagingSource:
class ProjectPagingSource : PagingSource<Int, Project>() {

    // 在此函数中实现分页加载逻辑,并返回 LoadResult 这个结果
    override suspend fun load(params: LoadParams<Int>): LoadResult<Int, Project> {
        val currentPage = 1
        val pageSize = 8
        val projects =
            RetrofitClient.createApi(ProjectApi::class.java).getProjects(currentPage, pageSize)
        // todo 返回一个 LoadResult
    }
}
实现抽象类 PagingSource 需要实现抽象方法 load,它就是用于触发异步数据加载的(比如从数据库或网络加载数据),它需要返回一个 LoadResult 作为加载的结果,实际上就指明是加载成功了还是发生错误了,如果成功则返回 LoadResult.Page,Page 内会带有请求的数据;如果失败则返回 LoadResult.Error,Error 内包含 Throwable 对象用于描述导致错误的异常:
	sealed class LoadResult<Key : Any, Value : Any> {

        data class Error<Key : Any, Value : Any>(
            val throwable: Throwable
        ) : LoadResult<Key, Value>()

        data class Page<Key : Any, Value : Any> constructor(
            /**
             * Loaded data
             */
            val data: List<Value>,
            /**
             * [Key] for previous page if more data can be loaded in that direction, `null`
             * otherwise.
             */
            val prevKey: Key?,
            /**
             * [Key] for next page if more data can be loaded in that direction, `null` otherwise.
             */
            val nextKey: Key?,
            /**
             * Optional count of items before the loaded data.
             */
            @IntRange(from = COUNT_UNDEFINED.toLong())
            val itemsBefore: Int = COUNT_UNDEFINED,
            /**
             * Optional count of items after the loaded data.
             */
            @IntRange(from = COUNT_UNDEFINED.toLong())
            val itemsAfter: Int = COUNT_UNDEFINED
        ) : LoadResult<Key, Value>() {...}
看到这里让我想起前面在系列的第 6 篇文章的第 2 节,讲解使用 Flow 下载文件的例子时,使用 DownloadStatus 这个密封类定义下载时的几种情况:
// 密封类的所有成员都是其子类
sealed class DownloadStatus {

    object None : DownloadStatus()
    data class Progress(val value: Int) : DownloadStatus()
    data class Error(val throwable: Throwable) : DownloadStatus()
    data class Done(val file: File) : DownloadStatus()
}
通过 Progress 拿到下载进度 value,Error 拿到 throwable 这个异常,Done 拿到下载好的文件。这与现在的 LoadResult 的设计思想是异曲同工的。
再回到 Paging 的框架搭建,目前在 load 中我们没有返回 LoadResult 会导致编译报错。由于我们处于框架搭建阶段,因此先不涉及 LoadResult 的具体生成,暂时先放在这,继续下一步,在 ViewModel 中创建一个 Pager 进行相关配置。
其实你仔细看,架构图中 Repository 内还有一个 RemoteMediator,它是用来从远程网络下载数据然后保存到数据库中用的。本篇作为 Paging 的入门介绍为了简化脉络没有使用 RemoteMediator,在下一篇项目实战中会使用到它。
ViewModel 部分搭建
class ProjectViewModel : ViewModel() {

    fun loadProject(): Flow<PagingData<Project>> {
        return Pager(
            config = PagingConfig(pageSize = 8),
            pagingSourceFactory = { ProjectPagingSource() }).flow
    }
}
Pager 的构造函数指定了 PagingConfig,每页数据为 8 个,然后还指定了 PagingSource 工厂函数,需要返回一个 PagingSource 对象,这里我们返回上一步配置的 ProjectPagingSource 的构造函数用以创建 ProjectPagingSource 对象。
Pager 配置好了,最后返回的是该 Pager 对象的 flow 属性,该属性是 Pager 的构造函数内定义的属性:
// Pager.kt
class Pager<Key : Any, Value : Any>
@JvmOverloads constructor(
    config: PagingConfig,
    initialKey: Key? = null,
    @OptIn(ExperimentalPagingApi::class)
    remoteMediator: RemoteMediator<Key, Value>? = null,
    pagingSourceFactory: () -> PagingSource<Key, Value>
) {
    /**
     * A cold [Flow] of [PagingData], which emits new instances of [PagingData] once they become
     * invalidated by [PagingSource.invalidate] or calls to [AsyncPagingDataDiffer.refresh] or
     * [PagingDataAdapter.refresh].
     */
    val flow: Flow<PagingData<Value>> = PageFetcher(
        pagingSourceFactory,
        initialKey,
        config,
        remoteMediator
    ).flow
}
而 PageFetcher.flow 实际上是 PageFetcher 内的一个成员属性,通过 channelFlow 函数构造了一个 Flow 对象,具体源码先不继续追了,知道是返回了一个 Flow 就好。
UI 部分搭建
Paging 在这一部分的主要组件是 PagingDataAdapter,也就是为 RecyclerView 提供适配器。
先看这个 PagingDataAdapter 如何实现,观察源码发现至少需要传一个参数 diffCallback 给构造函数:
abstract class PagingDataAdapter<T : Any, VH : RecyclerView.ViewHolder> @JvmOverloads constructor(
    diffCallback: DiffUtil.ItemCallback<T>, // 比较 RecyclerView 中两个 Item 是否相同的回调
    mainDispatcher: CoroutineDispatcher = Dispatchers.Main, // 主调度器,用于更新 UI
    workerDispatcher: CoroutineDispatcher = Dispatchers.Default // 任务调度器用于在后台执行耗时任务
) : RecyclerView.Adapter<VH>() {
    private val differ = AsyncPagingDataDiffer(
        diffCallback = diffCallback,
        updateCallback = AdapterListUpdateCallback(this),
        mainDispatcher = mainDispatcher,
        workerDispatcher = workerDispatcher
    )
mainDispatcher 与 workerDispatcher 分别用于在主线程和子线程中执行任务,使用默认值即可。因此继承 PagingDataAdapter 时需要给构造函数传入 diffCallback 用于区分 RecyclerView 中的两个 Item 是否相同,如果相同的话可以不进行刷新,这样可以避免多余的绘制,节省资源以优化性能:
class ProjectAdapter(private val context: Context) :
    PagingDataAdapter<Project, ProjectViewHolder>(object : DiffUtil.ItemCallback<Project>() {
        /**
         * DiffUtil.ItemCallback 用于判断是否是同一个 item,如是,则不再重新绘制以避免不必要的绘制,
         * 从而提升性能。
         * areItemsTheSame 通过 Int 型的 id 判断是否是同一个 item
         * areContentsTheSame 通过 == 判断两个对象的内容是否相等,Kotlin 的 == 相当于 Java 的
         * equals(),而 === 才相当于 Java 的 ==
         */
        override fun areItemsTheSame(oldItem: Project, newItem: Project) = oldItem.id == newItem.id

        override fun areContentsTheSame(oldItem: Project, newItem: Project) = oldItem == newItem

    }) {
    override fun onBindViewHolder(holder: ProjectViewHolder, position: Int) {
        val project = getItem(position)
        project?.let {
            val binding = holder.binding as ItemProjectBinding
            binding.project = it
            binding.networkImage = it.envelopePic
        }
    }

    // 使用 ViewBinding 后,ViewHolder 就是一个空壳了:
    // class ProjectViewHolder(val binding: ViewBinding) : RecyclerView.ViewHolder(binding.root)
    override fun onCreateViewHolder(parent: ViewGroup, viewType: Int): ProjectViewHolder {
        val binding = ItemProjectBinding.inflate(LayoutInflater.from(context), parent, false)
        return ProjectViewHolder(binding)
    }
}
ItemProjectBinding 由 RecyclerView Item 的布局而来,item_project 使用了 DataBinding:
<?xml version="1.0" encoding="utf-8"?>
<layout xmlns:android="http://schemas.android.com/apk/res/android"
    xmlns:app="http://schemas.android.com/apk/res-auto"
    xmlns:tools="http://schemas.android.com/tools">

    <data>

        <variable
            name="networkImage"
            type="String" />

        <variable
            name="project"
            type="com.coroutine.flow.paging3.model.Project" />
    </data>

    <androidx.constraintlayout.widget.ConstraintLayout
        android:layout_width="match_parent"
        android:layout_height="wrap_content"
        android:paddingVertical="10dp">

        <ImageView
            android:id="@+id/imageView"
            android:layout_width="100dp"
            android:layout_height="100dp"
            app:image="@{networkImage}"
            app:layout_constraintBottom_toBottomOf="parent"
            app:layout_constraintEnd_toStartOf="@id/guideline2"
            app:layout_constraintHorizontal_bias="0.432"
            app:layout_constraintStart_toStartOf="parent"
            app:layout_constraintTop_toTopOf="parent"
            app:layout_constraintVertical_bias="0.054"
            tools:srcCompat="@tools:sample/avatars" />

        <TextView
            android:id="@+id/tv_title"
            android:layout_width="190dp"
            android:layout_height="wrap_content"
            android:ellipsize="end"
            android:maxLines="2"
            android:text="@{project.title}"
            android:textSize="16sp"
            app:layout_constraintBottom_toBottomOf="parent"
            app:layout_constraintStart_toStartOf="@id/guideline"
            app:layout_constraintTop_toTopOf="parent"
            app:layout_constraintVertical_bias="0.255"
            app:layout_constraintWidth_max="wrap"
            tools:text="泰坦尼克号泰坦尼克号泰坦尼克号" />

        <!-- 文章发布时间,对应课程的电影评分 -->
        <TextView
            android:id="@+id/tv_zan"
            android:layout_width="wrap_content"
            android:layout_height="wrap_content"
            android:layout_marginTop="24dp"
            android:text="@{project.niceDate}"
            android:textSize="16sp"
            app:layout_constraintStart_toStartOf="@id/guideline"
            app:layout_constraintTop_toBottomOf="@id/tv_title"
            tools:text="2018-01-28 22:27" />

        <androidx.constraintlayout.widget.Guideline
            android:id="@+id/guideline2"
            android:layout_width="wrap_content"
            android:layout_height="wrap_content"
            android:orientation="vertical"
            app:layout_constraintGuide_percent="0.4" />

        <androidx.constraintlayout.widget.Guideline
            android:id="@+id/guideline"
            android:layout_width="wrap_content"
            android:layout_height="wrap_content"
            android:orientation="vertical"
            app:layout_constraintGuide_percent="0.5" />
    </androidx.constraintlayout.widget.ConstraintLayout>
</layout>
Item 需要展示项目图片、项目名称与发布时间,其中后两个数据可以通过 project 直接获取,而图片显示虽然通过 networkImage 变量传来了图片地址,但是无法通过布局设置直接显示,需要自定义一个 DataBinding 用于显示图片的适配器 ImageViewBindingAdapter:
/**
 * 自定义适配器帮助 MVVM + DataBinding 的 ImageView 加载图片
 */
class ImageViewBindingAdapter {

    companion object {
        /**
         * @JvmStatic:在使用 Kotlin 编写 BindingAdapter 时,通常推荐将其声明为静态函数。具体做法是
         * 在 companion object 中声明一个 @JvmStatic 方法,这样其就会编译为 Java 的静态函数
         *
         * @BindingAdapter:在 Kotlin 中如果想要使用 data binding 的注解,需要在 module 的 build.gradle
         * 中添加 kapt 插件;
         * 通过该注解绑定括号内传入的属性后,在解析属性的时候,会自动调用该方法
         *
         * 方法参数说明:
         * 使用 BindingAdapter 的函数一般需要两个参数,第一个参数是绑定的 View,第二个参数是绑定的属性值。
         * 在这个例子中,我们绑定的是 ImageView 下的 app:image 属性,因此第一个参数是 ImageView,第二个
         * 是 app:image 的属性值,也就是项目的图片地址
         */
        @JvmStatic
        @BindingAdapter("image")
        fun setImage(imageView: ImageView, url: String) {
            if (!TextUtils.isEmpty(url)) {
                Picasso.get().load(url).placeholder(R.drawable.ic_launcher_background)
                    .into(imageView)
            } else {
                imageView.setBackgroundColor(Color.GRAY)
            }
        }
    }
}
代码执行顺序大概是在解析布局 ImageView 时,当解析到自定义的 app:image 属性时,就会执行与该 ImageView 的该属性绑定的方法:
- 比如 setImage 方法被 @BindingAdapter 标记,该注解的值为 image 表示将方法与 app:image 属性绑定
- 方法参数,第一个是绑定的组件,这里就是 ImageView;第二个是绑定的属性值,这里就是图片地址,也就是布局中的 networkImage
- 由于推荐这种绑定方法是一个 Java 静态方法,所以要在 companion object 内使用 @JvmStatic 标记该方法
最后在 MainActivity 中为 RecyclerView 设置 ProjectAdapter,并通过 ViewModel 执行 loadProject() 得到获取项目数据的 Flow 对象,收集数据后提交给 ProjectAdapter 即可:
class MainActivity : AppCompatActivity() {

    private val viewModel by viewModels<ProjectViewModel>()

    private val mBinding: ActivityMainBinding by lazy {
        ActivityMainBinding.inflate(layoutInflater)
    }

    override fun onCreate(savedInstanceState: Bundle?) {
        super.onCreate(savedInstanceState)
        setContentView(mBinding.root)

        val projectAdapter = ProjectAdapter(this)
        mBinding.apply {
            recyclerView.adapter = projectAdapter
        }

        lifecycleScope.launch {
            lifecycle.repeatOnLifecycle(Lifecycle.State.CREATED) {
                // 由于可能会刷新多次,因此只使用最后一次刷新出来的值
                viewModel.loadProject().collectLatest {
                    projectAdapter.submitData(it)
                }
            }
        }
    }
}
至此,第 1 节中展示的 Paging3 框架就算基本搭建完毕了。
3、功能实现
上一节搭建 Paging 框架时,PagingSource 的加载逻辑我们还没有实现,先来处理它。
3.1 实现分页逻辑
(P109)PagingSource 分页逻辑的实现,要完善 PagingSource 的 load():
	override suspend fun load(params: LoadParams<Int>): LoadResult<Int, Project> {
        // API 从第 1 页开始,而不是第 0 页
        val currentPage = params.key ?: 1
        // 分页大小
        val pageSize = params.loadSize
        val projects =
            RetrofitClient.createApi(ProjectApi::class.java).getProjects(currentPage, pageSize)

        // 当前页面的前一页:如果当前是第一页,那么前面没有就是 null,否则就是 currentPage - 1
        var prevKey = if (currentPage == 1) null else currentPage - 1
        // 当前页面的后一页:如果当前是最后一页,那么后面没有就是 null,否则就是 currentPage + 1
        var nextKey = if (!projects.data.over) currentPage + 1 else null

        Log.d("Frank", "currentPage = $currentPage, pageSize = $pageSize, prevKey = $prevKey, nextKey = $nextKey")

        return LoadResult.Page(
            data = projects.data.projectList,
            prevKey = prevKey,
            nextKey = nextKey
        )
    }
实际上就是添加了当前页面的前后页码 prevKey 和 nextKey 的计算,在返回 LoadResult.Page 对象时需要传入当前页的数据以及前后页的页码。
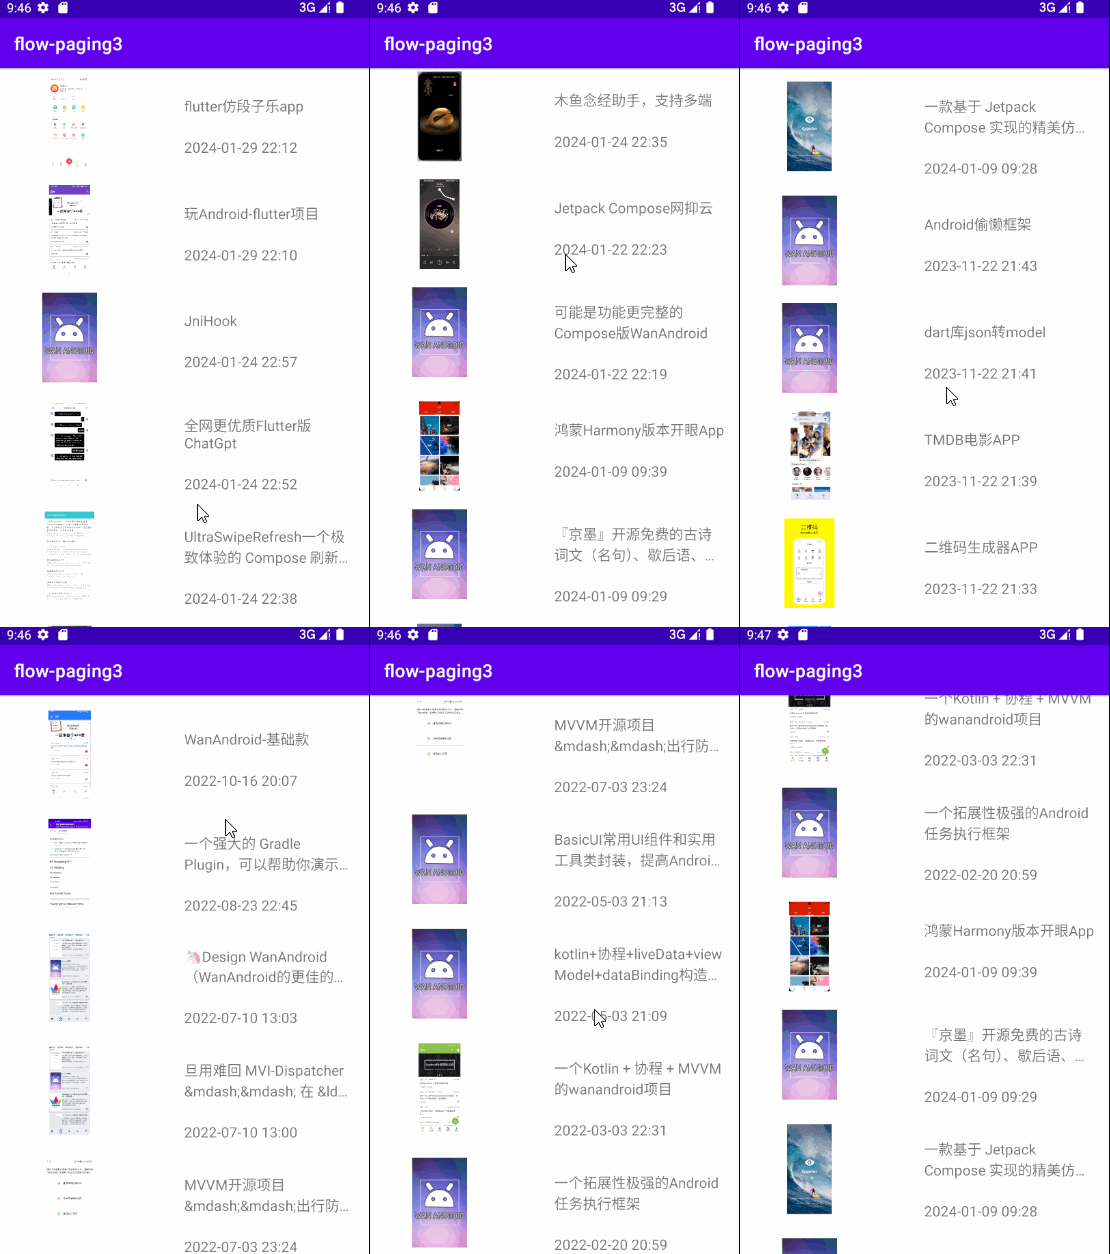
这样项目数据就能呈现在页面上了:
3.2 分页数据混乱问题
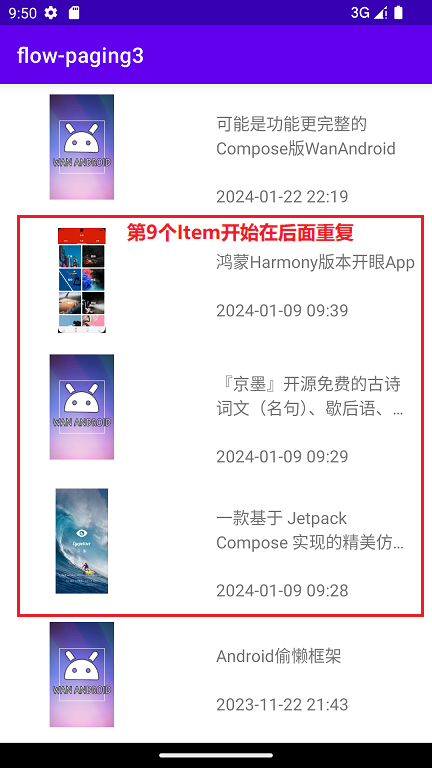
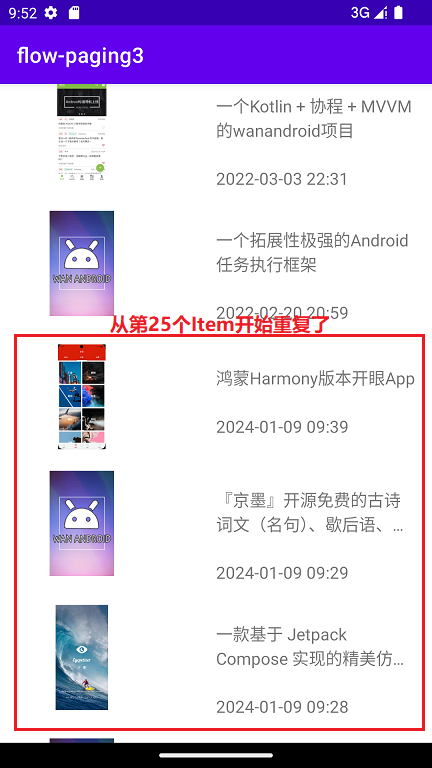
(P110)仔细观察上面的效果图能发现,从第 9 个项目到第 24 个项目在第 25 到第 40 个项目重复出现了:
|
|
发生问题的原因是我们在配置 Paging 时将页大小设置为 8:
class ProjectViewModel : ViewModel() {

    fun loadProject(): Flow<PagingData<Project>> {
        return Pager(
            config = PagingConfig(pageSize = 8),
            pagingSourceFactory = { ProjectPagingSource() }).flow
    }
}
但是观察 load 内 log 的输出:
com.coroutine.flow.paging3           D  currentPage = 1, pageSize = 24, prevKey = null, nextKey = 2
com.coroutine.flow.paging3           D  currentPage = 2, pageSize = 8, prevKey = 1, nextKey = 3
com.coroutine.flow.paging3           D  currentPage = 3, pageSize = 8, prevKey = 2, nextKey = 4
发现第一次加载时 pageSize = 24,是我们设置的 pageSize 的 3 倍,第二次加载时 pageSize 才变成我们设置的 8,并且是在 currentPage = 2 的情况下加载 8 个,也就是说页面展示的第 25 ~ 32 个 Item 的数据实际上是第 9 ~ 16 个,Log 与实际展示的页面是能对上的。
实际上,造成这种情况的根本原因是在加载第 1 页时,nextKey 的计算出现了问题。因为 currentPage = 1, pageSize = 24,相当于在第 1 页一次性加载了 3 页的数据,那么下一次加载的 nextKey 应该是 1 + 3 = 4 才对。
我们查看源码能看到 PagingConfig 内确实通过 initialLoadSize 控制着首次加载的尺寸为 pageSize 的 3 倍:
class PagingConfig @JvmOverloads constructor(
    @JvmField
    @IntRange(from = 1)
    val initialLoadSize: Int = pageSize * DEFAULT_INITIAL_PAGE_MULTIPLIER,
) {
    companion object {
        /**
         * When [maxSize] is set to [MAX_SIZE_UNBOUNDED], the maximum number of items loaded is
         * unbounded, and pages will never be dropped.
         */
        @Suppress("MinMaxConstant")
        const val MAX_SIZE_UNBOUNDED = Int.MAX_VALUE
        internal const val DEFAULT_INITIAL_PAGE_MULTIPLIER = 3
    }
}
结合前面的原因分析,解决方法可以有两种。最简单的方法就是在配置 Pager 时,让 initialLoadSize 刚好就是 pageSize:
class ProjectViewModel : ViewModel() {

    fun loadProject(): Flow<PagingData<Project>> {
        return Pager(
            config = PagingConfig(pageSize = 8, initialLoadSize = 8),
            pagingSourceFactory = { ProjectPagingSource() }).flow
    }
}
但是倘若想让首次加载的数据多一些,假如初始加载 2 页数据:
class ProjectViewModel : ViewModel() {

    fun loadProject(): Flow<PagingData<Project>> {
        return Pager(
            config = PagingConfig(
                pageSize = Constants.PAGING_PAGE_SIZE, // 8
                initialLoadSize = Constants.PAGING_INITIAL_LOAD_SIZE // 16
            ),
            pagingSourceFactory = { ProjectPagingSource() }).flow
    }
}
然后在加载第 1 页时对 nextKey 做一个特殊处理:
class ProjectPagingSource : PagingSource<Int, Project>() {

    override suspend fun load(params: LoadParams<Int>): LoadResult<Int, Project> {
        // 从第 1 页开始,而不是第 0 页
        val currentPage = params.key ?: 1
        // 分页大小,第 1 页是 PagingConfig.initialLoadSize,第 2 页开始是 PagingConfig.pageSize
        val pageSize = params.loadSize
        val projects =
            RetrofitClient.createApi(ProjectApi::class.java).getProjects(currentPage, pageSize)

        val prevKey: Int?
        val nextKey: Int?

        // 如果当前是第一页,那么向前一次加载的页号没有就是 null,向后加载一次应该增加首次加载的页数
        if (currentPage == 1) {
            prevKey = null
            nextKey = currentPage + Constants.PAGING_INITIAL_LOAD_SIZE / Constants.PAGING_PAGE_SIZE
        } else {
            // 非首页的前一次加载的页号是当前页号减 1,向后加载,如果不是最后一页的话应该是
            // 当前页号加 1,否则为空
            prevKey = currentPage - 1
            nextKey = if (!projects.data.over) currentPage + 1 else null
        }

        Log.d(
            "Frank",
            "currentPage = $currentPage, pageSize = $pageSize, prevKey = $prevKey, nextKey = $nextKey"
        )

        return try {
            LoadResult.Page(
                data = projects.data.projectList,
                prevKey = prevKey,
                nextKey = nextKey
            )
        } catch (e: Exception) {
            e.printStackTrace()
            return LoadResult.Error(e)
        }
    }
}
这样再看 UI 页面和 Log 就正常了:
com.coroutine.flow.paging3           D  currentPage = 1, pageSize = 16, prevKey = null, nextKey = 3
com.coroutine.flow.paging3           D  currentPage = 3, pageSize = 8, prevKey = 2, nextKey = 4
com.coroutine.flow.paging3           D  currentPage = 4, pageSize = 8, prevKey = 3, nextKey = 5
com.coroutine.flow.paging3           D  currentPage = 5, pageSize = 8, prevKey = 4, nextKey = 6
编码时需要注意一点,load() 的 LoadParams.loadSize 是本次加载实际加载的数据量,它并不是我们设置的页长 8,而是第一次加载的是 initialLoadSize = 16,第二次加载时才是 pageSize = 8。
3.3 上滑刷新与下拉加载
(P111)通过 LoadStateFooter 实现上滑刷新,需要给 RecyclerView 的 PagingDataAdapter 指定 LoadStateFooter:
class MainActivity : AppCompatActivity() {
    override fun onCreate(savedInstanceState: Bundle?) {
        super.onCreate(savedInstanceState)
        setContentView(mBinding.root)

        val projectAdapter = ProjectAdapter(this)
        mBinding.apply {
            // 通过 withLoadStateFooter 添加上滑加载更多的 Footer
            recyclerView.adapter =
                projectAdapter.withLoadStateFooter(ProjectLoadMoreAdapter(this@MainActivity))
        }

        lifecycleScope.launch {
            lifecycle.repeatOnLifecycle(Lifecycle.State.CREATED) {
                // 由于可能会刷新多次,因此只使用最后一次刷新出来的值
                viewModel.loadProject().collectLatest {
                    projectAdapter.submitData(it)
                }
            }
        }
    }
}
ProjectLoadMoreAdapter 需要继承 LoadStateAdapter,返回 Footer 布局对应的 ViewHolder:
class ProjectLoadMoreAdapter(private val context: Context) : LoadStateAdapter<ProjectViewHolder>() {
    override fun onBindViewHolder(holder: ProjectViewHolder, loadState: LoadState) {
    }

    override fun onCreateViewHolder(parent: ViewGroup, loadState: LoadState): ProjectViewHolder {
        val binding = ProjectLoadmoreBinding.inflate(LayoutInflater.from(context), parent, false)
        return ProjectViewHolder(binding)
    }
}
ProjectLoadmoreBinding 来自于布局文件 project_loadmore:
<?xml version="1.0" encoding="utf-8"?>
<androidx.constraintlayout.widget.ConstraintLayout xmlns:android="http://schemas.android.com/apk/res/android"
    xmlns:app="http://schemas.android.com/apk/res-auto"
    android:layout_width="match_parent"
    android:layout_height="50dp"
    android:padding="10dp">

    <ProgressBar
        android:id="@+id/progressBar"
        android:layout_width="20dp"
        android:layout_height="20dp"
        app:layout_constraintBottom_toBottomOf="parent"
        app:layout_constraintEnd_toStartOf="@id/tv_loading" />

    <TextView
        android:id="@+id/tv_loading"
        android:layout_width="wrap_content"
        android:layout_height="wrap_content"
        android:text="正在加载数据"
        android:textSize="18sp"
        app:layout_constraintBottom_toBottomOf="parent"
        app:layout_constraintEnd_toEndOf="parent"
        app:layout_constraintStart_toStartOf="parent" />
</androidx.constraintlayout.widget.ConstraintLayout>
为了能看清 Footer 的状态,在加载数据时延迟 2s,否则数据加载太快看不清现象:
class ProjectPagingSource : PagingSource<Int, Project>() {

	override suspend fun load(params: LoadParams<Int>): LoadResult<Int, Project> {
        // 为了能看清上滑刷新加载效果,延迟 2 秒
        delay(2000)
        ...
    }
}
(P112)下拉刷新需要在布局中将 RecyclerView 放到 SwipeRefreshLayout 中:
<?xml version="1.0" encoding="utf-8"?>
<androidx.constraintlayout.widget.ConstraintLayout xmlns:android="http://schemas.android.com/apk/res/android"
    xmlns:app="http://schemas.android.com/apk/res-auto"
    xmlns:tools="http://schemas.android.com/tools"
    android:layout_width="match_parent"
    android:layout_height="match_parent"
    tools:context=".activity.MainActivity">

    <androidx.swiperefreshlayout.widget.SwipeRefreshLayout
        android:id="@+id/swipeRefreshLayout"
        android:layout_width="match_parent"
        android:layout_height="match_parent">

        <!-- 注意 height 被换成 wrap_content 了 -->
        <androidx.recyclerview.widget.RecyclerView
            android:id="@+id/recyclerView"
            android:layout_width="match_parent"
            android:layout_height="wrap_content"
            app:layoutManager="androidx.recyclerview.widget.LinearLayoutManager" />
    </androidx.swiperefreshlayout.widget.SwipeRefreshLayout>
</androidx.constraintlayout.widget.ConstraintLayout>
然后在 MainActivity 中给 SwipeRefreshLayout 设置刷新的监听,并且在刷新完成后要为其更新 isRefreshing 的值以隐藏刷新进度条:
	override fun onCreate(savedInstanceState: Bundle?) {
        super.onCreate(savedInstanceState)
        setContentView(mBinding.root)

        val projectAdapter = ProjectAdapter(this)
        mBinding.apply {
            recyclerView.adapter =
                projectAdapter.withLoadStateFooter(ProjectLoadMoreAdapter(this@MainActivity))
            // 设置 SwipeRefreshLayout 的刷新监听,触发 ProjectAdapter 的刷新
            swipeRefreshLayout.setOnRefreshListener {
                projectAdapter.refresh()
            }
        }

        lifecycleScope.launch {
            lifecycle.repeatOnLifecycle(Lifecycle.State.CREATED) {
                viewModel.loadProject().collectLatest {
                    projectAdapter.submitData(it)
                }
            }
        }

        lifecycleScope.launch {
            lifecycle.repeatOnLifecycle(Lifecycle.State.CREATED) {
                // 通过 ProjectAdapter 的 loadStateFlow 获取到 Adapter 的刷新状态流
                projectAdapter.loadStateFlow.collectLatest { state ->
                    mBinding.swipeRefreshLayout.isRefreshing = state.refresh is LoadState.Loading
                }
            }
        }
    }
ProjectAdapter 的 loadStateFlow 会返回该 Adapter 的刷新状态流:
	@OptIn(FlowPreview::class)
    val loadStateFlow: Flow<CombinedLoadStates> = differ.loadStateFlow
收集这个流的最新值,可以获取到 LoadState:
sealed class LoadState(
    val endOfPaginationReached: Boolean
) {
    class NotLoading(
        endOfPaginationReached: Boolean
    ) : LoadState(endOfPaginationReached)

    object Loading : LoadState(false)

    class Error(
        val error: Throwable
    ) : LoadState(false)
}
密封类的三个子类表示三种加载状态,如果不是 Loading 表名不在加载状态,那么就可以将状态同步给 SwipeRefreshLayout 的 isRefreshing 属性,告诉布局加载已经完成,不用再显示加载进度条了。
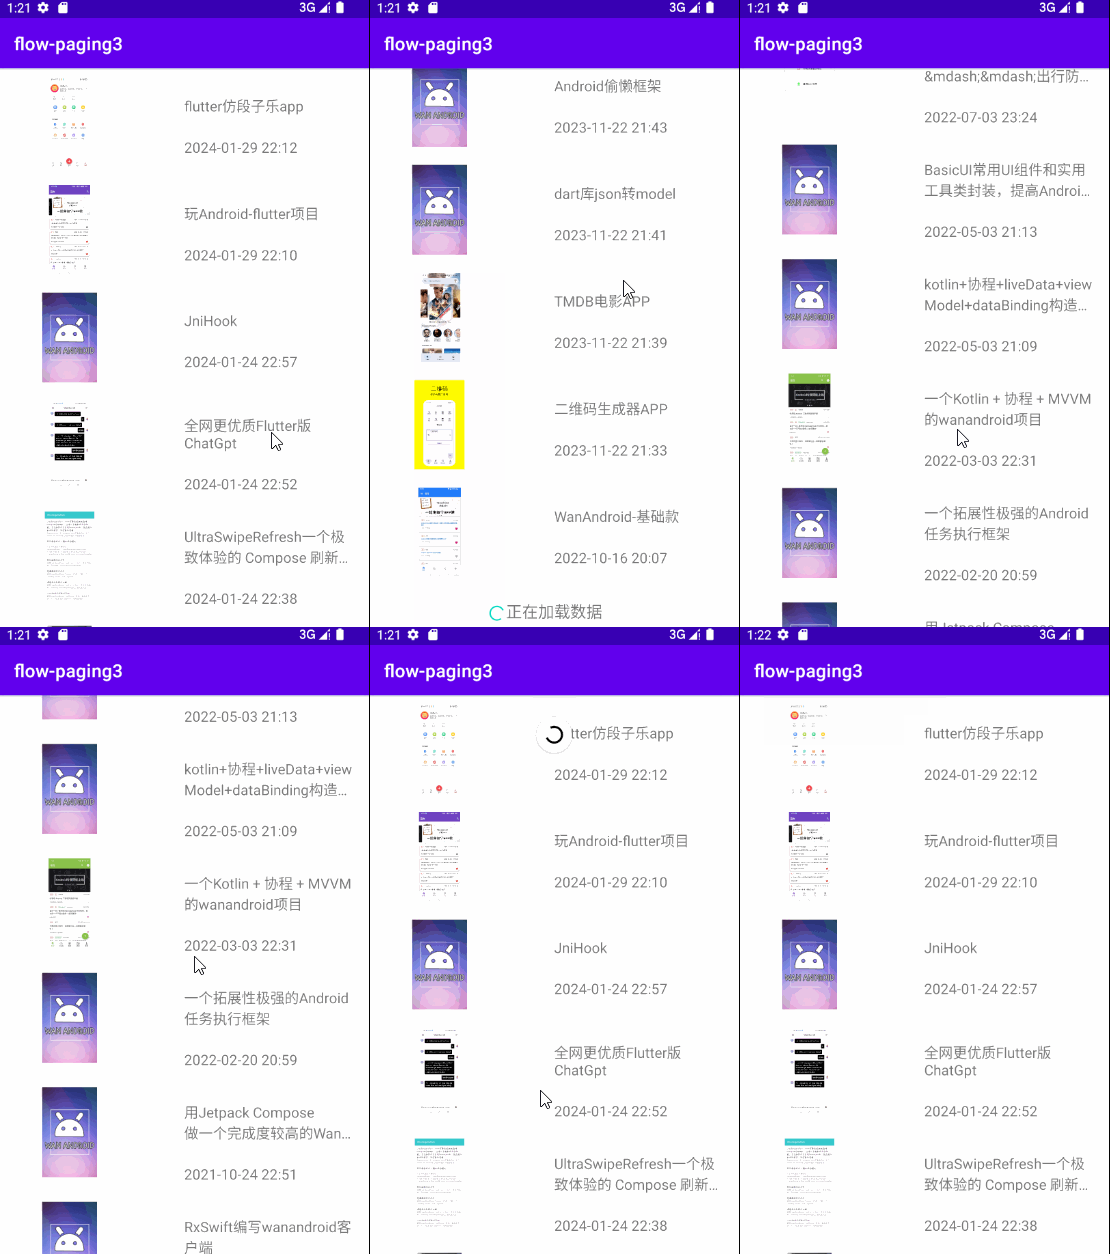
一个比较完备的效果展示图:
3.4 其他问题
(P113)下拉刷新隐藏 Bug,需要先对 Paging 进行再一次的配置:
class ProjectViewModel : ViewModel() {

    fun loadProject(): Flow<PagingData<Project>> {
        return Pager(
            config = PagingConfig(
                pageSize = Constants.PAGING_PAGE_SIZE,
                initialLoadSize = Constants.PAGING_INITIAL_LOAD_SIZE,
                prefetchDistance = 1
            ),
            pagingSourceFactory = { ProjectPagingSource() }).flow
    }
}
将 prefetchDistance 设置为 1,同时将 initialLoadSize 调小至与 pageSize 相同:
class Constants {

    companion object {
        const val PAGING_INITIAL_LOAD_SIZE = 8
        const val PAGING_PAGE_SIZE = 8
    }
}
运行应用,可以看到上滑是正常的,可以加载更多数据。但是在进行一次下拉刷新后,再向上滑,滑到第一页数据结束就划不动了:
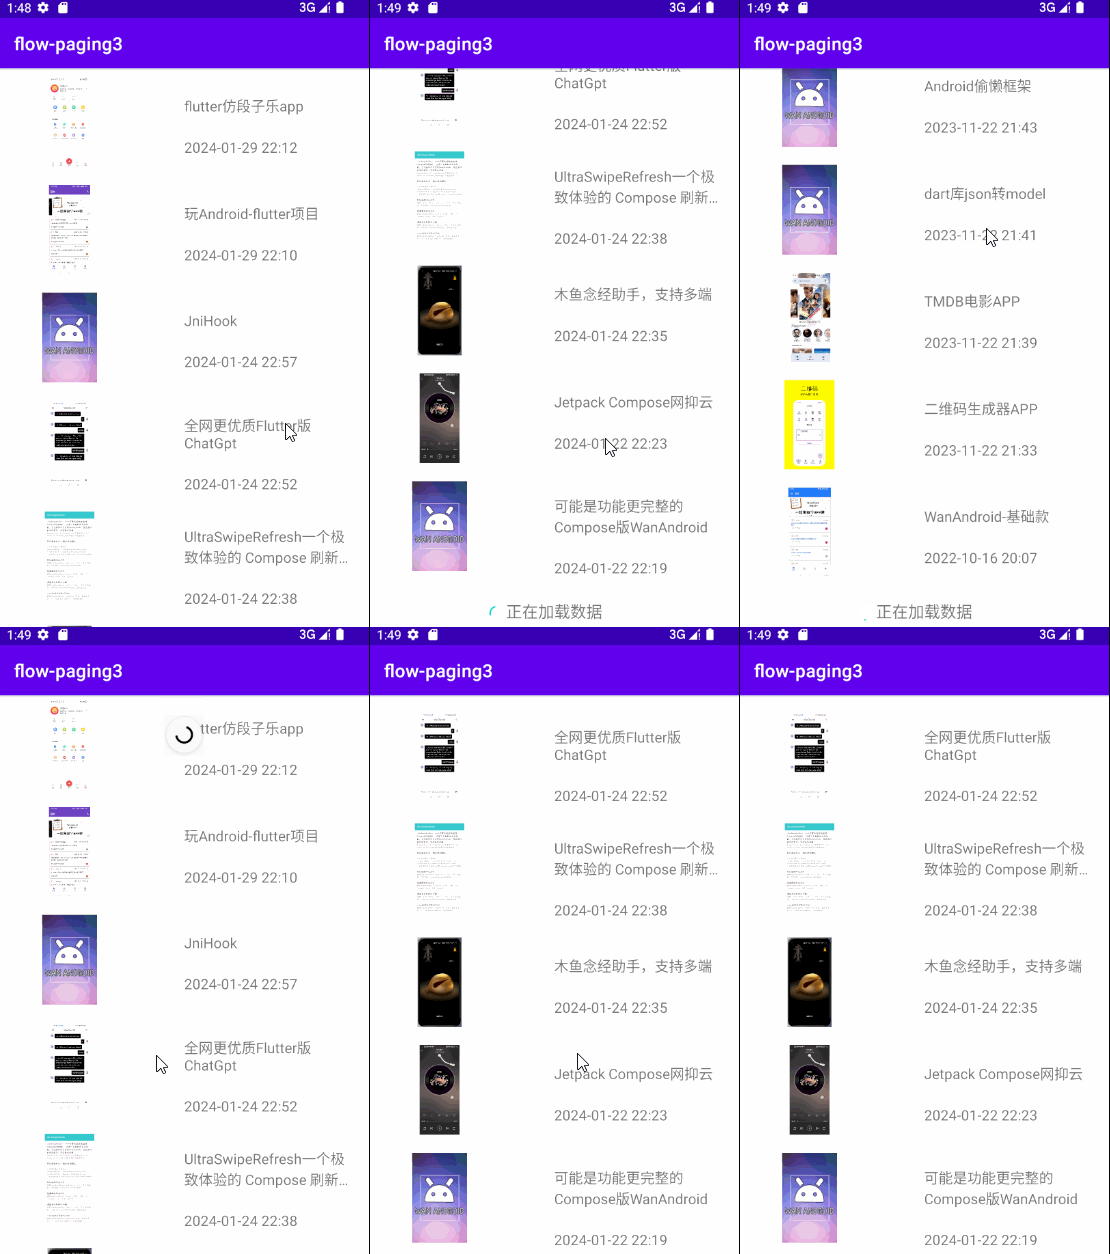
想要解决这个 Bug,要么将 prefetchDistance 设置大一点,设置成 2 就可以了;或者将 initialLoadSize 设置的大一点,比如原来使用的 16。实际上看一下这两个属性的注释也能了解到相关信息:
	/**
	* Prefetch distance定义了从加载内容边缘多远的访问将触发进一步加载。通常应设置为屏幕上可见项目数
	* 量的数倍。
	* 例如,如果此值设置为50,PagingData将尝试提前加载已经访问的数据之外50个项目。
	* 数值为0表示直到明确请求时才会加载列表项。一般不建议这样做,以免用户在滚动时看到占位符
	* 项目(带有占位符)或列表末尾(不带占位符)。
	*/
	@JvmField
    @IntRange(from = 0)
    val prefetchDistance: Int = pageSize,

	/**
	* 定义了从 PagingSource 进行初始加载的请求加载大小,通常比 pageSize 大,因此在首次加载数据时,
	* 加载的内容范围足够大,可以覆盖小幅滚动。
	*/
	@JvmField
    @IntRange(from = 1)
    val initialLoadSize: Int = pageSize * DEFAULT_INITIAL_PAGE_MULTIPLIER,
initialLoadSize 的注释其实暗示了,其值足够大才能够覆盖小幅滚动避免 Footer 滑动不出来的 Bug。
(P114)分页数据 cacheIn
旋转屏幕,你会发现 RecyclerView 的内容会重新通过网络加载(旋转时屏幕内容会消失一会儿再重新出现,并且出现后是新加载的状态),这说明 ViewModel 没起作用。查看代码发现确实如此,通过 Flow 请求的数据没有被保存:
class ProjectViewModel : ViewModel() {

    fun loadProject(): Flow<PagingData<Project>> {
        return Pager(
            config = PagingConfig(
                pageSize = Constants.PAGING_PAGE_SIZE,
                initialLoadSize = Constants.PAGING_INITIAL_LOAD_SIZE,
                // 至少是 2 避免 Foot 刷不出来的 Bug
                prefetchDistance = 2
            ),
            pagingSourceFactory = { ProjectPagingSource() }).flow
    }
}
尝试将流保存到变量中:
class ProjectViewModel : ViewModel() {

    private val projects by lazy {
        Pager(
            config = PagingConfig(
                pageSize = Constants.PAGING_PAGE_SIZE,
                initialLoadSize = Constants.PAGING_INITIAL_LOAD_SIZE,
                // 至少是 2 避免 Foot 刷不出来的 Bug
                prefetchDistance = 2
            ),
            pagingSourceFactory = { ProjectPagingSource() }).flow
    }

    fun loadProject(): Flow<PagingData<Project>> = projects
}
发现仍然不行,需要再进一步改造,在 flow 后接一个 cachedIn:
class ProjectViewModel : ViewModel() {

    private val projects by lazy {
        Pager(
            config = PagingConfig(
                pageSize = Constants.PAGING_PAGE_SIZE,
                initialLoadSize = Constants.PAGING_INITIAL_LOAD_SIZE,
                // 至少是 2 避免 Foot 刷不出来的 Bug
                prefetchDistance = 2
            ),
            pagingSourceFactory = { ProjectPagingSource() }
        ).flow.cachedIn(viewModelScope)
    }

    fun loadProject(): Flow<PagingData<Project>> = projects
}
cachedIn 方法内容如下:
/**
* 将 PagingData 缓存,以便从此流中的任何下游集合都共享相同的 PagingData。
* 只要给定的作用域处于活动状态,该流就会保持活动状态。为避免泄漏,请确保使用已经受管的
* 作用域(如 ViewModel 作用域)或在不再需要分页时手动取消它。
* 这种缓存的常见用例是在 ViewModel 中缓存 PagingData。这可以确保在配置更改(例如旋转)时,
* 新的 Activity 将立即接收现有数据,而不是从头开始获取数据。
* 请注意,这不会将 Flow<PagingData> 转换为热流。除非被收集,它不会执行任何不必要的代码。
* 参数:
* scope - 此页面缓存将保持活动状态的协程作用域。
*/
@CheckResult
fun <T : Any> Flow<PagingData<T>>.cachedIn(
    scope: CoroutineScope
) = cachedIn(scope, null)
注意 cachedIn 的参数要传一个合适的 CoroutineScope,这里我们是在 ViewModel 中缓存数据,因此使用的是 viewModelScope。