1、创建python环境
Download Python | Python.org
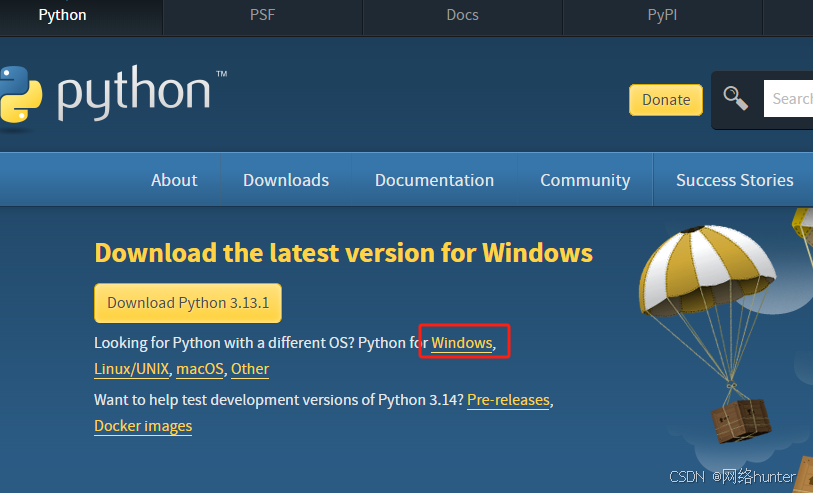
选择python版本3.9.7,64位操作系统。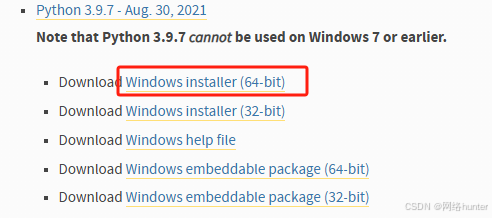
点击 windows installer(64-bit)后,下载的是个exe文件。双击该exe文件,图中两个选项勾选上,选择自定义安装路径(根据自己的习惯选择安装目录)这里不做赘述。
安装成功后,win+r 打开终端,输入python,如下图,就表示安装成功了

2、YOLOv5下载
YOLOv5为开源代码,直接从github上下载,首先打开github官网下载。
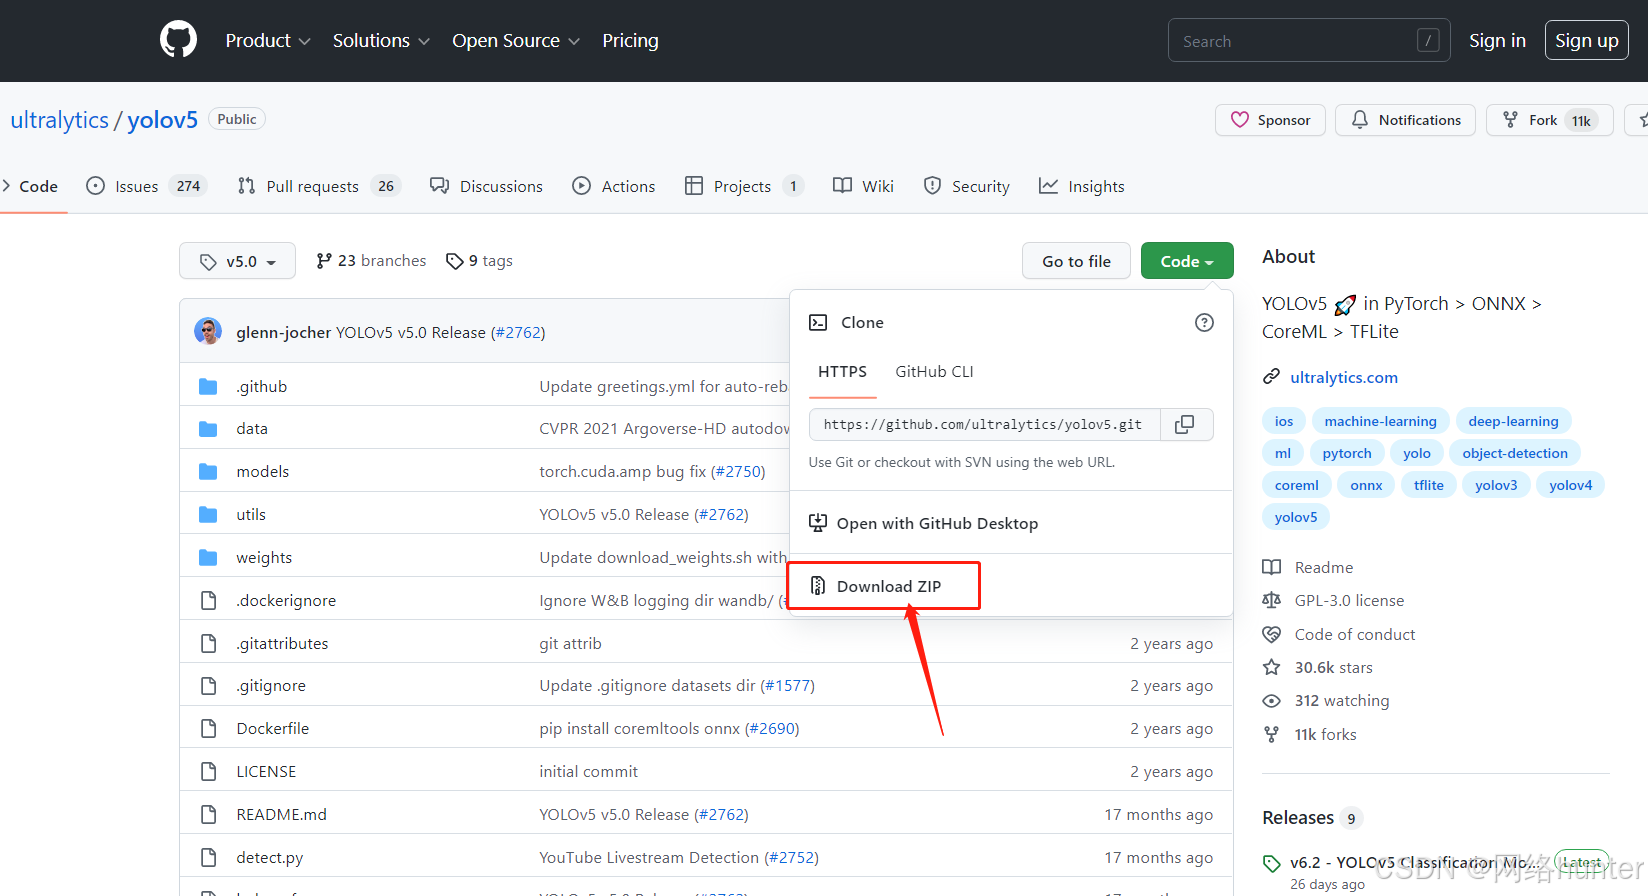
注意:下载后会出现好多lib下文件可能不会被完整下载,出现好多缺失文件,导致编译运行迟迟不通过。需要自行核对。
下载后使用pycharm打开,附pycharm下载链接百度网盘 请输入提取码,打开yolov5目录如下
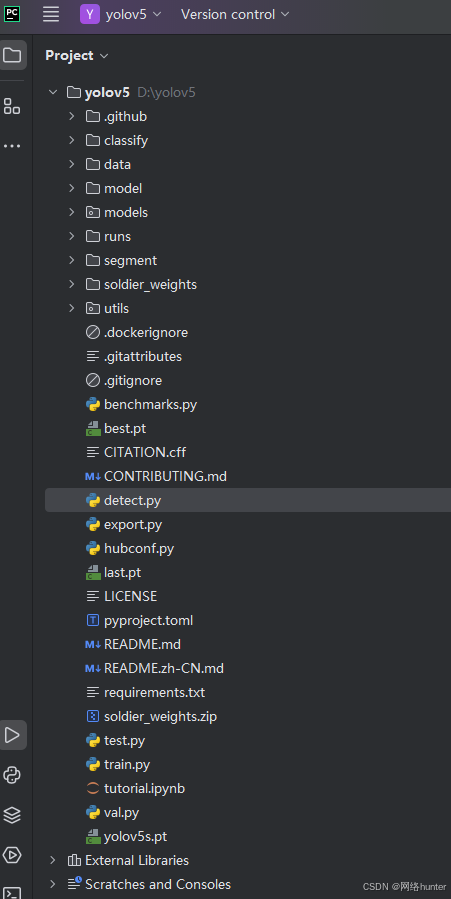
data:主要是存放一些超参数的配置文件(这些文件(yaml文件)是用来配置训练集和测试 集还有验证集的路径的,其中还包括目标检测的种类数和种类的名称);如果是训练自己 的数据集的话,那么就需要修改其中的yaml文件。
models:主要是一些网络构建的配置文件和函数,如果训练自己的数据集的话,就需要修 改这里面相对应的yaml文件来训练自己模型。
utils:存放的是工具类的函数,里面有loss函数,metrics函数,plots函数等。
runs:是自主训练模型train.py执行后的训练结果集和detect.py执行后的目标识别后的结果 集。
weights:放置训练好的权重参数。
detect.py:利用训练好的权重参数进行目标检测,可以进行图像、视频和摄像头的检测。
train.py:训练自己的数据集的函数。
test.py:测试训练的结果的函数
soldier_weights: 是后加的目录用于存放训练的模型文件.pt
打开根目录中的requirements.txt,版本配置要求。一定注意numpy版本对应关系。否则训练出来模型也无法识别到结果。
# YOLOv5 requirements
# Usage: pip install -r requirements.txt

# Base ------------------------------------------------------------------------
gitpython>=3.1.30
matplotlib>=3.3
numpy>=1.23.5
opencv-python>=4.1.1
pillow>=10.3.0
psutil  # system resources
PyYAML>=5.3.1
requests>=2.32.2
scipy>=1.4.1
thop>=0.1.1  # FLOPs computation
torch>=1.8.0  # see https://pytorch.org/get-started/locally (recommended)
torchvision>=0.9.0
tqdm>=4.66.3
ultralytics>=8.2.34  # https://ultralytics.com
# protobuf<=3.20.1  # https://github.com/ultralytics/yolov5/issues/8012

# Logging ---------------------------------------------------------------------
# tensorboard>=2.4.1
# clearml>=1.2.0
# comet

# Plotting --------------------------------------------------------------------
pandas>=1.1.4
seaborn>=0.11.0

# Export ----------------------------------------------------------------------
# coremltools>=6.0  # CoreML export
# onnx>=1.10.0  # ONNX export
# onnx-simplifier>=0.4.1  # ONNX simplifier
# nvidia-pyindex  # TensorRT export
# nvidia-tensorrt  # TensorRT export
# scikit-learn<=1.1.2  # CoreML quantization
# tensorflow>=2.4.0,<=2.13.1  # TF exports (-cpu, -aarch64, -macos)
# tensorflowjs>=3.9.0  # TF.js export
# openvino-dev>=2023.0  # OpenVINO export

# Deploy ----------------------------------------------------------------------
setuptools>=70.0.0 # Snyk vulnerability fix
# tritonclient[all]~=2.24.0

# Extras ----------------------------------------------------------------------
# ipython  # interactive notebook
# mss  # screenshots
# albumentations>=1.0.3
# pycocotools>=2.0.6  # COCO mAP
首次运行detect.py(yolov5目标检测的测试文件),会自动下载yolov5s.pt预训练权重文件。下载不方便可直接在此下载https://download.csdn.net/download/OuNuo5280/90207988
主目录下新建了目录soldier_weights,将下载的预训练权重文件都放在该目录下。对应修改detect.py文件中的默认参数.
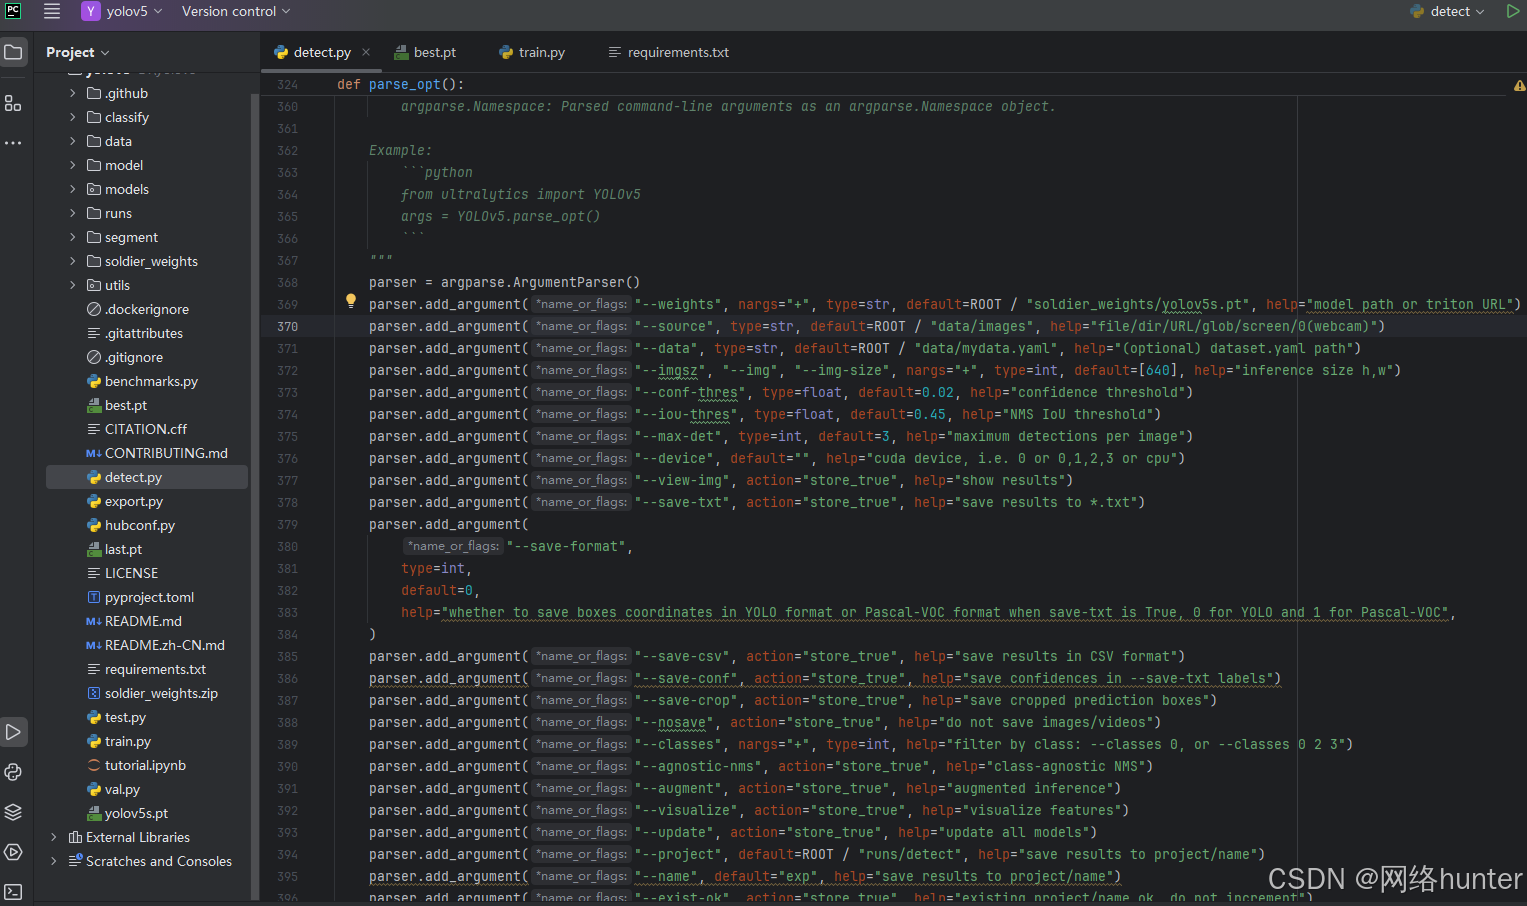
参数说明:在模型训练出来后需要调整参数才能真正识别出结果集。
常用可能修改的参数有:
1. --source
指定模型推理的输入源如:图片为"data/images"视频为"data/video".
2. --weights
指定模型的权重文件路径或Triton URL。当有新的训练好的模型或者要使用不同的预训练模型时,这个参数就需要修改。
3. --conf - thres
置信度阈值,用于筛选检测结果中可信度较高的目标
4. --iou - thres
是非极大值抑制(NMS)的交并比(IoU)阈值,用于去除重叠过多的检测框
5. --classes
用于按类别过滤检测结果。当只关注特定类别的目标检测时,可以修改这个参数。
5. --device
指定使用的计算设备,如CUDA设备或CPU。当有不同的硬件资源可用或者想要在不同设备上测试模型性能时,会修改这个参数。
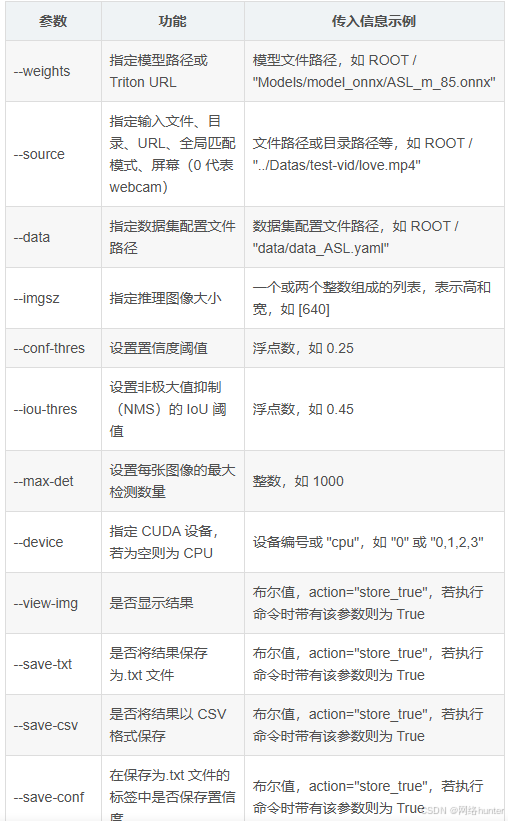
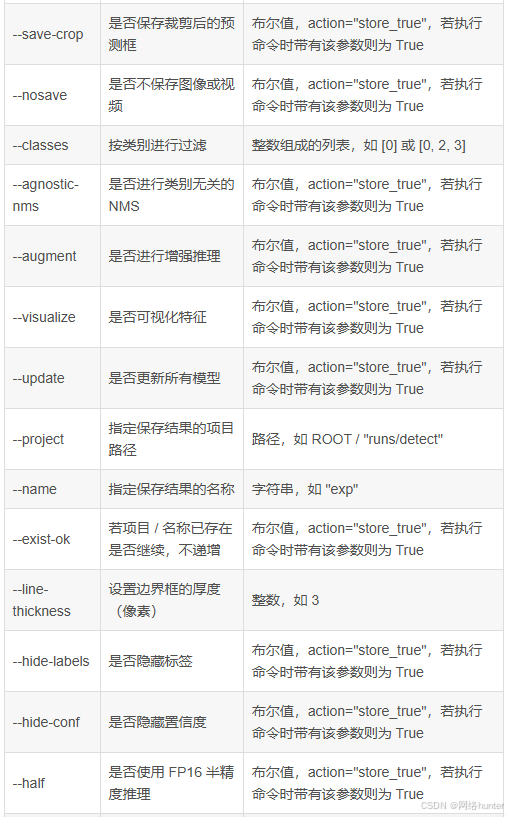

再次运行detect.py成功后,实时识别打印信息如下,同时会将测试图片结果存放于 runs/detect/exp 目录下。如下识别第几张图识别到人和车的打印信息显示。
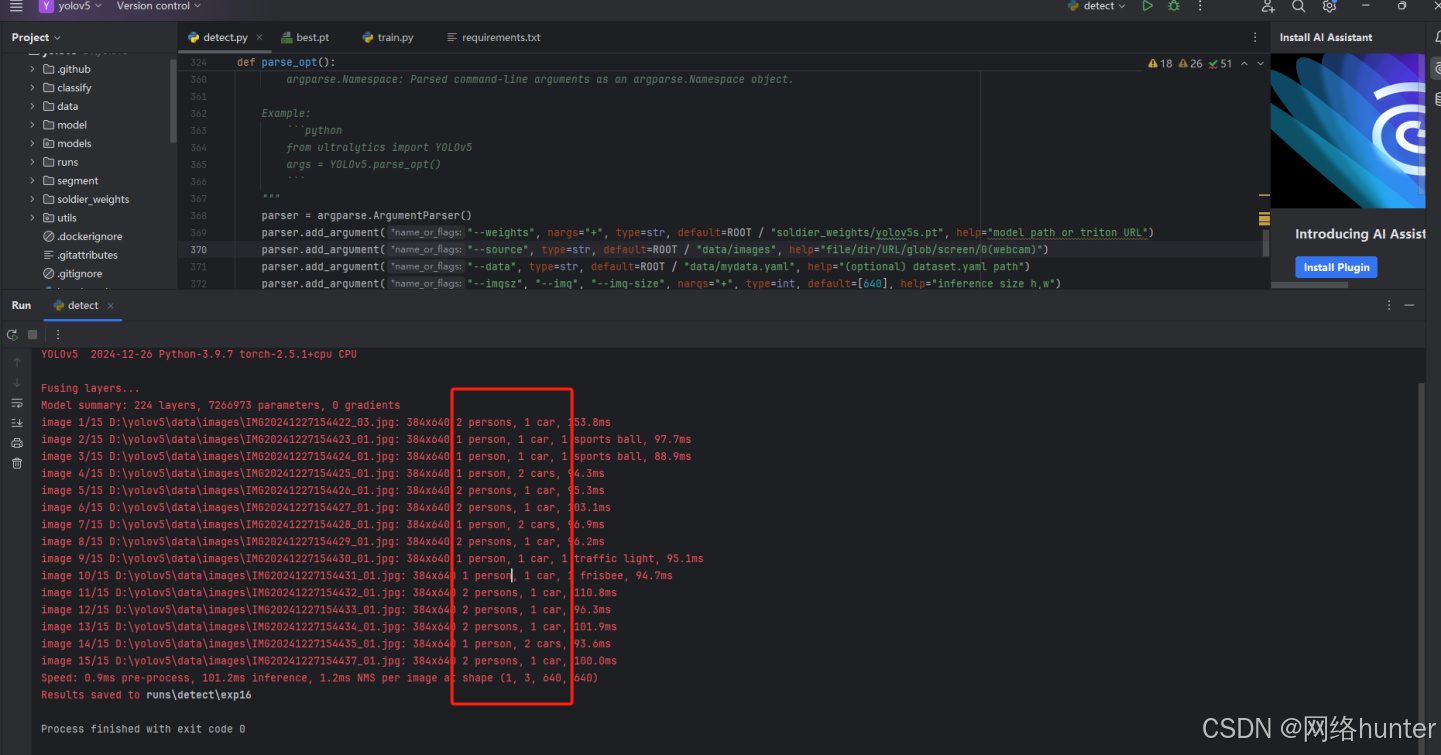
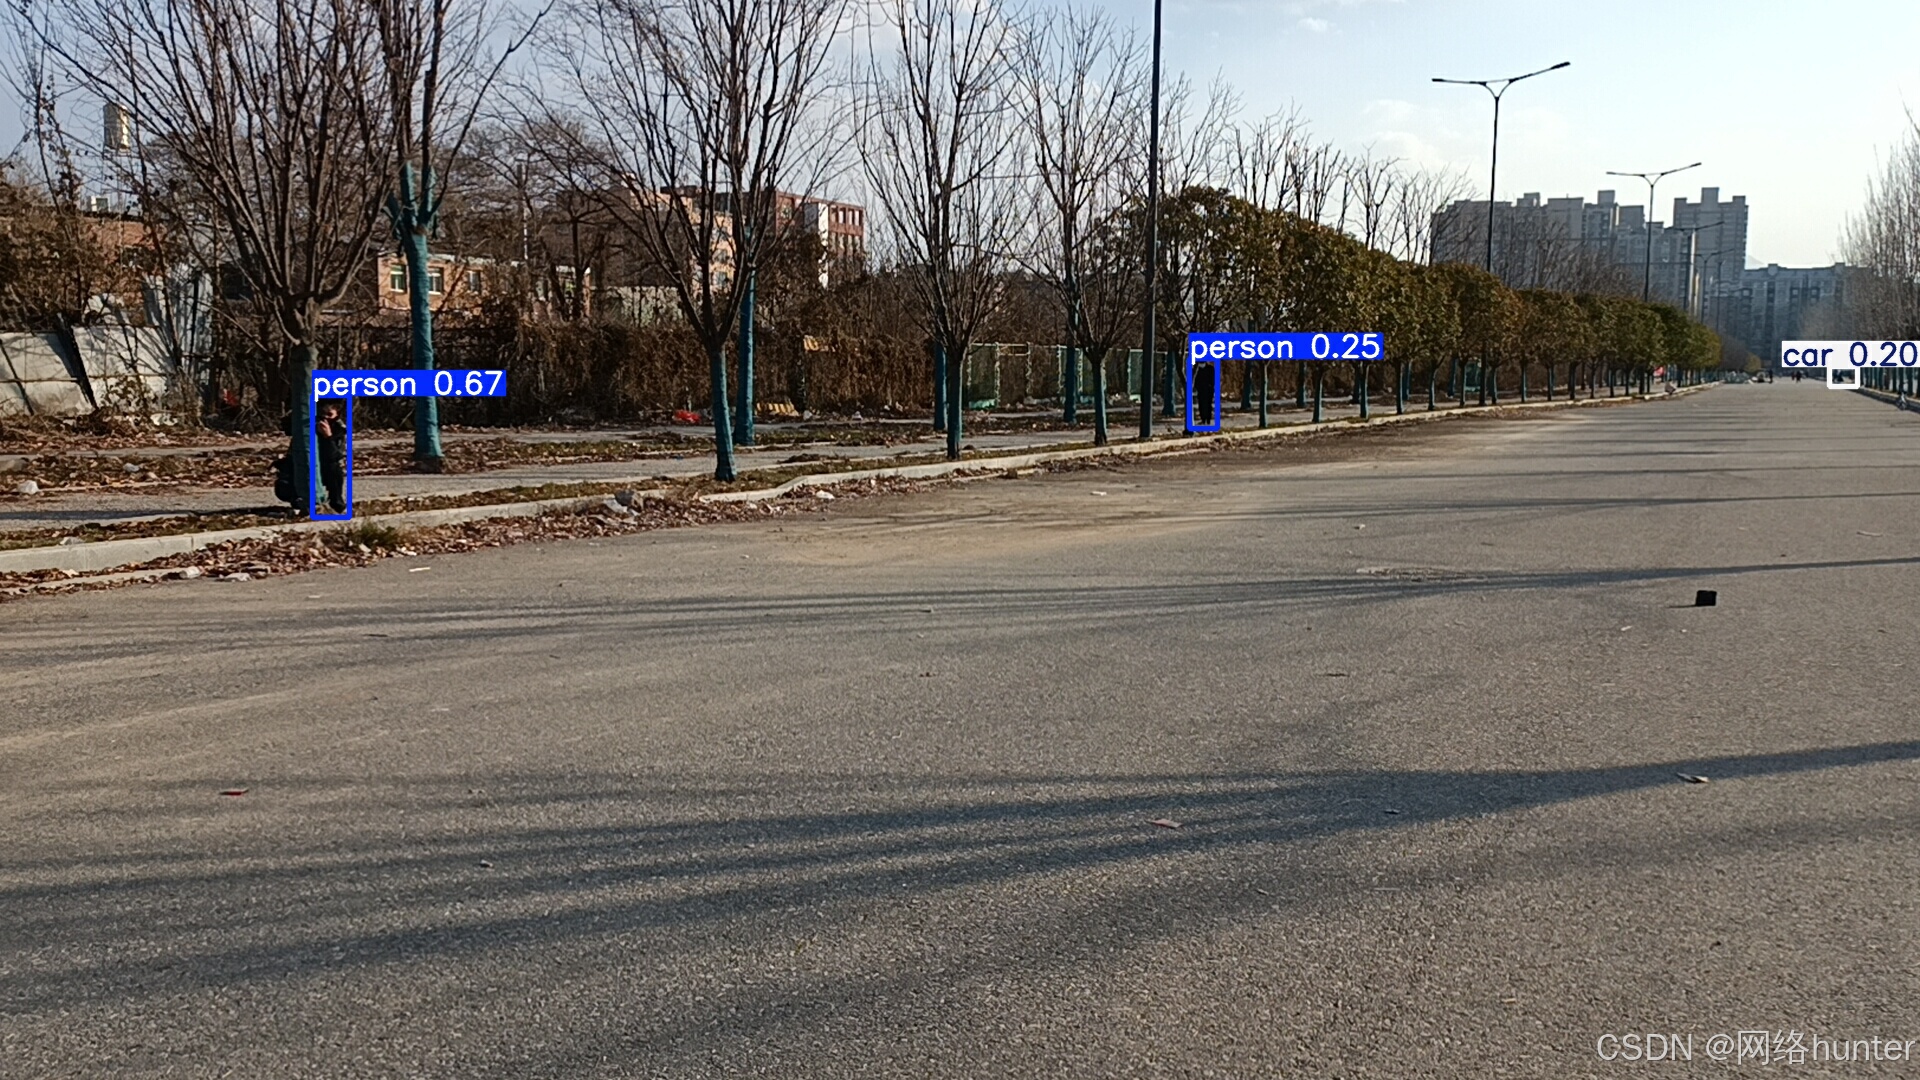
上述测试用的是yolov5s.pt。
3、数据集训练自己的检测模型
使用Label Studio,或者labelimg工具进行标注
这里使用labelimg标注工具,在python环境内,安装命令
pip install labelimg -i https://pypi.tuna.tsinghua.edu.cn/simple完成后直接cmd, 后会打开如下界面
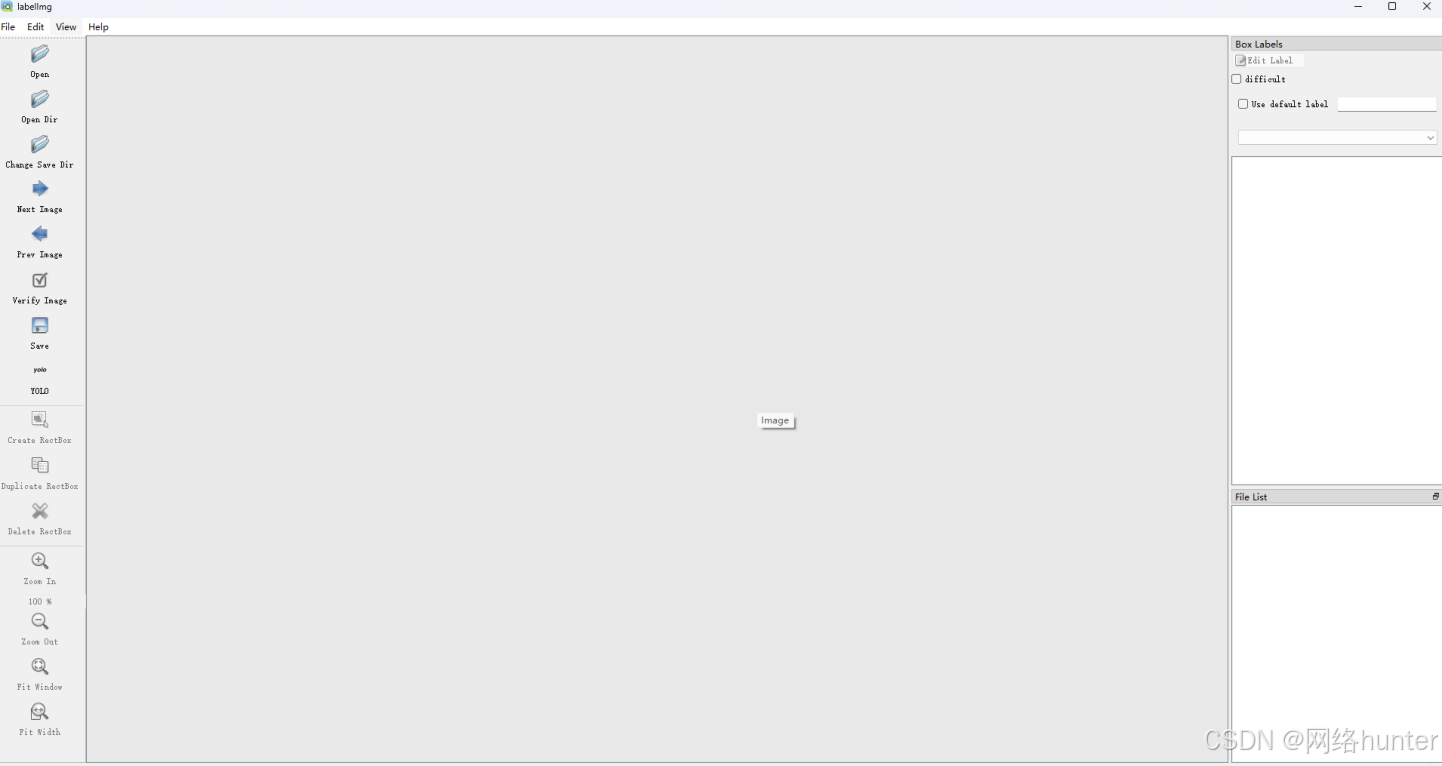
网上使用教程可自行查看使用方式。这里不做赘述。
将标注好的数据(图片和标签),放到yolov5.0目录下。我这里是在data目录下创建了一个新目录mydata,该目录下又新建了images(存放图片文件)和labels(存放yolo格式的标签文档)目录。
接下来,需要生成训练、验证以及测试集的文档,比例以8:1:1。在yolov5根目录创建一个test.py,代码如下:
import os
import random

# 数据集根目录,根据自己的目录路径修改
root_path = 'D:\yolov5\data\mydata'

# 训练,验证和测试比例,8:1:1
train_percent = 0.8
val_percent = 0.1
test_percent = 0.1

# 图片目录和标签目录
img_path = os.path.join(root_path, 'images')
txt_path = os.path.join(root_path, 'labels')

# 图片总数量,图片和标签一一对应,数量一致,命名一致
imgname_list = os.listdir(img_path)
nums = len(imgname_list)

# 根据比例确定不同集合的数据数量
train_num = int(nums * train_percent)
val_num = int(nums * val_percent)
test_num = int(nums * test_percent)

# 优化随机分配数据逻辑,通过循环确保抽取足够数量的索引
train_index = []
while len(train_index) < train_num:
    new_samples = random.sample(range(nums), train_num - len(train_index))
    train_index.extend(new_samples)
train_index = list(set(train_index))  # 去重

vt_index = set(range(nums)) - set(train_index)
val_index = []
while len(val_index) < val_num:
    new_samples = random.sample(list(vt_index), val_num - len(val_index))
    val_index.extend(new_samples)
val_index = list(set(val_index))

test_index = list(set(vt_index) - set(val_index))

# 分别写入
with open(os.path.join(root_path, 'train.txt'), 'w') as f:
    for i in train_index:
        name = imgname_list[i]
        path = os.path.join(img_path, name)
        f.write(path + '\n')

with open(os.path.join(root_path, 'val.txt'), 'w') as f:
    for i in val_index:
        name = imgname_list[i]
        path = os.path.join(img_path, name)
        f.write(path + '\n')

with open(os.path.join(root_path, 'test.txt'), 'w') as f:
    for i in test_index:
        name = imgname_list[i]
        path = os.path.join(img_path, name)
        f.write(path + '\n')
执行test.py后会生成三个.txt文件,每个里面都是数据集的每张图片的绝对路径地址。
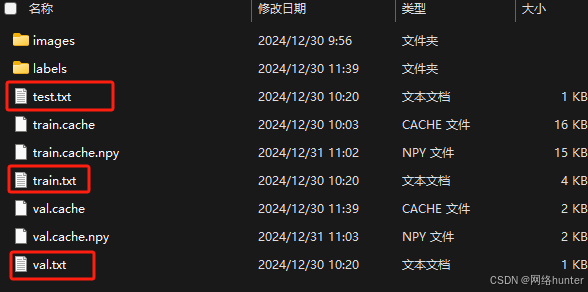
在data目录下,创建一个新的yaml文件,命名为mydata.yaml。
# Ultralytics YOLOv5 🚀, AGPL-3.0 license
# COCO 2017 dataset http://cocodataset.org by Microsoft
# Example usage: python train.py --data coco.yaml
# parent
# ├── yolov5
# └── datasets
#     └── coco  ← downloads here (20.1 GB)
# Train/val/test sets as 1) dir: path/to/imgs, 2) file: path/to/imgs.txt, or 3) list: [path/to/imgs1, path/to/imgs2, ..]
path: data/mydata # dataset root dir
train: ./train.txt # train images (relative to 'path') 118287 images
val: ./val.txt # val images (relative to 'path') 5000 images
#test: test.txt # 20288 of 40670 images, submit to https://competitions.codalab.org/competitions/20794

nc: 1
# Classes
names:
  0: soldier
# Download script/URL (optional)
#download: |
 # from utils.general import download, Path


  # Download labels
  #segments = False  # segment or box labels
  #dir = Path(yaml['path'])  # dataset root dir
  #url = 'https://github.com/ultralytics/assets/releases/download/v0.0.0/'
  #urls = [url + ('coco2017labels-segments.zip' if segments else 'coco2017labels.zip')]  # labels
  #download(urls, dir=dir.parent)

  # Download data
  #urls = ['http://images.cocodataset.org/zips/train2017.zip',  # 19G, 118k images
   #       'http://images.cocodataset.org/zips/val2017.zip',  # 1G, 5k images
    #      'http://images.cocodataset.org/zips/test2017.zip']  # 7G, 41k images (optional)
  #download(urls, dir=dir / 'images', threads=3)
修改模型配置参数:
yolov5的模型配置文件在models目录下,提供了x,s,n,m,l五个版本,是逐渐增大的(模型越大,训练时间也越长),根据要使用的预训练权重文件,更改其中的nc(类别数量)参数。
# Ultralytics YOLOv5 🚀, AGPL-3.0 license

# Parameters
nc: 1 # number of classes #更改类型数量
depth_multiple: 0.33 # model depth multiple
width_multiple: 0.50 # layer channel multiple
anchors:
  - [10, 13, 16, 30, 33, 23] # P3/8
  - [30, 61, 62, 45, 59, 119] # P4/16
  - [116, 90, 156, 198, 373, 326] # P5/32

# YOLOv5 v6.0 backbone
backbone:
  # [from, number, module, args]
  [
    [-1, 1, Conv, [64, 6, 2, 2]], # 0-P1/2
    [-1, 1, Conv, [128, 3, 2]], # 1-P2/4
    [-1, 3, C3, [128]],
    [-1, 1, Conv, [256, 3, 2]], # 3-P3/8
    [-1, 6, C3, [256]],
    [-1, 1, Conv, [512, 3, 2]], # 5-P4/16
    [-1, 9, C3, [512]],
    [-1, 1, Conv, [1024, 3, 2]], # 7-P5/32
    [-1, 3, C3, [1024]],
    [-1, 1, SPPF, [1024, 5]], # 9
  ]

# YOLOv5 v6.0 head
head: [
    [-1, 1, Conv, [512, 1, 1]],
    [-1, 1, nn.Upsample, [None, 2, "nearest"]],
    [[-1, 6], 1, Concat, [1]], # cat backbone P4
    [-1, 3, C3, [512, False]], # 13

    [-1, 1, Conv, [256, 1, 1]],
    [-1, 1, nn.Upsample, [None, 2, "nearest"]],
    [[-1, 4], 1, Concat, [1]], # cat backbone P3
    [-1, 3, C3, [256, False]], # 17 (P3/8-small)

    [-1, 1, Conv, [256, 3, 2]],
    [[-1, 14], 1, Concat, [1]], # cat head P4
    [-1, 3, C3, [512, False]], # 20 (P4/16-medium)

    [-1, 1, Conv, [512, 3, 2]],
    [[-1, 10], 1, Concat, [1]], # cat head P5
    [-1, 3, C3, [1024, False]], # 23 (P5/32-large)

    [[17, 20, 23], 1, Detect, [nc, anchors]], # Detect(P3, P4, P5)
  ]
训练和测试
主目录下的train.py为训练脚本。
--weights :加载预训练权重文件的路径
--data:训练数据集的yaml文件
--epoch:训练轮数,设置太少可能出现无法准确识别的问题。
--batch-size:每一轮训练送往GPU的图片数量,分几个批次数据,和机器配置有关。
运行train.py后则在如下目录生成训练结果集。

weights目录下的就是训练后的模型文件。

用detect.py执行验证。即可得到对应识别结果。

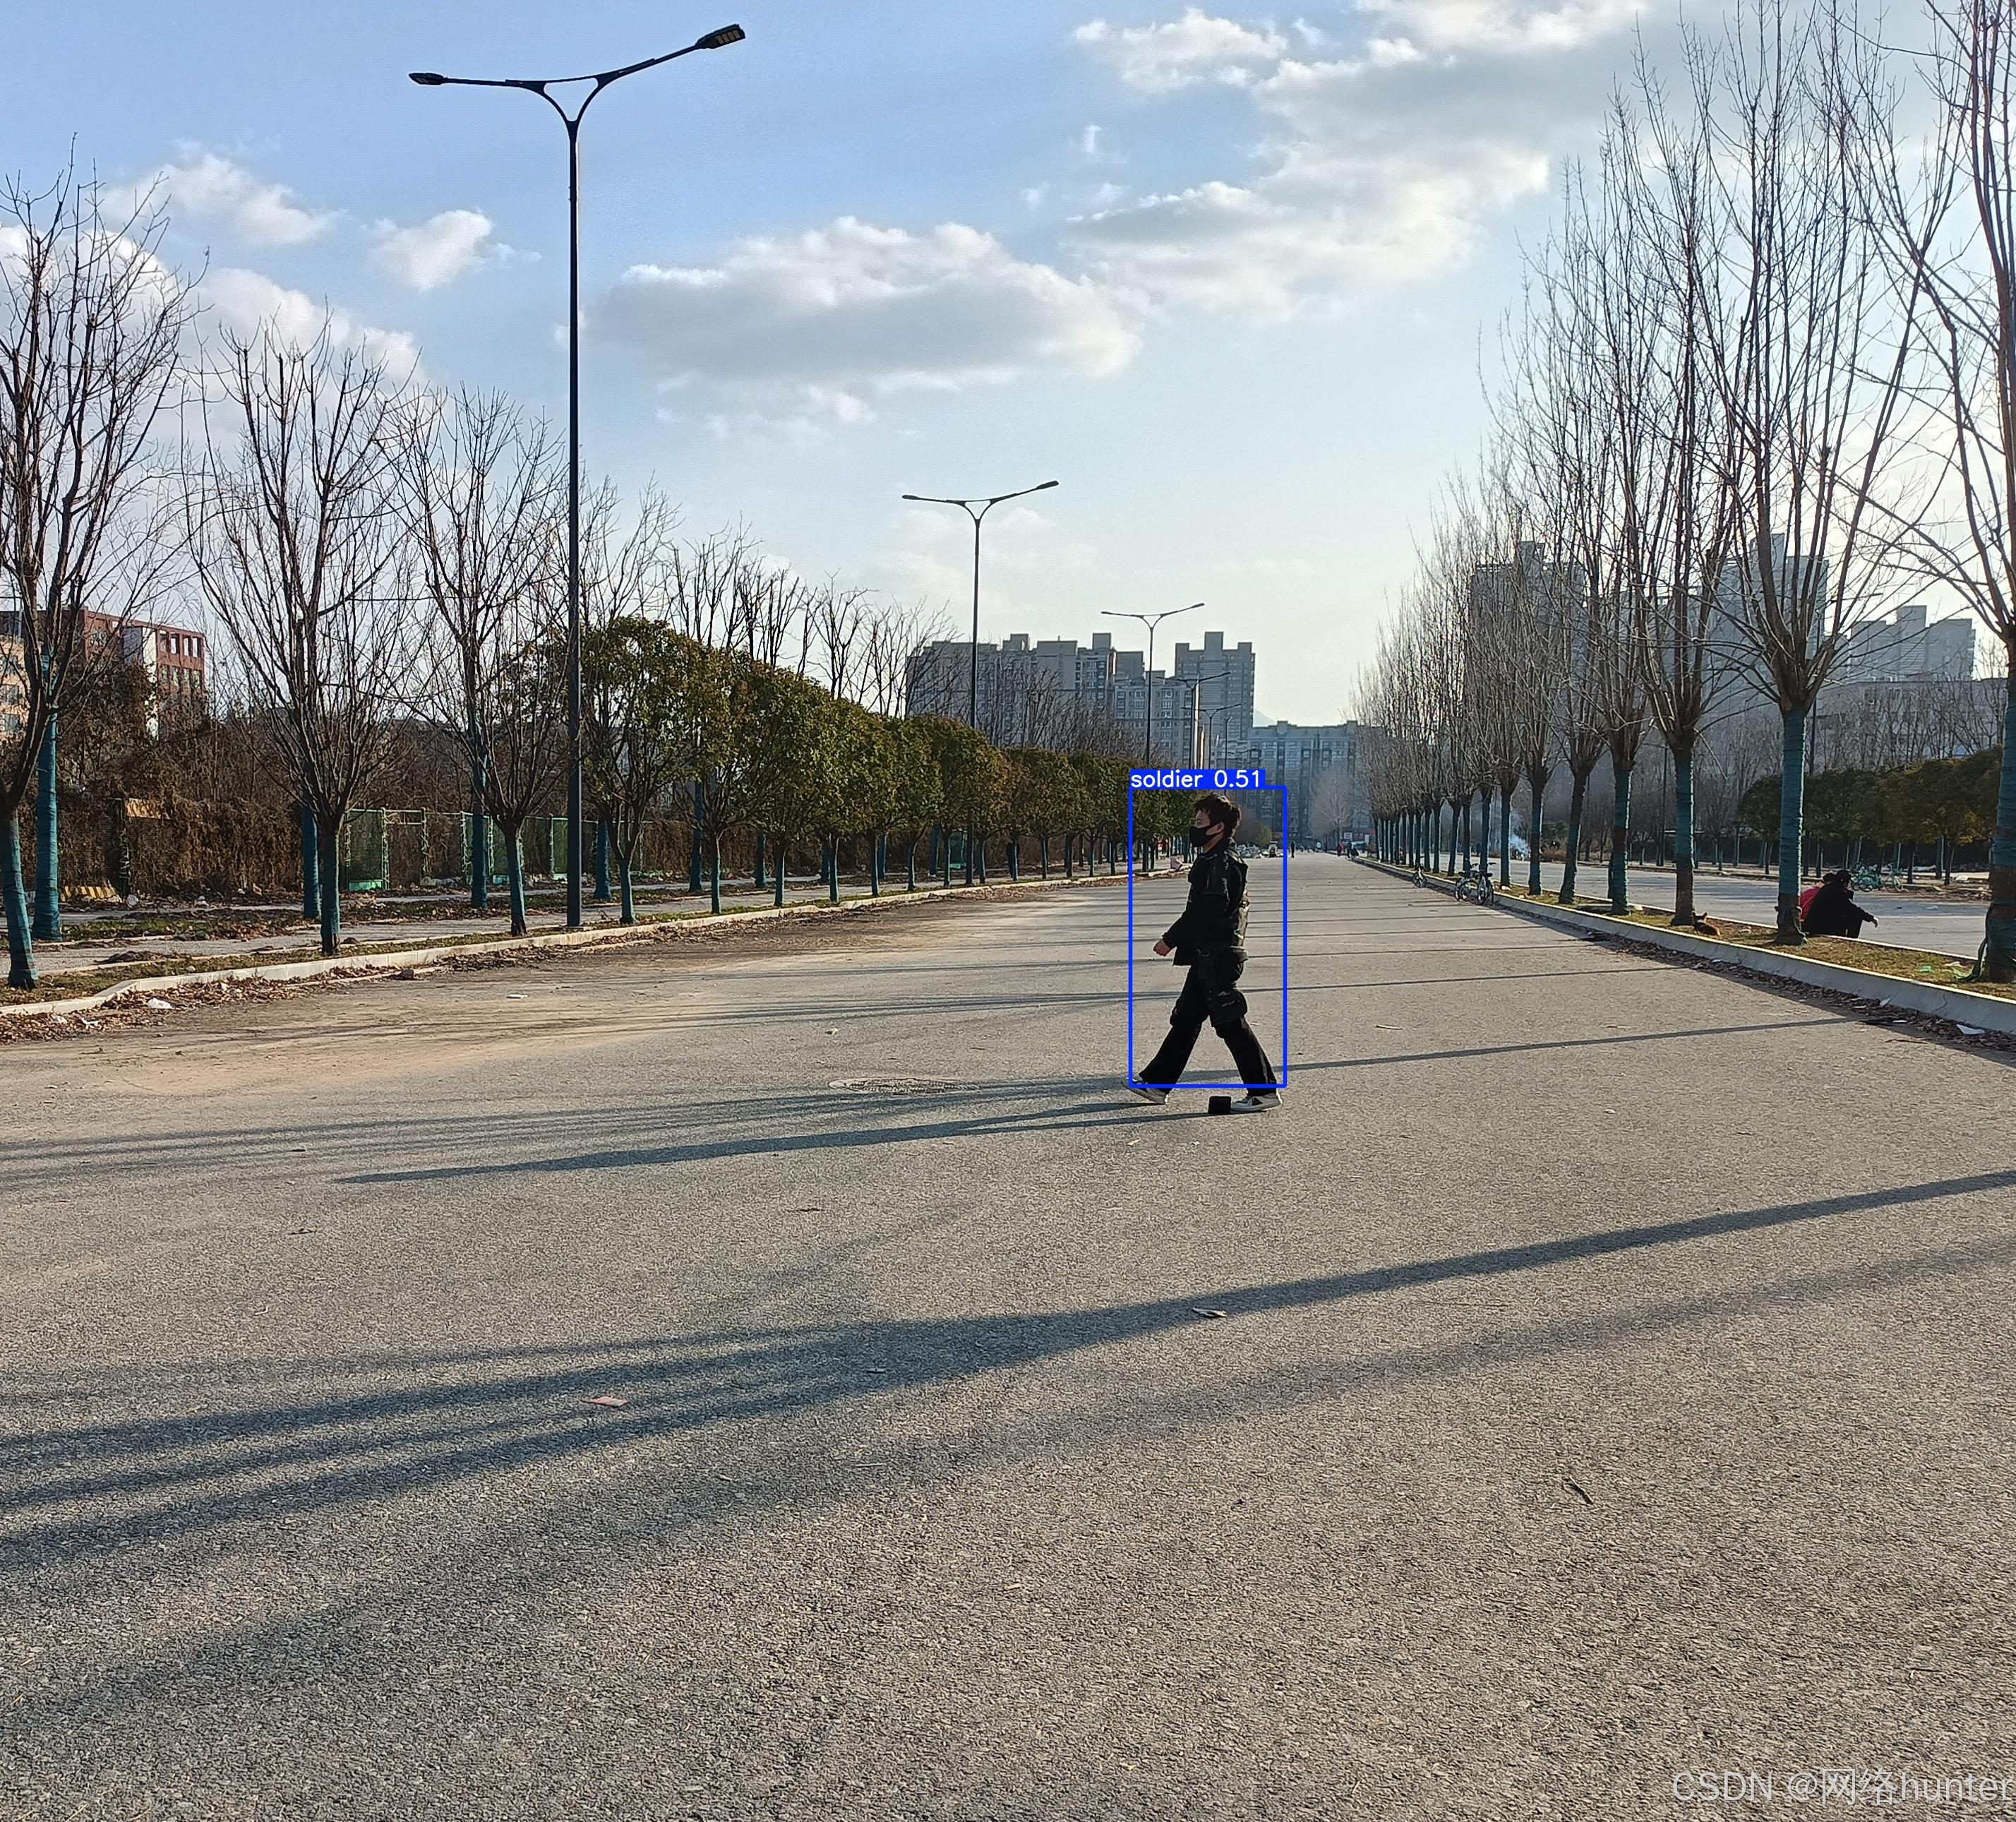
4、yolov5训练完后检测不到目标的解决办法
开始训练完成后,进行测试,发现识别不到任何结果集.问题排查。
1、opencv-python版本太高了,更换opencv-python版本和numpy版本
2、降低detect.py中的“--conf-thres”阀值设置为0.01再尝试。可逐步增大。
3、在detect.py里面增加:cudnn.benchmark = True——其实没用,只是识别一张打开显示一张。
4、训练次数不够,增加到50,train.py文件更改
parser.add_argument("--epochs", type=int, default=50, help="total training epochs")