文章目录
8. 软件测试
8.1 Testing(测试)
8.1.1 A note of testing under the V & A framework
测试是软件验证和确认(V & V)过程的一部分,其目的是检查正在开发的软件是否符合其规范,并提供了由支付软件费用的人所期望的功能。
这些检查过程从需求提供时就开始,并贯穿开发过程的所有阶段。
测试技术包括静态和动态两种:
静态测试:主要是对静态系统表示的分析,以发现问题(例如,检查文档和代码分析)。
动态测试:主要是对产品行为进行测试,通过执行测试数据来观察系统的运行行为。
8.1.2 The Basics
从实际、执行焦点的角度出发,测试意在展示程序是否能够实现其预期功能,并在投入使用之前发现程序的缺陷。
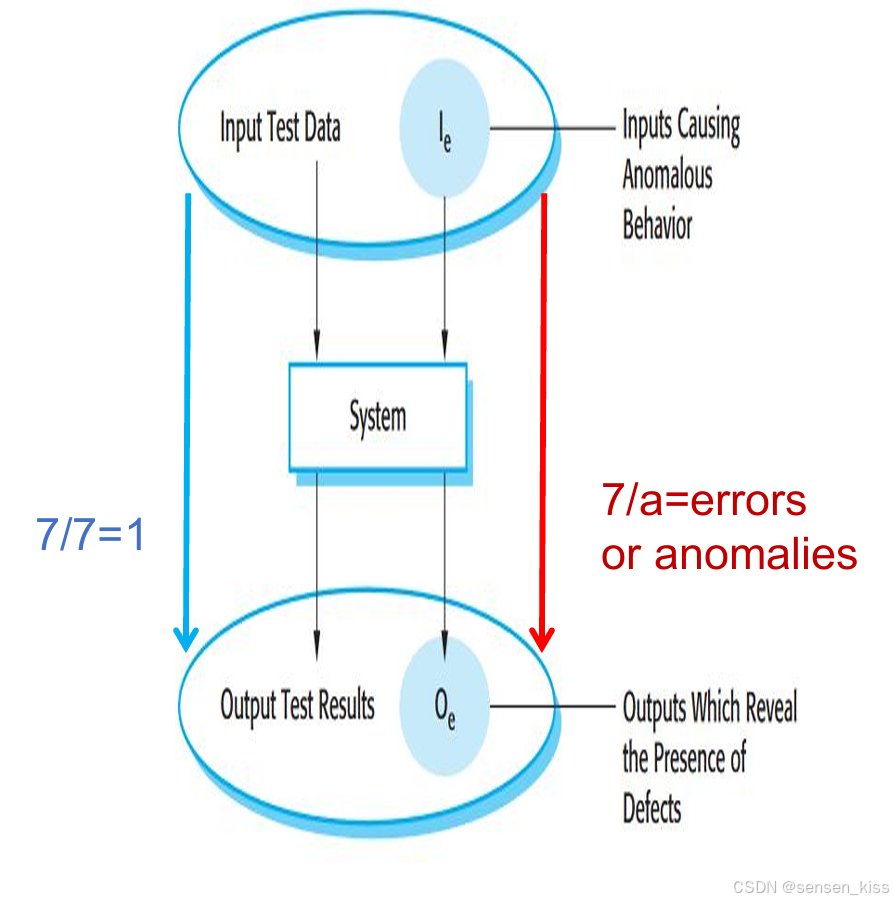
在进行软件测试时,你会使用人工数据来执行程序。然后,你会检查测试运行的结果,以发现错误、异常或关于程序非功能属性的信息。
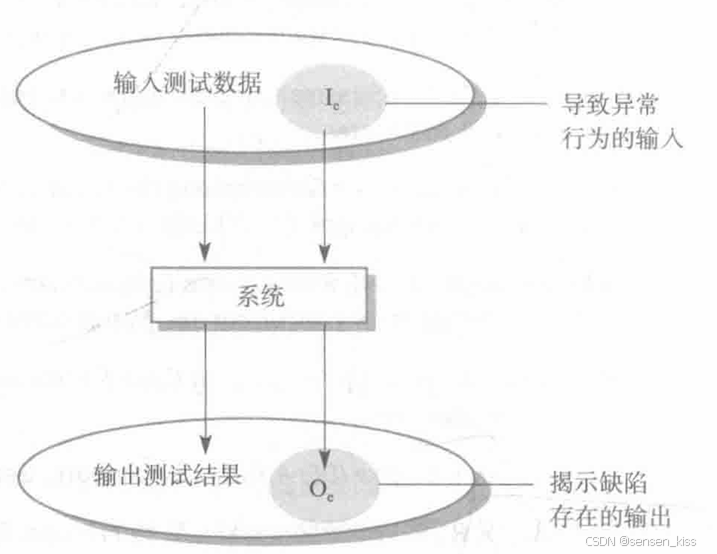
下图是一个程序测试的输入-输出模型。
8.1.3 The Goals
软件测试主要有两个目的:
1.Validation(验证):通过测试来证明软件满足其需求,以便向开发人员和客户展示。
对于定制软件,这意味着每个需求文件中的需求都应至少有一个测试。
对于通用软件产品,这意味着应该对所有系统功能进行测试,以及这些功能的组合,这些将被纳入产品发布中。
2.Finding defects(发现缺陷):通过测试来发现软件行为不正确、不期望的或不符合规范的情况。这包括发现系统崩溃、与其他系统的不良交互、错误的计算和数据损坏等不良系统行为。
8.1.4 The Stages
软件测试有不同的阶段:
1.Developing testing(开发测试):在软件开发过程中对系统进行测试,以发现错误和缺陷。
系统设计师和程序员通常会参与其中。
2.Release testing(发布测试):由一个独立的测试团队由一个独立的测试团队在软件发布给用户之前对系统的完整版本进行测试。
确保系统满足系统利益相关者的需求。
3.User testing(用户测试):用户或潜在用户在他们自己的环境中对系统进行测试。
用户可能是内部营销团队。
Acceptance testing(验收测试)也是用户测试的一种,以确定系统是否符合其需求和预期。
8.2 Developing testing(开发测试)
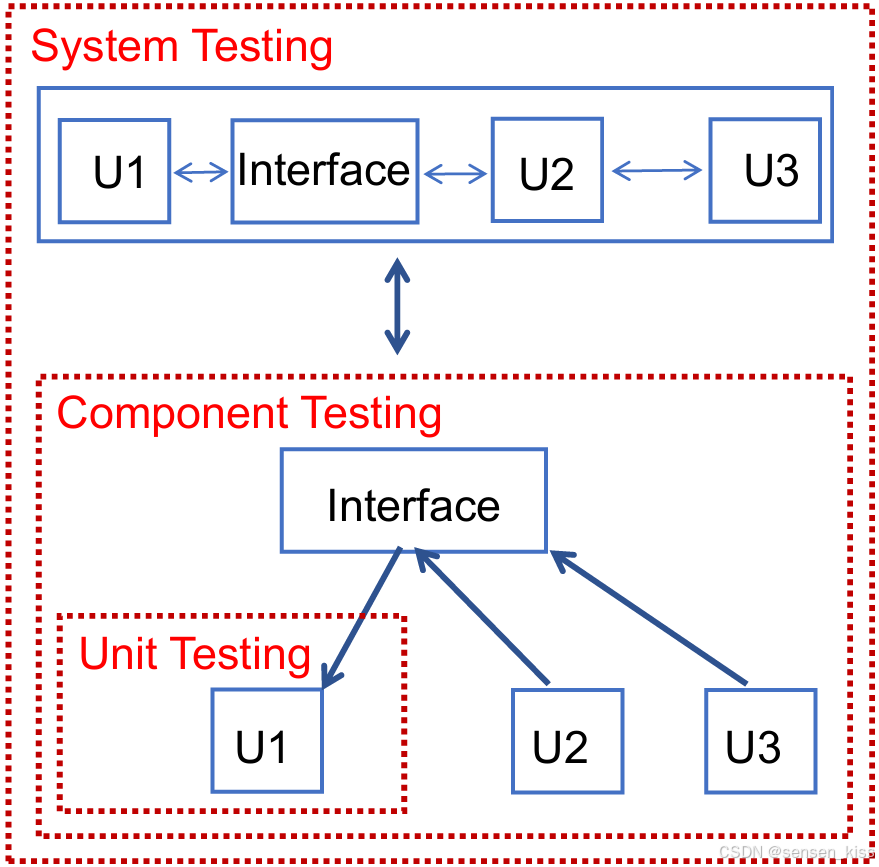
开发测试包含从低层次到高层次的三个阶段的测试:
1.Unit testing(单元测试)对单个程序单元或对象类进行测试。单元测试应该专注于测试对象或方法的功能性。
where individual program units or object classes are tested. Unit testing should focus on testing the functionality of objects or methods.
2.Component testing(组件测试)将多个单独的单元集成在一起,创建复合组件进行测试。组件测试应该专注于通过接口测试这些单元之间的交互。
where several individual units are integrated to create composite components. Component testing should focus on testing the interaction between these units via interfaces.
3.System testing(系统测试)将系统中的一些或所有组件集成在一起,对整个系统进行测试。系统测试应该专注于测试组件之间的交互。
where some or al of the components in a system are integrated and the system is tested as a whole. System testing should focus on testing component interactions.
8.2.1 Unit testing(单元测试)
单元测试是指在隔离环境中测试单个组件单元的过程。
Unit testing is the process of testing individual component unit in isolation.
单元可以在不同的层次上进行定义(例如,一个函数/方法),但在这里被认为是具有多个属性和方法的对象类。
It is considered to be object classes with several attributes and methods.
对一个类进行完整的测试覆盖需要包括以下内容:
测试与对象相关的所有操作。
Testing all operations associated with an object.
设置和查询所有对象属性。
Setting and interrogating all object attributes.
在所有可能的状态下对对象进行测试。
Exercising the object in al possible states.
下面以这个气象站类为例进行单元测试。
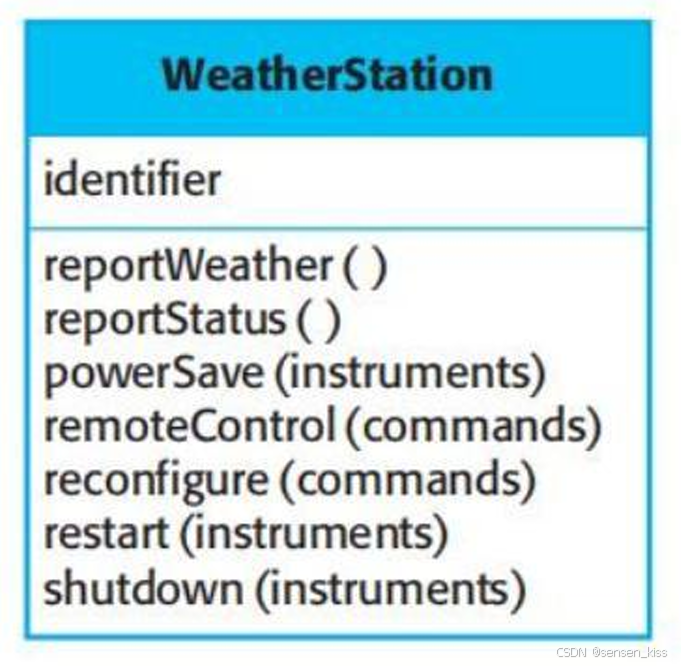
对象具有一个单一属性,即其标识符。只需要一个测试来检查它是否已经被正确设置。
针对该对象的所有方法(如reportWeather、reportStatus等)定义测试用例。
理想情况下,应该独立测试每个方法,但在某些情况下,可能需要进行一些测试序列(例如,重新启动/关闭)。
下图使用了状态模型用于单元测试。
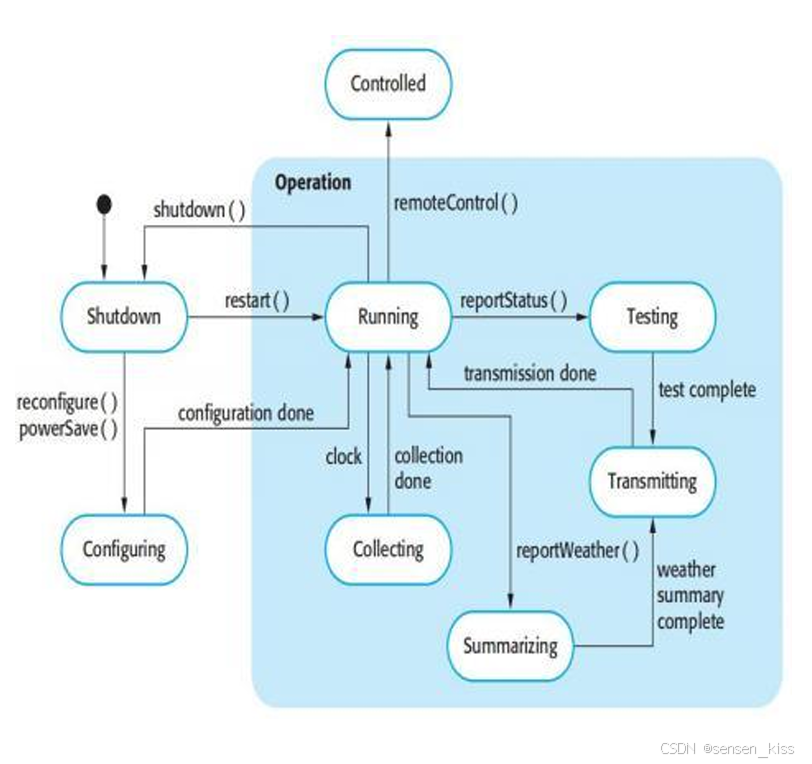
状态转换示例:
Shutdown -> Running -> Shutdown
Configuring -> Running -> Testing -> Transmitting -> Running
Running-> Colecting->Running-> Summarizing ->Transmitting -> Running
下图使用了状态图对另一个领子进行单元测试。
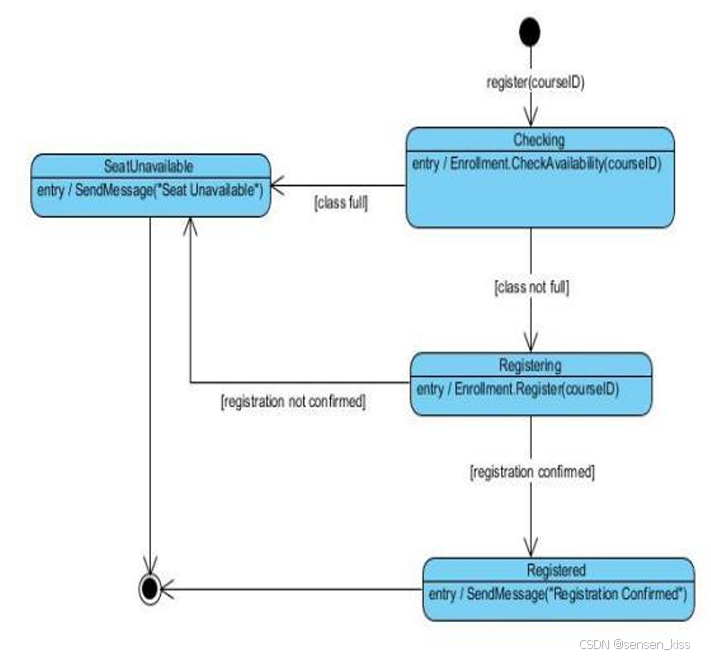
测试案例:
Test Case 1:Start > Checking > SeatUnavailable > Terminate
Test Case 2:Start > Checking > Registering > Registered >Terminate
Test Case 3:Start > Checking > Registering > SeatUnavailable > Terminate
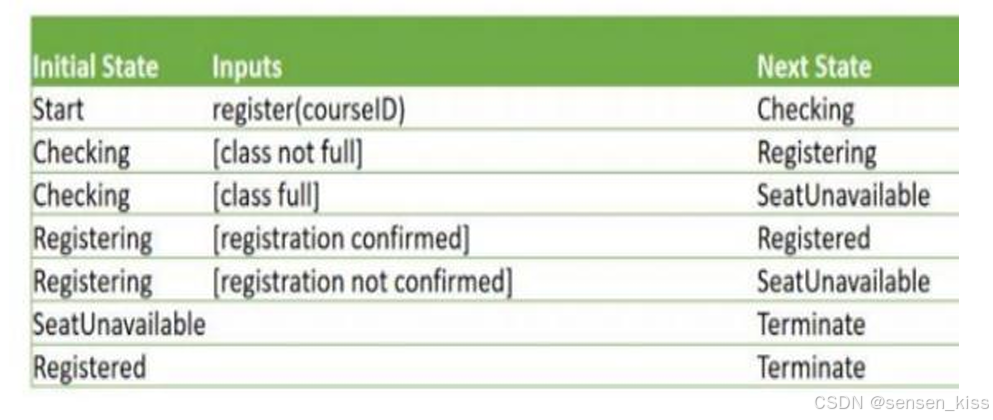
下图展示了这个例子的状态转换表。
8.2.1.1 Automated Unit Testing(自动化单元测试)
只要有可能都应当尽量自动化单元测试,以便在没有手动干预的情况下运行和检查测试。在自动化单元测试中,你可以利用测试自动化框架(例如JUnit)来编写和运行程序测试。单元测试框架提供了通用的测试类,你可以扩展这些类来创建特定的测试用例。然后,它们可以运行你实现的所有测试,并通过某种图形用户界面(GUI)报告测试的成功或失败情况。
Whenever possible, unit testing should be automated so that tests are run and checked without manual intervention.In automated unit testing, you make use of a test automation framework (such as JUnit) to write and run your program tests.Unit testing frameworks provide generic test classes that you extend to create specific test cases. They can then run all of the tests that you have implemented and report, often through some GUI, on the success of otherwise of the tests.
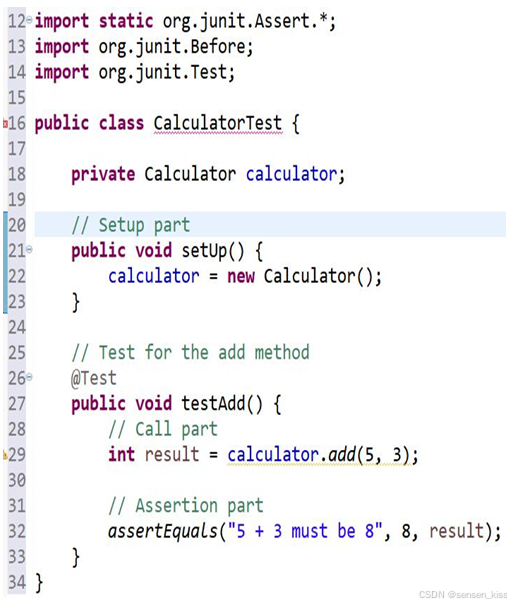
一个自动化测试包括以下3个部分:
1.一个setup part(设置部分)。你会初始化系统以准备测试用例(例如,初始化待测试的对象)。
where you initialize the system with the test case (e.g., initialize the object under test)
2.一个call part(调用部分)。你会调用待测试的对象或方法。
where you call the object or method to be tested.
3.一个assertion part(断言部分)。你会比较调用的结果与预期结果。如果断言评估为真,则测试成功;如果为假,则测试失败。
where you compare the result of the call with the expected result. If the assertion evaluates to true, the test has been successful if false, then it has failed.
下图使用了JUnit进行了一个自动化单元测试。
8.2.1.2 Choosing test cases(选择测试用例)
因为测试是昂贵且耗时的,所以选择有效的单元测试用例是重要的。
Effectiveness(有效性)意味着两件事情:
测试用例应该表明,当按预期方式使用时,你正在测试的组件确实完成了其预期功能。
The test cases should show that, when used as expected, the component that you are testing does what it is supposed to do.
如果组件存在缺陷,这些缺陷应该被测试用例所揭示。
If there are defects in the component, these should be revealed by test cases.
基于这两点,有两种类型的单元测试用例:
1.反映程序的正常运行,并且应该表明组件按预期方式工作。
The first of these should reflect normal operation of a program and should show that the component works as expected.
2.基于测试经验,检查常见问题的发生位置,并使用异常输入来验证这些输入是否被正确处理,且不会导致组件崩溃。
The other kind of test case should be based on testing experience of where common problems arise. It should use abnormal inputs to check that these are properly processed and do not crash the component.
以下是帮助你选择测试用例的策略:
1.Partition testing(划分测试):你需要识别具有共同特征并应以相同方式处理的输入组。你应该从每个组中选择测试用例。
每个这样的组被称为等价分区或领域,在这个领域中,程序对每个组成员的行为方式是等价的。
where you identify groups of inputs that have common characteristics and should be processed in the same way. You should choose tests from within each of these groups.
Each of these groups is an equivalence partition or domain where the program behaves in an equivalent way for each group member.
下图给出了例子。

所以划分了正整数分区和负整数分区。对于这两个分区的成员,只需要测试一个成员即可。
用例选择的一个良好原则,即选择在分区边界上的测试用例,以及接近分区中点的测试用例。
A good rule of thumb for test case selection is to choose test cases on the boundaries of the partitions.
你可以通过使用程序规范或用户文档以及经验来识别分区,从而预测可能检测到错误的输入值类别。
下图展示了一个例子,该程序接受输入的数量在4到10之间,确定输入的五位数整数是否在10000到99999之间。
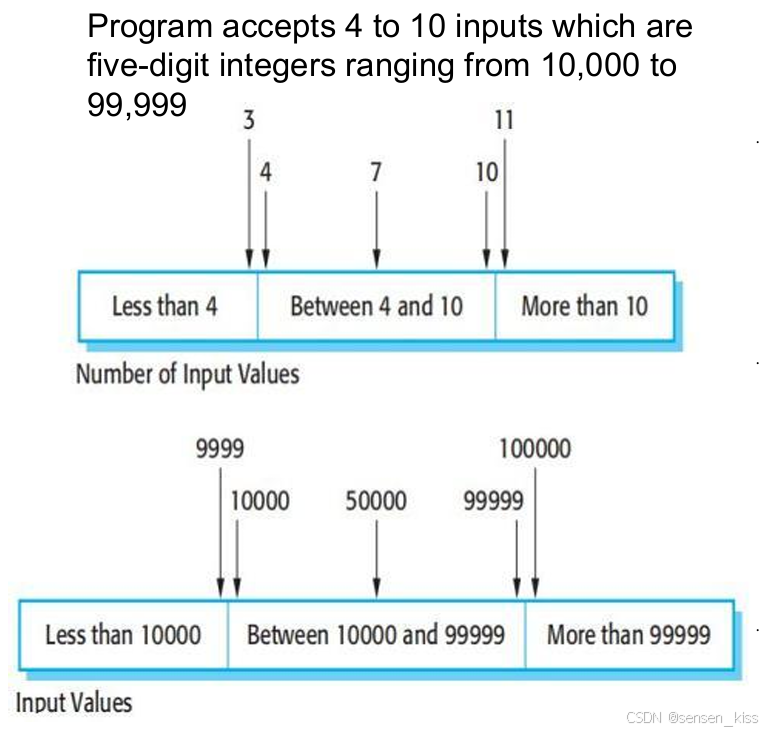
可以使用图片展示的方式选择一些用例。
2.Guideline-based testing(基于指南的测试)
使用测试指导来选择测试用例。这些指导反映了程序员在开发组件时经常犯的错误的先前经验。
where you use testing guidelines to choose test cases. These guidelines reflect previous experience of the kinds of errors that programmers often make when developing component.
使用仅包含单个值的序列/数组/列表进行测试。程序员通常会认为序列由多个值组成,有时会在程序中嵌入这种假设。因此,如果给定一个仅包含单个值的序列,程序可能无法正常工作。
在不同的测试中使用不同大小的序列/数组/列表。
派生测试,以便访问序列的第一个、中间和最后一个元素。
使用零长度的序列/数组/列表进行测试。
8.2.2 Component Testing(组件测试)
软件组件通常是由多个相互作用的单元组成的复合组件。而组件的功能是基于这些单元通过接口进行交互。因此,测试复合组件应该集中在展示组件接口是否按照其规范进行行为。在这种情况下,你可以假设组件内部各个对象的单元测试已经完成。
单元A、B和C已经集成在一起,创建了一个更大的组件或子系统。
测试用例不是应用于单独的单元,而是应用于通过组合这些组件而创建的复合组件的接口。
注意:复合组件中的接口错误可能无法通过测试单个对象来检测,因为这些错误是由组件中对象之间的交互产生的。
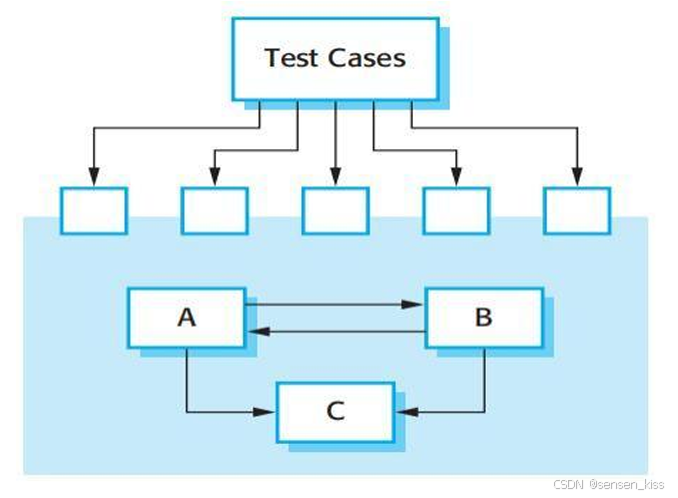
接口错误是复杂系统常见的错误形式之一,这些错误包括以下3种类型:
1.Interface misuse(接口误用):一个调用单元调用另一个单元时,在使用接口时出现错误,例如参数顺序错误。
2.Interface misunderstanding(接口误解):一个调用单元对被调用单元的行为做出了错误的假设。
3.Timing errors(时间性错误):被调用和调用单元以不同的速度运行,导致访问过时的信息。
对于接口测试的通用指南有以下几条:
设计测试用例,使得调用过程的参数处于其范围的极端端点。
总是使用空指针来测试指针参数。
例如:processCustomerData(some para) -> processCustomerData(NULL)。
设计能导致组件失败的测试用例。
例如:parseDate(String dateStr) in format "YYYY-MM-DD” -> parseDate(“2024-31-02”) or parseDate(“02-2024-31”)
使用压力测试,测试系统如何处理高流量和数据负载。
当多个组件通过共享内存进行交互时,设计测试来改变这些组件被激活的顺序。
例如一个多线程的程序的线程是T1,T2,T3共享内存,写一个测试顺序是T1,T3,T2
8.2.3 System Testing(系统测试)
系统测试在开发过程中涉及将组件集成在一起,创建系统的一个版本,然后对集成系统进行测试。
系统测试的重点是测试组件之间的交互。
系统测试检查组件是否兼容,是否正确地相互作用,并且在适当的时间通过它们的接口传递正确的数据。
系统测试与组件测试之间有两个重要区别:
1.系统测试中可能会集成已经单独开发的可重复使用的组件或现成的系统,然后对整个系统进行测试。
2.系统测试阶段可能会涉及不同团队成员或子团队开发的组件的集成。因此,系统测试是一个集体的过程,而不是一个个体的过程。
在一些公司中,系统测试可能由一个独立的测试团队来进行,设计人员和程序员可能不参与其中。
可以使用用例来识别系统交互的开发,这作为系统测试的基础。每个用例通常涉及多个系统组件,因此测试用例会促使这些交互发生。
可以使用序列图来识别将被测试的操作,并帮助设计执行测试用例。
下图用序列图展示了气象站系统收集气象数据的操作序列。
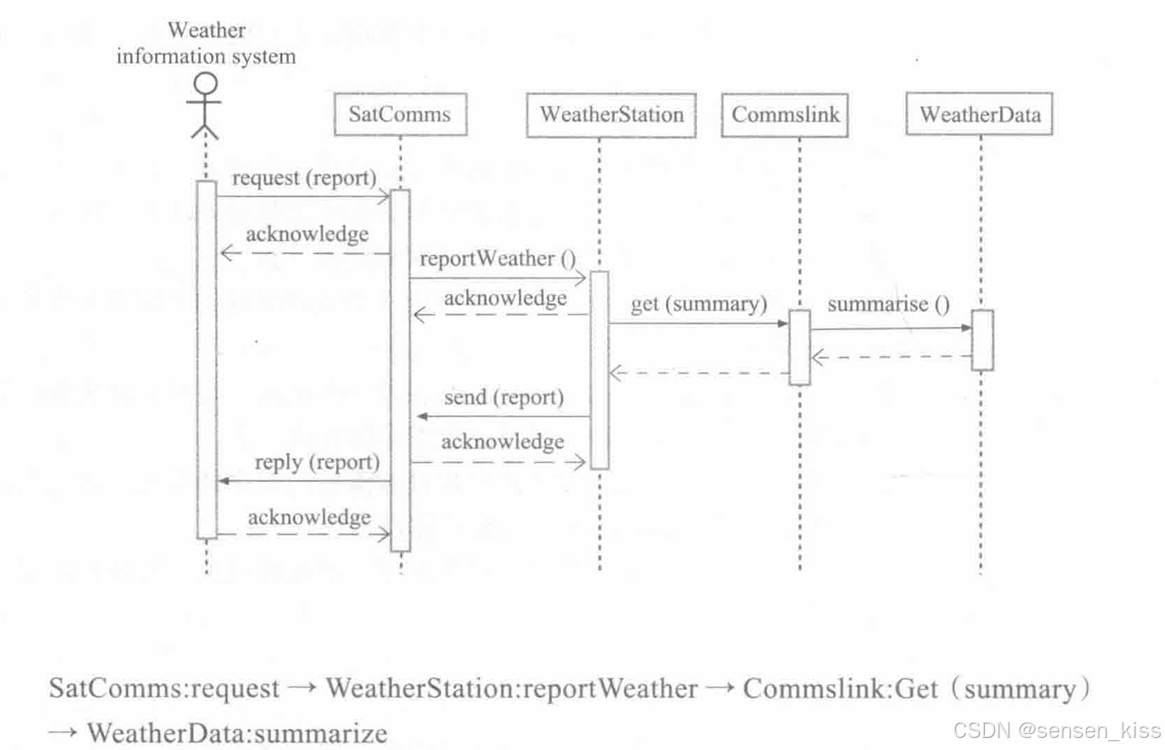
用这张图可以识别将要进行的操作序列,并帮助设计测试用例来执行这些操作。
Exhaustive(详尽的)系统测试是不可能的,因此可以制定testing policy(测试方针)来定义所需的系统测试覆盖范围。
Testing policy(测试方针)的一些例子包括:
对通过菜单访问的所有系统功能进行测试。
在菜单上提供了“打开”、“保存”、“退出”选项,确保这些选项都可以正常交互。
对通过相同菜单访问的功能组合进行测试。
例如字体在加粗和斜体的功能下能既加粗又倾斜。
对用户输入提供的所有功能进行测试,包括正确和不正确的输入。
例如账号密码输入的正确喝不正确情况。
8.3 Release testing(发布测试)
8.3.1 The basics
发布测试是指对系统的特定发布版本进行测试,该版本打算在开发团队之外的环境中使用。
发布测试的主要目标是说服系统的提供方,证明该系统已经足够好以供使用。
因此,发布测试必须表明系统提供了其指定的功能、性能和可靠性,并且在正常使用过程中不会出现故障。
8.3.2 The difference between the System Testing and the Component Testing
发布测试与系统测试的主要不同如下:
1.发布测试由一个独立的团队负责,他们并未参与系统的开发过程。这与系统测试由开发团队进行的情况不同。
2.系统测试的重点是发现系统中的错误,而发布测试的目标是检查系统是否满足其要求,并且是否足够好以供外部使用。
8.3.3 Approaches
8.3.3.1 Requirements based testing(基于需求的测试)
我们现在知道发布测试的重点是检查系统是否满足其要求,而一个好的需求工程实践的一个一般原则是需求应该是可测试的。
通过审查每个需求并为其开发一个或多个测试来进行测试。有关MHC-PMS系统如下:
需求如下:
当患者对特定药物过敏时,系统应发出警告消息。
如果开药人选择忽略过敏警告,他们必须提供忽略警告的原因。
可以根据这些需求设计以下的测试:
设置没有已知过敏的患者记录。
设置已知过敏的患者记录。
设置已知对一种或多种药物过敏的患者记录。
为患者开具两种他们对其过敏的药物。
为患者开具一种会发出警告的药物,并覆盖该警告。
8.3.3.2 Scenario testing(场景测试)
场景方法通过构思典型的使用场景,并用这些场景来为系统开发测试用例。
场景是描述系统可能被使用的一种方式的故事。
场景应该是现实的,真实的系统用户应该能够与之产生共鸣。
下图展示了一个关于MHC-PMS系统的场景。
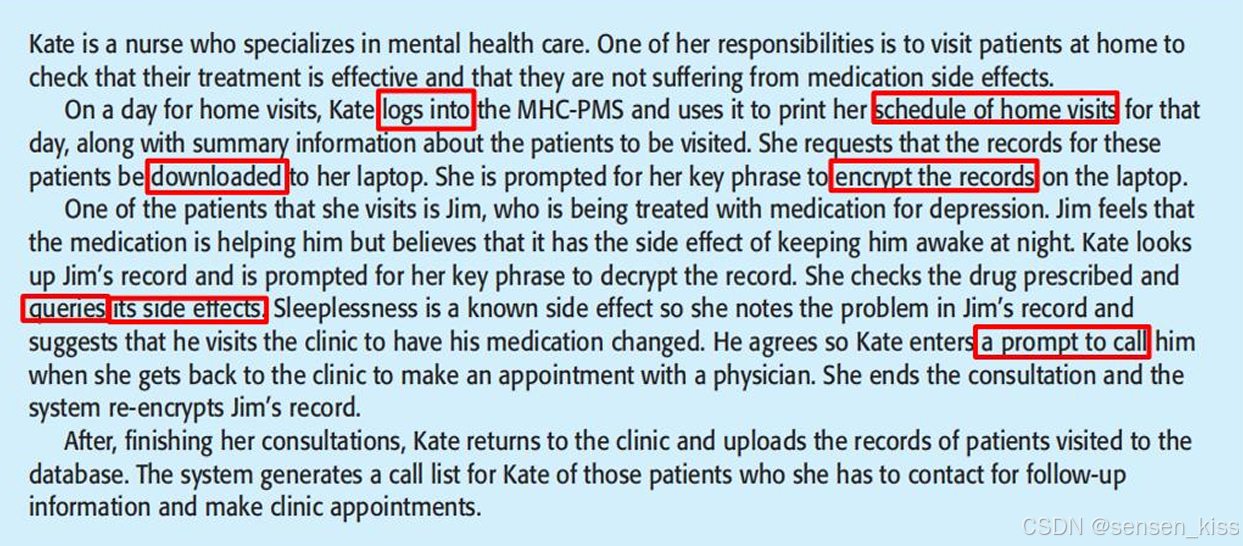
红框标注了场景中的关键活动,这些定义了用户与系统的交互方式。因此测试用例要体现出这些功能。
8.3.3.3 Performance testing(性能测试)
发布测试的一部分可能涉及测试系统的emergent properties(涌现性属性),如性能和可靠性。
性能测试通常涉及计划一系列测试,其中负载逐渐增加,直到系统的性能变得不可接受为止。
进行性能测试既关注展示系统满足其需求又关注发现系统中的问题和缺陷。为了测试性能需求是否得到满足,可能就要构造一个operational profile(运行说明),operational profile(运行说明)是系统将处理的实际工作混合的一组测试。
例如:如果系统中90%的交易属于A类型,5%属于B类型,其余属于C、D和E类型,那么设计运行说明时应确保绝大多数测试都是A类型的。
8.3.3.3.1 Stress testing(压力测试)
压力测试是通过对软件的设计极限之外的需求进行测试,从而对系统进行压力测试。
例如:对于一个设计用于每秒处理最多300笔交易的交易处理系统进行测试。
测试步骤包括先测试少于300笔交易的情况,然后逐渐增加系统负载直到系统失败为止。
压力测试的重要性在于:
测试系统的故障行为。
对系统施加压力,可能导致一些平时难以发现的缺陷浮出水面。
8.4 User testing(用户测试)
8.4.1 The background
用户测试是测试过程中的一个阶段,在这个阶段用户或客户提供对系统测试的意见和建议。
即使进行了全面的系统和发布测试,用户测试仍然是必不可少的。
原因在于用户工作环境的影响对系统的可靠性、性能、可用性和健壮性有重大影响,这些影响是无法在测试环境中复制的。
8.4.2 Types
有3种不同类型的用户测试:
1.Alpha testing:软件的用户与开发团队在开发者的现场一起测试软件。
Users of the software work with the development team to test the software at the developer’s site.
2.Beta testing:软件发布给用户,让他们进行实验,并提出他们在使用过程中发现的问题给系统开发人员。
A release of the software is made available to users to alow them to experiment and to raise problems that they discover with the system developers.
3.Acceptance testing(验收测试):客户测试系统,决定系统是否已经准备好从系统开发人员那里接收,并在客户环境中部署。主要用于定制系统。
Customers test a system to decide whether or not it is ready to be accepted from the system developers and deployed in the customer environment. Primarily for custom systems.
8.4.2.1 Alpha Testing
Alpha测试是指用户和开发人员在系统开发过程中一起测试系统,因为用户可以发现对开发测试团队来说不太明显的问题和情况。
In alpha testing, users and developers work together to test a system as it is being developed, becasue users can identify problems and issues that are not readily apparent to the development testing team.
测试人员可能愿意参与Alpha测试过程,因为这样可以让他们提前了解新系统功能,从而能够更好地利用这些功能。
Testers may be willing to get involved in the alpha testing process because this gives them early information about new system features that they can exploit.
好处包括:
1.早期发现问题:真实用户能够及早发现那些微妙且依赖上下文的问题,避免在发布后进行昂贵的修复。
Early Detection of Issues: Problems that are subtle and context-specific are identified early by real users, preventing costly fixes post-launch.
2.早期采用者参与:参与Alpha测试的用户会对产品产生所有权感和参与感,使他们在产品上市后更有可能支持该产品。
Early Adopter Engagement: Users involved in the alpha testing feel a sense of ownership and engagement with the product, making them likely support the product when it is on the market.
8.4.2.2 Beta Testing
Beta测试是指将软件系统的早期、有时是未完成的版本提供给客户和用户进行评估。Beta测试对于发现软件与使用环境特性之间的交互问题至关重要,并且也是一种营销手段。
Beta testing takes place when an early, sometimes unfinished, release of a software system is made available to customers and users for evaluation. Beta testing is essential to discover interaction problems between the software and features of the environment where it is used. Also a form of markerting.
Beta测试人员可能是一组被选中的早期采用者客户,也可能是公开提供给所有对软件感兴趣的人使用。
Beta testers may be a selected group of customers who are early adopters of the system. Alternatively, the software may be made publicly available for use by anyone who is interested in it.
好处包括:
1.可用性反馈:让开发人员看到真实用户如何与软件互动,从而发现可能之前不太明显的可用性问题。
Usability Feedback: It allows the developers to see how real users interact with the software, which can highlight usability issues that may not have been apparent before.
2.性能问题:帮助识别性能瓶颈和应用程序可能不太适合的领域。
Performance Issues: It helps identify performance bottlenecks and areas where the application may not scale well
3.市场洞察:从Beta用户那里收集反馈有助于确保产品符合目标市场的期望。
Marketing Insight: Gathering feedback from beta users helps ensure the product meets the expectations of its target market.
8.4.2.3 Acceptance Testing(验收测试)
验收测试是软件开发生命周期中的关键阶段,其重点是评估系统是否满足业务或最终用户设定的约定要求和规格。
Acceptance testing is a critical phase in the software development lifecycle, focusing on evaluating whether the system meets the agreed-upon requirements and specifications set by the business or the end-users.
验收测试的目的在于验证软件系统是否满足所有业务和用户需求,检查是否符合相关法规、标准以及与利益相关者达成的其他标准,并确保系统能够投入运营并且令最终用户满意。
It verifies that the software system meets all business and user requirements, checks compliance with regulations, standards, and other criteria agreed upon with the stakeholders, and ensures that the system is capable and ready for operational use and is satisfactory to the end-users.
8.4.2.3.1 Acceptance Testing Process
下图展示了验收测试所包含的6个阶段:


1.Define Acceptance Criteria(定义验收准则):理想情况下,这应该在系统合同签订之前的早期阶段进行。然而,在实践中,详细的需求可能尚不可得,并且在开发过程中需求可能会发生重大变化。
Ideally, it should take place early in the process before the contract for the system is signed. In practice, detailed requirements may not be available and there may be significant requirements change during the development process.
2.Plan Acceptance Testing(计划验收测试):这涉及决定验收测试的资源、时间和预算,并制定测试计划。讨论内容包括:(1) 需求的测试覆盖范围;(2) 系统功能测试的顺序;以及 (3) 测试过程中的风险以及如何进行缓解。
It involves deciding on the resources, time, and budget for acceptance testing and establishing a testing schedule. Discussion about (1) the required coverage of the requirements; (2) the order in which system features are tested; and (3) risks to the testing process and how to mitigate them.
3.Derive Acceptance Tests(派生验收测试):一旦确定了验收标准,就需要设计测试来检查系统是否符合要求。验收测试应旨在测试系统的功能和非功能特性(例如性能)。
Once acceptance criteria have been established, tests have to be designed to check whether or not a system is acceptable. Acceptance tests should aim to test both the functional and non-functional characteristics(e.g., performance) of the system.
4.Run Acceptance Tests(运行验收测试):已经确定的验收测试在系统上执行。理想情况下,这应该在实际系统使用的环境中进行。然而在实际情况下,可能需要设置一个用户测试环境来运行这些测试。
The agreed acceptance tests are executed on the system. Ideally, take place in the actual environment where the system will be used. Practically, a user testing environment may have to be set up to run these tests.
5.Negotiate Test Results(协商测试结果):很少会出现所有定义的验收测试都能通过,系统没有任何问题的情况。开发人员和客户必须进行协商,决定系统是否已经足够好以投入使用。他们还必须就开发人员对已识别问题的响应达成一致意见。
It is very unlikely that all of the defined acceptance tests will pass and that there will be no problems with the system. The developer and the customer have to negotiate to decide if the system is good enough to be put into use. They must also agree on the developer’s response to identified problems.
6.Accept or Reject System(接受或拒绝系统):这一阶段涉及开发人员和客户之间的会议,决定系统是否应该被接受。如果系统不够好以投入使用,那么需要进行进一步的开发来解决已识别的问题。一旦完成,验收测试阶段将被重复执行。
This stage involves a meeting between the developers and the customer to decide on whether or not the system should be accepted. If
the system is not good enough for use, then further development is required to fix the identified problems. Once complete, the acceptance testing phase is repeated.
9. JUnit Testing
9.1 Unit Testing and JUnit
9.1.1 Review
前面介绍了Unit Testing(单元测试)和JUnit,单元测试测试单个软件单元,对象通常是一个对象类。单元测试专注于单元的功能,侧重于功能性、正确性、准确性。通常由该单元的开发人员执行。
一个自动化测试包括以下3个部分:
1.一个setup part(设置部分)。你会初始化系统以准备测试用例(例如,初始化待测试的对象)。
where you initialize the system with the test case (e.g., initialize the object under test)
2.一个call part(调用部分)。你会调用待测试的对象或方法。
where you call the object or method to be tested.
3.一个assertion part(断言部分)。你会比较调用的结果与预期结果。如果断言评估为真,则测试成功;如果为假,则测试失败。
where you compare the result of the call with the expected result. If the assertion evaluates to true, the test has been successful if false, then it has failed.
而JUnit正是一个用于自动化单元测试的框架。它的设计目的是在Java代码上编写和运行测试。确保单个测试用例在隔离环境中执行,促进更准确的结果。
JUnit的优势包括增强代码质量、基于Java、与诸如Eclipse等IDE和Maven、Gradle等构建工具无缝集成、免费使用等。
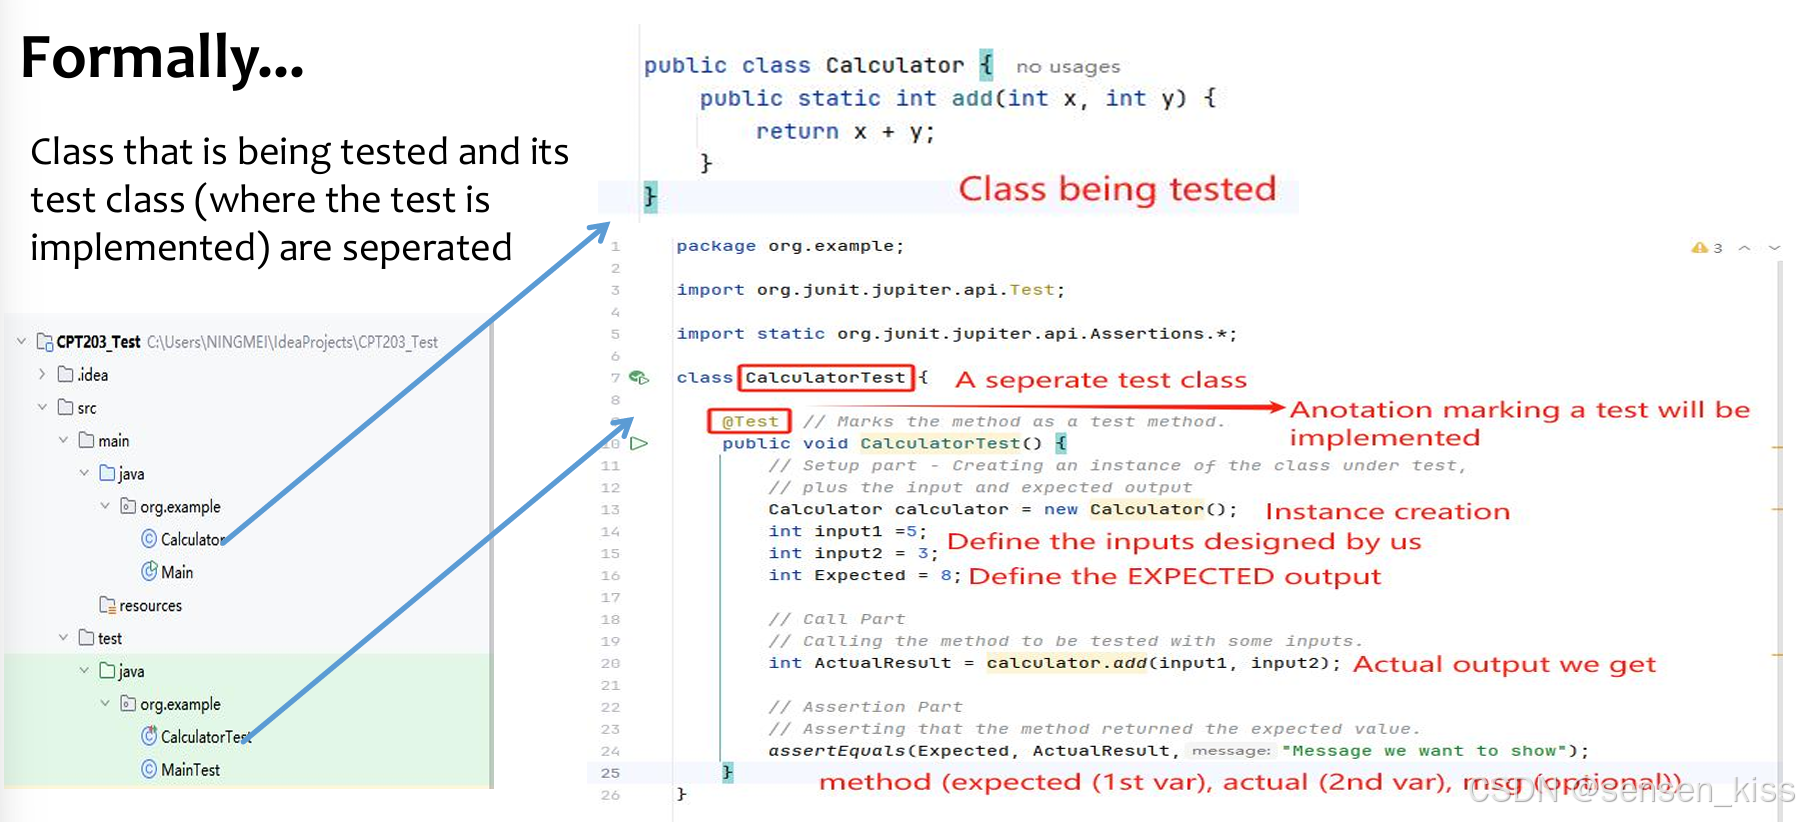
下图展示了一个正式的JUnit测试,被测试的类和测试类(测试实现的地方)是分开的。
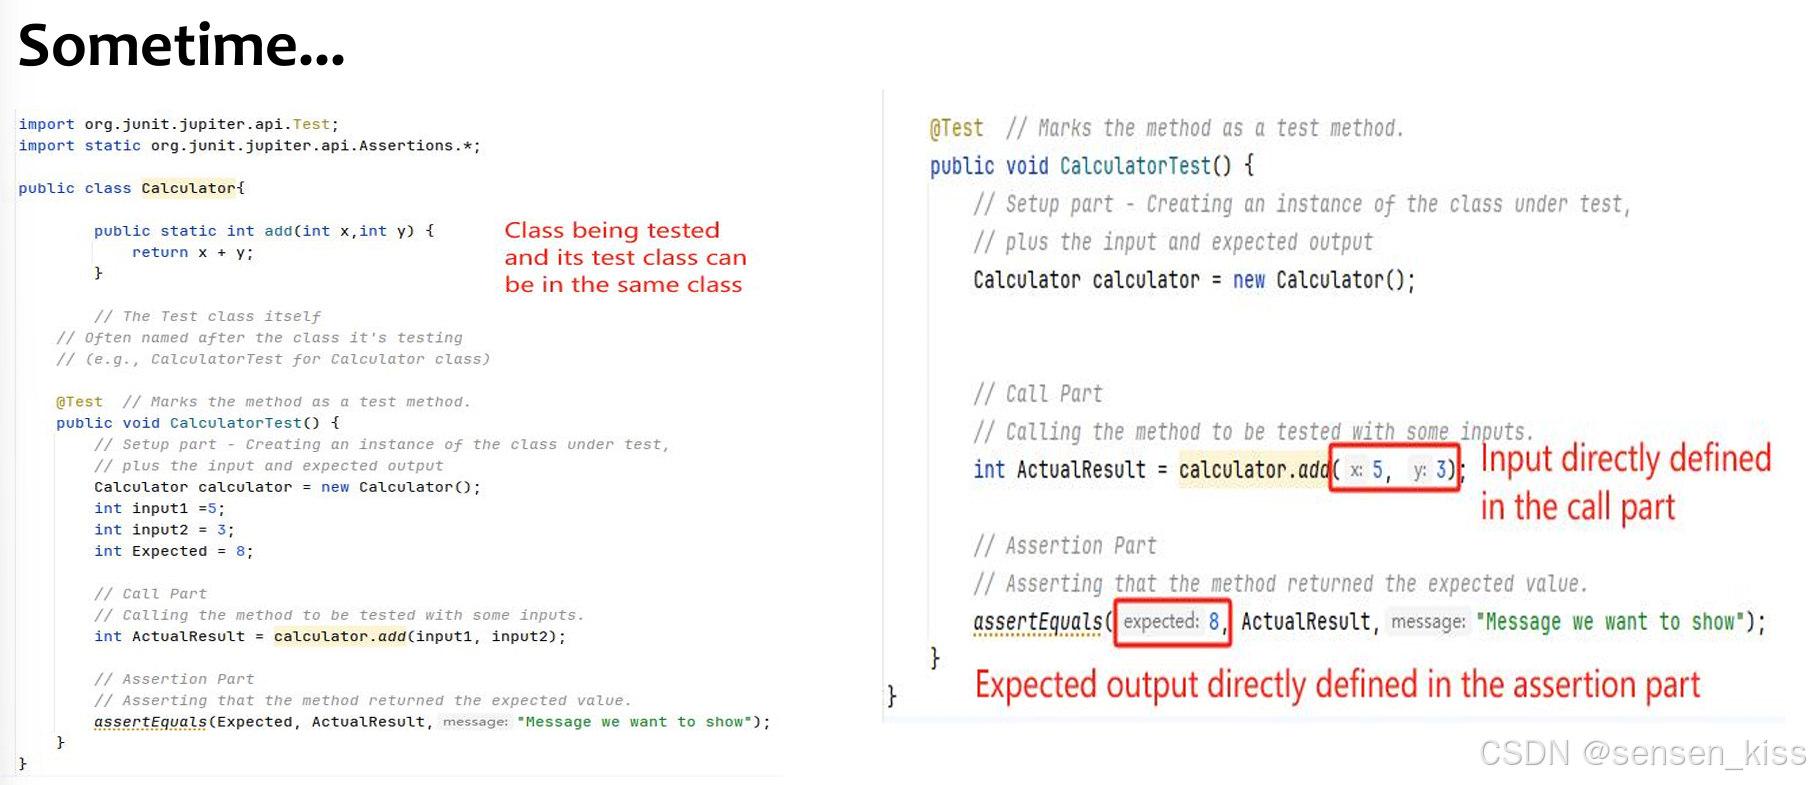
有时候JUnit测试,被测试的类和测试类是在一个类之下。
9.1.2 JUnit Test Verdicts
一个verdict(结论)是执行单个测试用例后得出的结果。
Verdict的类型有三种:
1.Pass(通过):测试用例执行完成,被测试的函数表现如预期。
The test case execution was completed.The function being tested performed as expected.
2.Fail(失败):测试用例执行完成,被测试的函数未如预期执行。
The test case execution was completed.The function being tested did not perform as expected.
3.Error(错误):测试用例未能完成执行,可能是由于意外事件、异常或测试用例设置不当等原因。
The test case execution was not completed, due to an unexpected event, exceptions, or improper set up of the test case, etc.
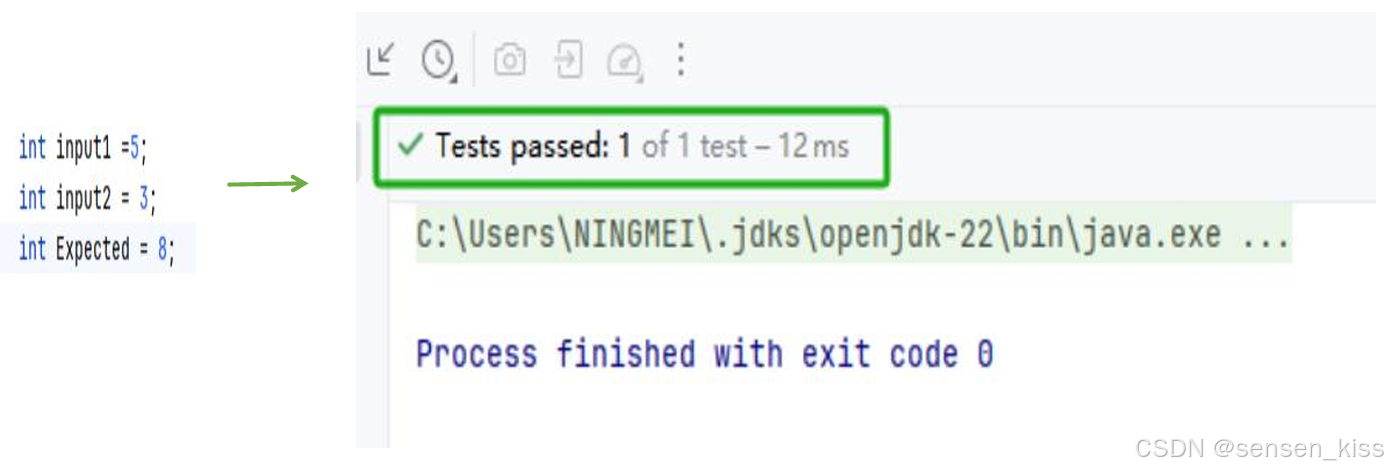
当测试正确运行,测试方法会显示结果为绿色,表示测试通过。
当测试失败,测试结果会显示结果为红色。
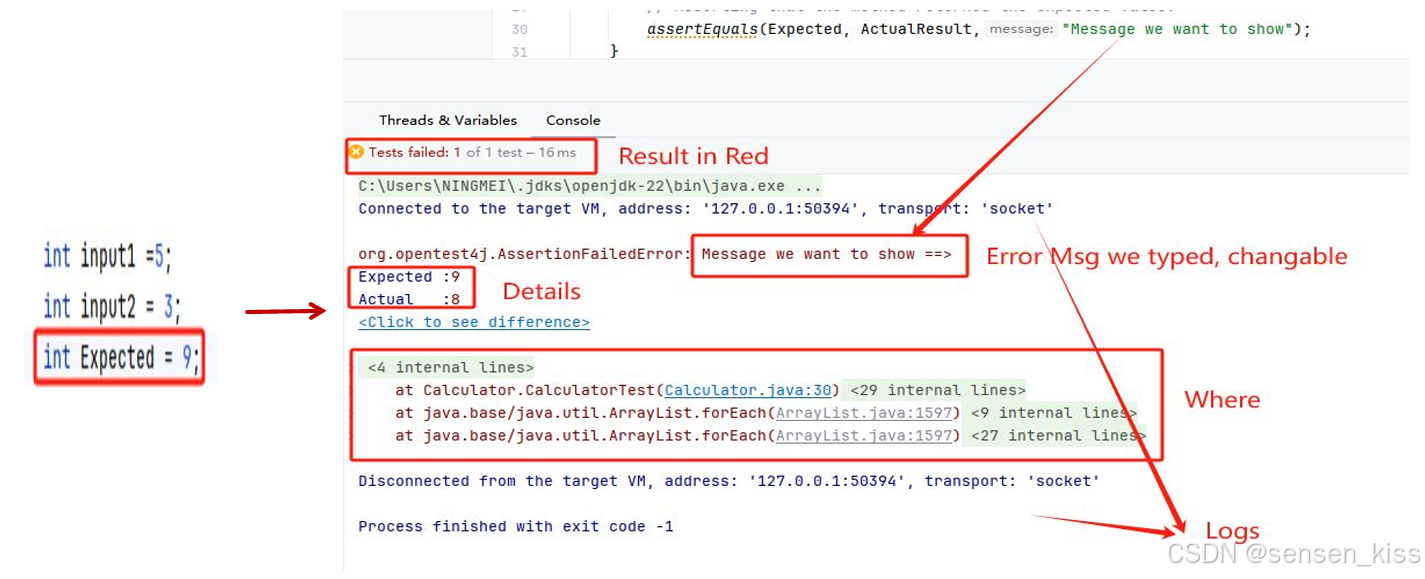
当测试过程中发生错误,通常会有错误信息指出问题所在。

9.1.3 JUnit Best Practices
编写良好的单元测试的几个最佳实践:
1.测试需要能够原子性地失败(能够准确知道哪里出了问题)。
每个测试应该有清晰、详细地名称。
断言应该始终具有清晰的消息,以便知道出了什么问题。
编写许多小的测试,而不是一个大的测试。
每个测试应该大致只有一个断言。
2.测试预期的错误/异常。
3.选择描述性的断言方法,而不总是使用assertTrue。
4.从等价输入类中选择代表性的测试用例。
5.如果可能的话,避免在测试方法中使用复杂逻辑。
9.1.4 Run JUnit in IntelliJ
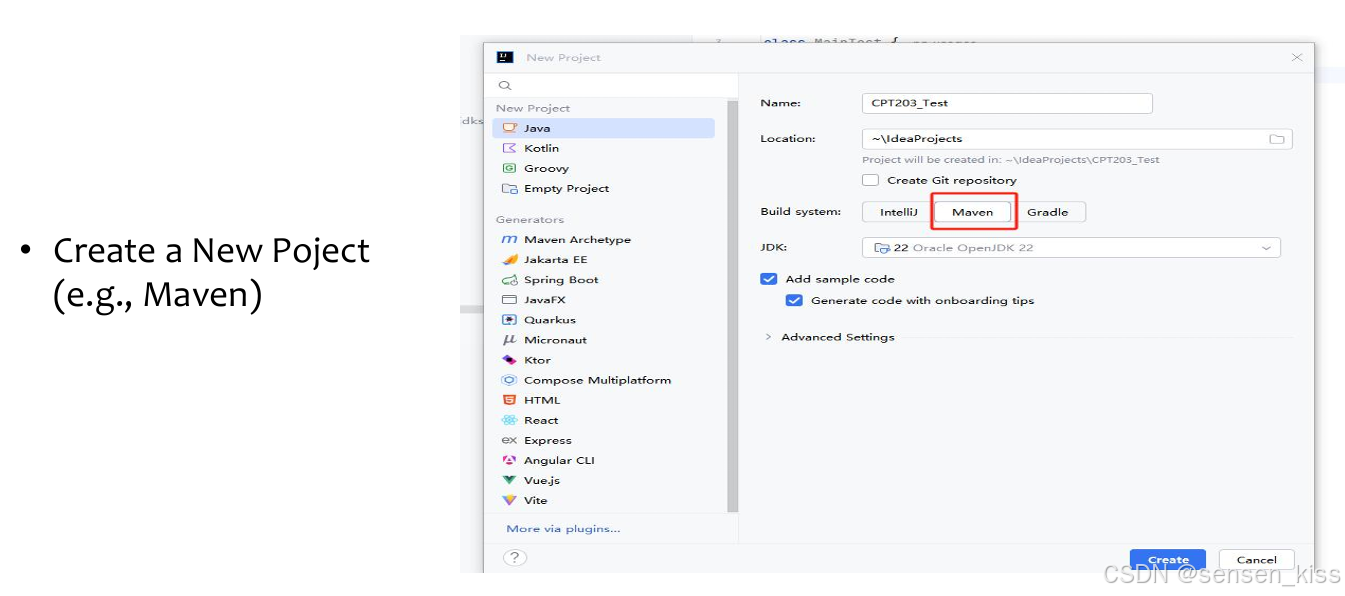
具体操作如下:创建一个新项目。
点击pom.xml以打开配置文件。
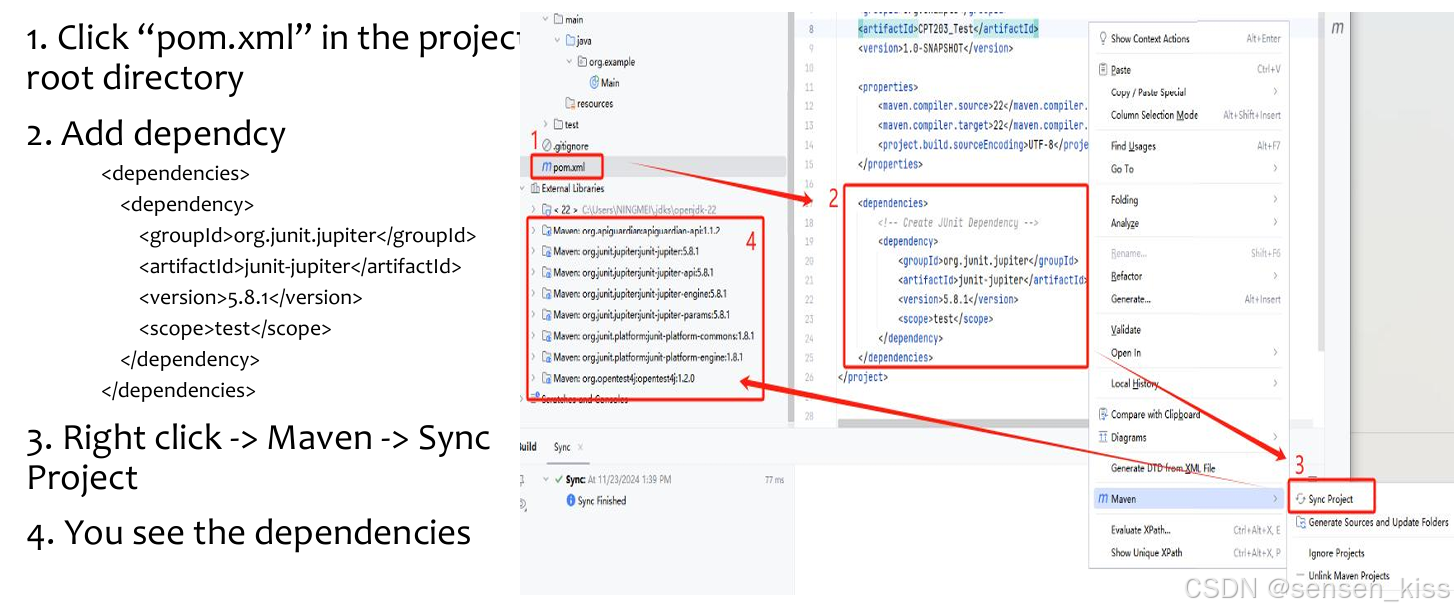
在<dependencies>标签内添加JUnit的依赖。
<dependency>
    <groupId>org.junit.jupiter</groupId>
    <artifactId>junit-jupiter</artifactId>
    <version>5.8.1</version>
    <scope>test</scope>
</dependency>
右击项目,选择“Maven” -> “Sync Project”以同步JUnit依赖到项目中。
在IntelliJ IDEA中,你可以通过右键点击包含你想要测试的类的Java文件,然后选择“Generate” -> “Test”来自动生成一个测试类。这将创建一个与被测试类同名的测试类,但位于test目录下。
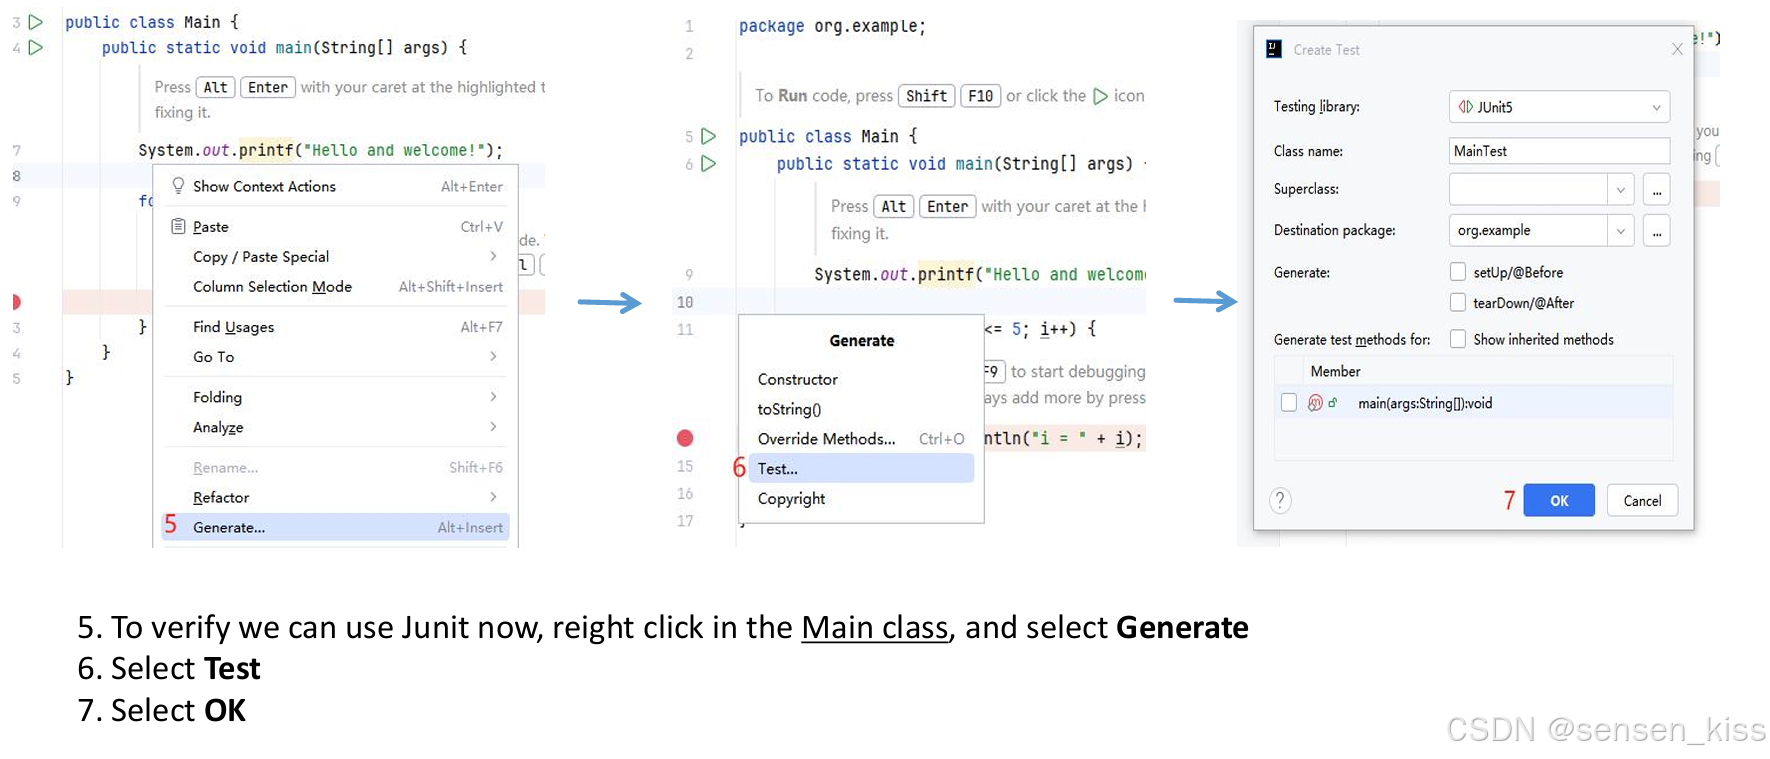
在弹出的对话框中,选择“Test”,这将为选中的类生成一个测试类。
点击“OK”确认生成测试类。
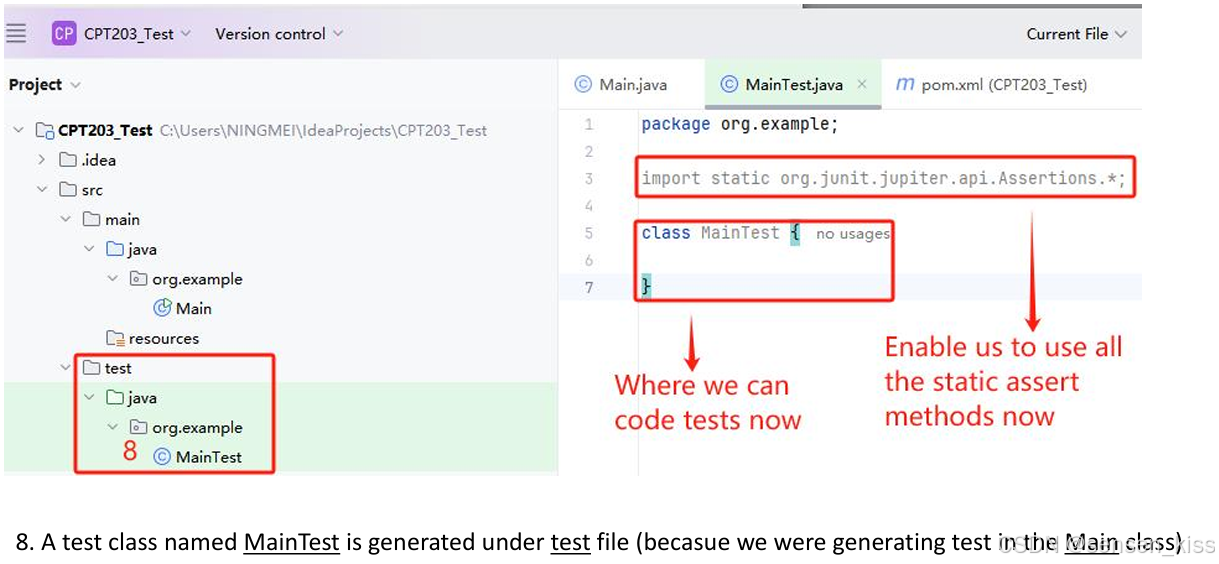
下图展示了一个更快地配置方法。
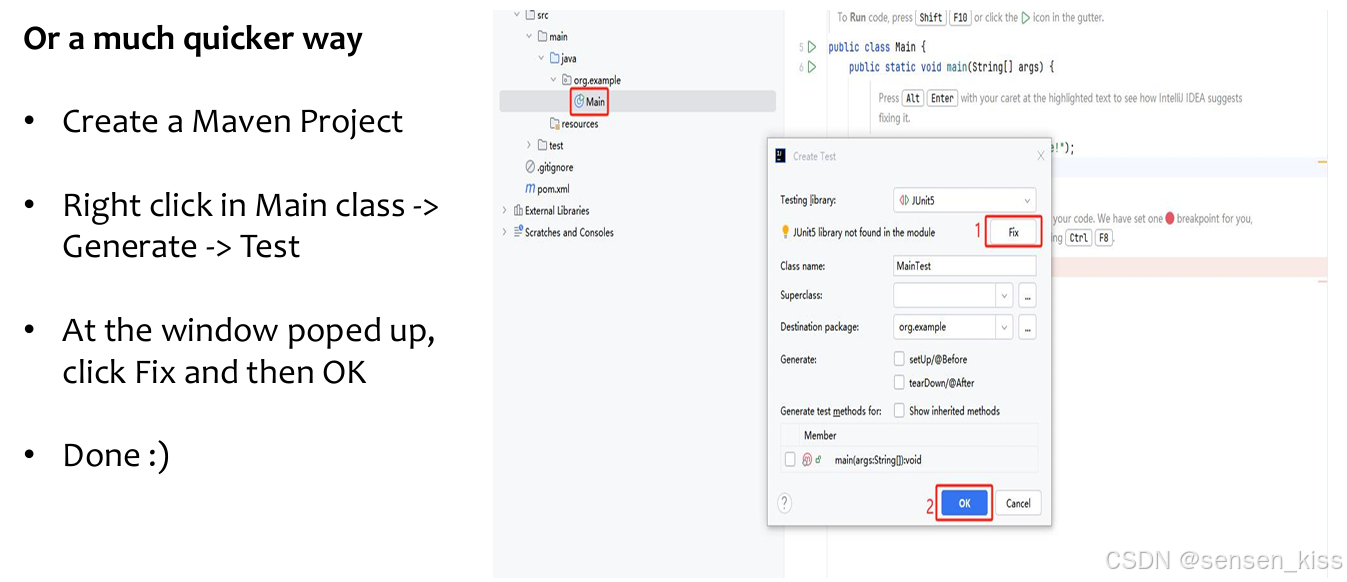
在创建号Maven项目后直接生成测试类。这时候对话框中会提示 “JUnit library not found in the module”(模块中未找到 JUnit 库),点击 “Fix” 来添加 JUnit 库到项目中。在对话框中设置好测试类的名称、父类和目标包后,点击 “OK” 来生成测试类。
9.2 Assertion Methods
9.2.1 AssertTrue/AssertFalse
assertTrue(condition)用于验证给定的条件是否为true。
assertFalse(condition)用于验证给定的条件是否为false。
它还可以用来显示错误信息,方法如下:
assertTrue(condition, message)用于验证给定的条件是否为true。如果条件为 true,则测试通过,不会执行任何额外的操作。如果条件为false,则测试失败,会显示message参数中指定的消息。
assertFalse(condition, message)用于验证给定的条件是否为false。如果条件为 false,则测试通过,不会执行任何额外的操作。如果条件为true,则测试失败,会显示message参数中指定的消息。
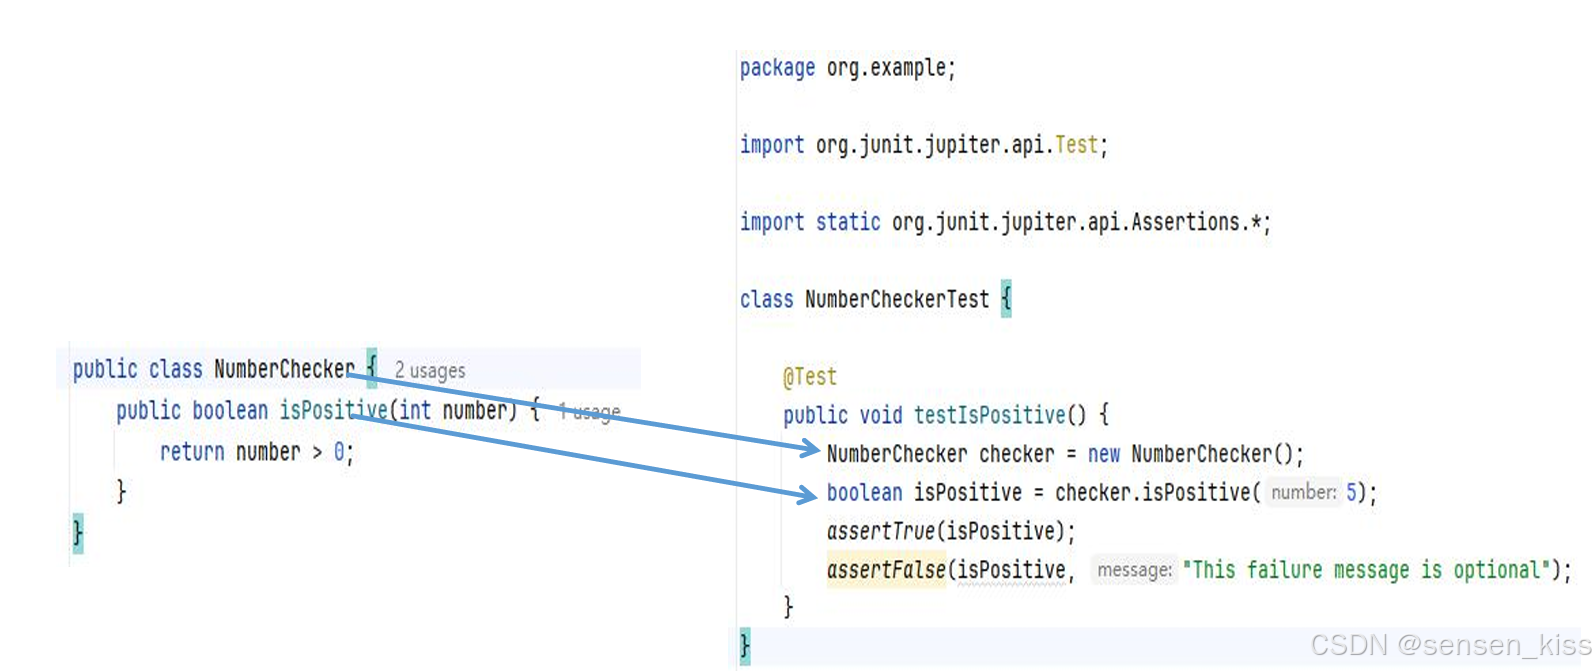
例子如下。
9.2.2 AssertSame/AssertNotSame
assertSame(expected, actual)用于检查两个对象引用是否相同,即它们是否指向内存中的同一个对象。
如果 expected 和 actual 指向同一个对象,则测试通过。
这与比较对象的值是否相等不同。即使两个对象的内容相同,如果它们是不同的实例,assertSame也会失败。
AssertNotSame(expected, actual)用于检查两个对象引用是否不相同,即它们是否指向内存中的不同对象。
如果 expected 和 actual 不指向同一个对象,则测试通过。
带有失败信息的是下面两个:
assertSame(expected, actual, message):如果expected和actual不是同一个对象,测试将失败,并显示指定的错误消息。
assertNotSame(expected, actual, message):如果expected和actual是同一个对象,测试将失败,并显示指定的错误消息。
示例如下:
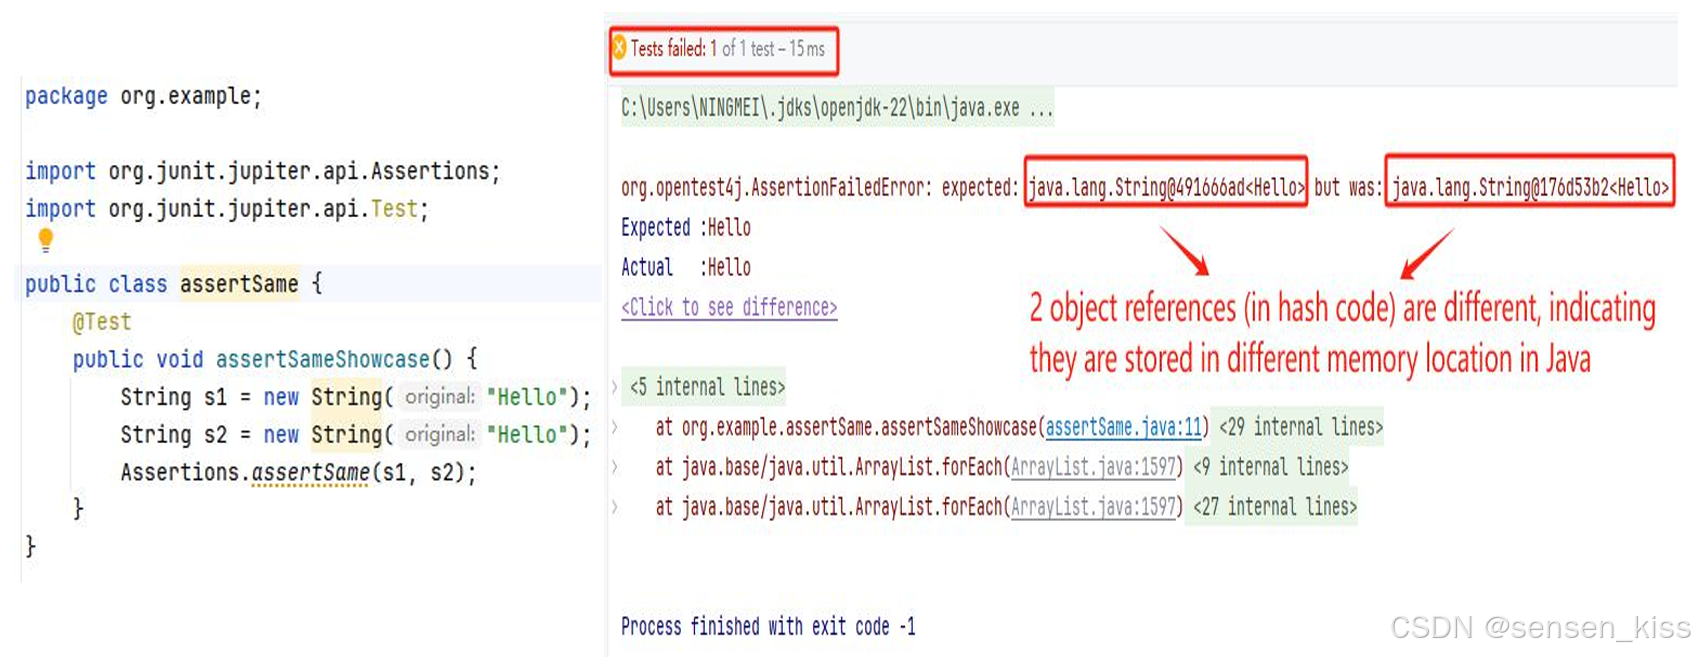
虽然s1和s2都是Hello,但是他们不是一个对象,因此assertSame(s1,s2)会失败。
9.2.3 AssertEquals/AssertNotEquals
assertEquals(expected, actual, (optional) message):用于检查两个对象的值是否相等,而不管这两个对象是否是同一个实例。如果 expected 和 actual 的内容或值相同,无论它们是否是同一个对象,测试都会通过。这适用于所有类型的值比较,不仅仅是基本数据类型(如 int),还包括其他类型的值(例如 String、float 等)。
下图给出了一个例子。
这里的测试结果就是通过。
9.2.4 AssertArrayEquals
assertArrayEquals(expected, actual, (optional) message):用于判断两个数组是否相等。它们的数组长度必须相等。这个方法会递归地检查每个有效索引i上的元素是否相等。
下图给出了一个例子。

由于两个数组的元素的顺序不同,所以这个测试会失败。
9.2.5 AssertThrows
assertThrows(expectedExceptionClass, executable)用于测试是否会抛出特定类型的异常。
expectedExceptionClass是你期望在测试代码块中抛出的异常类型。
executable是一个lambda表达式或方法引用,它包含了你想要测试的代码。
特别适用于负测试用例,即那些你期望代码在特定条件下失败的情况。
下图给出了一个例子。
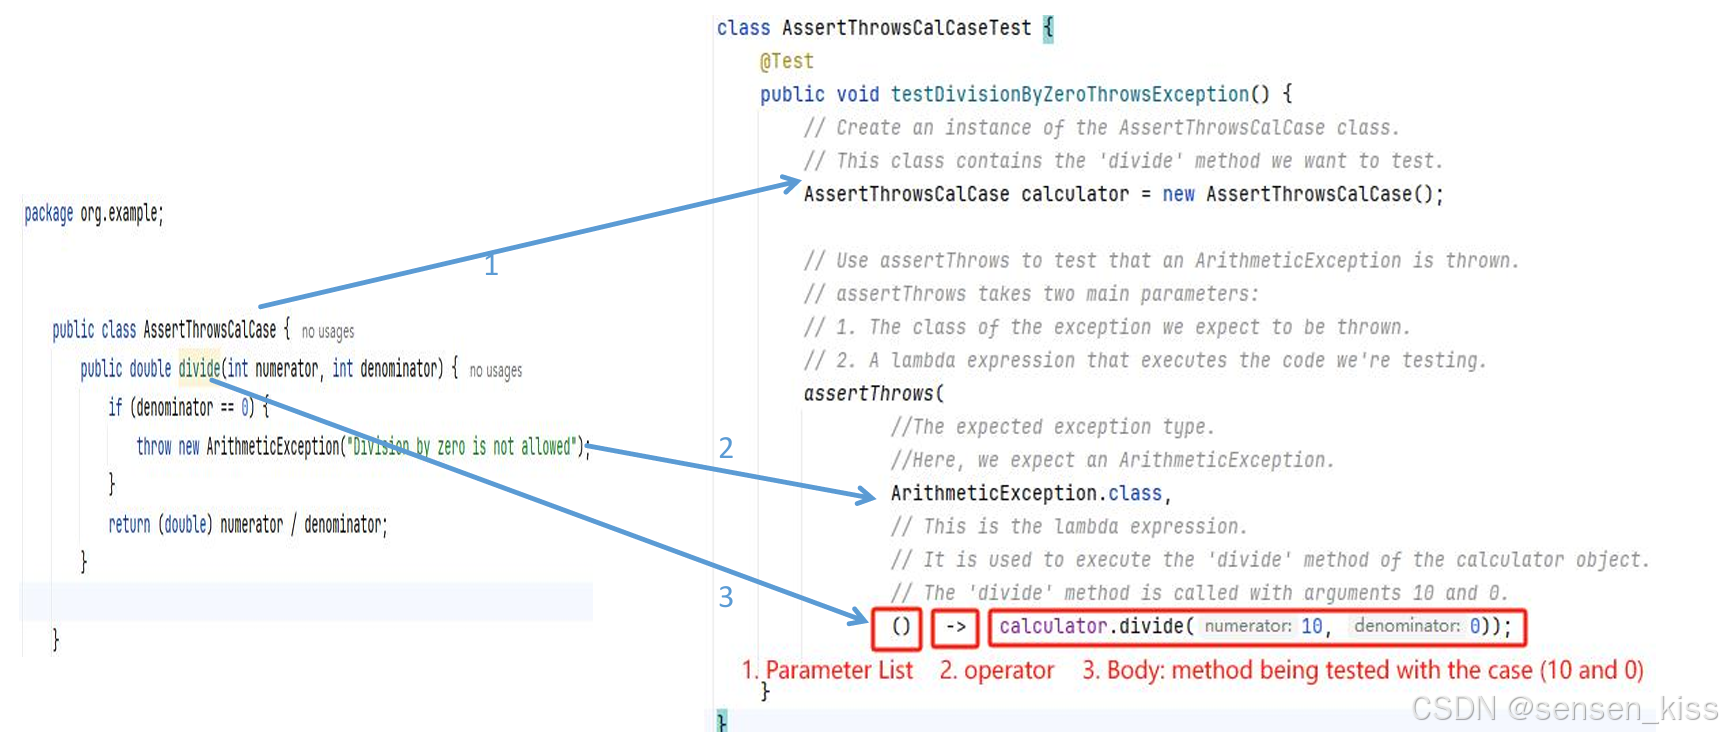
这里的测试结果就是通过。
使用Lambda表达式是正确的方式。
assertThrows(ArithmeticException.class, () -> calculator.divide(10, 0));
这种方法会延迟divide方法的执行,直到assertThrows能够捕获异常。
而不适用Lambda表达式可能会存在问题。
assertThrows(ArithmeticException.class, calculator.divide(10, 0));
在这种情况下,divide方法会立即执行。如果它抛出一个异常,这个异常会在assertThrows有机会捕获之前发生,导致测试错误。
9.3 JUnit Test Cycle and Annotation
9.3.1 Life Cycle(生命周期)
JUnit中,一个测试类通常包含多个测试方法,而JUnit会管理每个测试方法的执行,形成一个生命周期。
Normally, a test class contains multiple test methods. JUnit manages the execution of each test method in form of a lifecycle.
这个生命周期可以分为三个阶段,使用注解来实现:
The complete lifecycle of a test case can be seen in three phases with the help of annotations:
Setup(设置)阶段:在这个阶段,测试基础设施被放置好。JUnit提供了类级别的设置(@BeforeAll)和方法级别的设置(@BeforeEach)。通常情况下,类级别的设置会创建重量级的对象,比如数据库连接,而方法级别的设置会重置轻量级的对象,比如测试对象。
This phase puts the test infrastructure in place. JUnit provides class level setup (@BeforeAll) and method level setup (@BeforeEach). Generally, heavy objects like databse comnections are created in class level setup while lightweight objects like test objects are reset in the method level setup.
Execution(执行)阶段:在这个阶段,进行测试的执行和断言。执行的结果将表示成功或失败。
In this phase, the test execution and assertion happen. The execution result will signify a success or failure.
Teardown(拆除)阶段:这个阶段用于清理第一个阶段中设置的测试基础设施。和设置一样,清理也可以在类级别(@AfterAll)和方法级别(@AfterEach)进行。
This phase is used to cleanup the test infrastructure setup in the first phase. Just like setup, teardown also happen at class level (@AfterAll) and method level (@AfterEach).
在测试生命周期中,我们主要需要一些带注释的方法来设置和清理测试运行的测试环境或测试数据。
在JUnit中,默认情况下,对于每个测试方法,都会创建一个新的测试实例。
In the test life cycle, we will primarily need to have some annotated methods to setup and cleanup the test environment or test data on which the tests run.
In JUnit, by default, for each test method – a new instance of test is created.
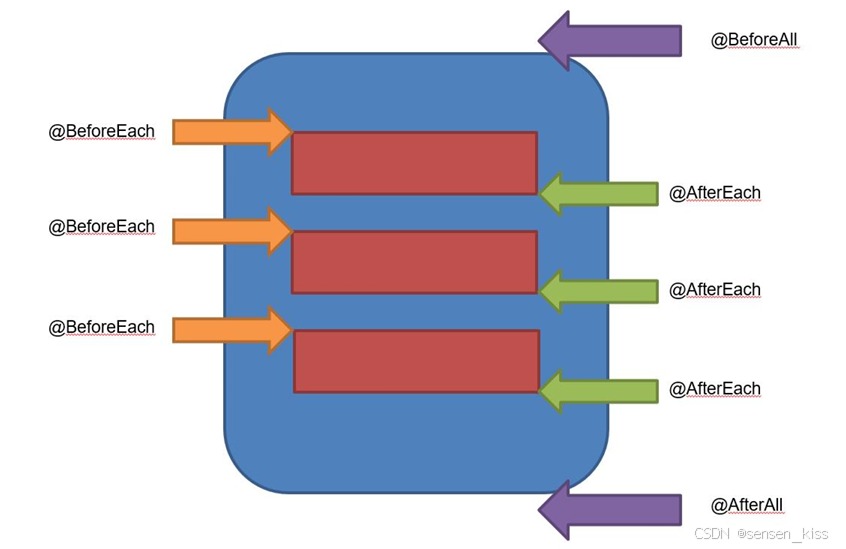
1.@BeforeAll 和 @AfterAll 注解:根据它们的名称可以清楚地理解,它们在整个测试执行周期中只会被调用一次。因此,它们必须声明为静态方法。
@BeforeAll and @AfterAll annotations – clear by their name – should be called only once in the entire tests execution cycle. So they must be declared static.
2.@BeforeEach 和 @AfterEach 注解:这两个注解会为每个测试实例调用。因此,它们不应该被声明为静态方法。
@BeforeEach and @AfterEach are invoked for each instance of test so they should not be static.
@BeforeAll、@BeforeEach、@AfterAll、@AfterEach的使用模型如图所示。
下图展示了一个具体例子。
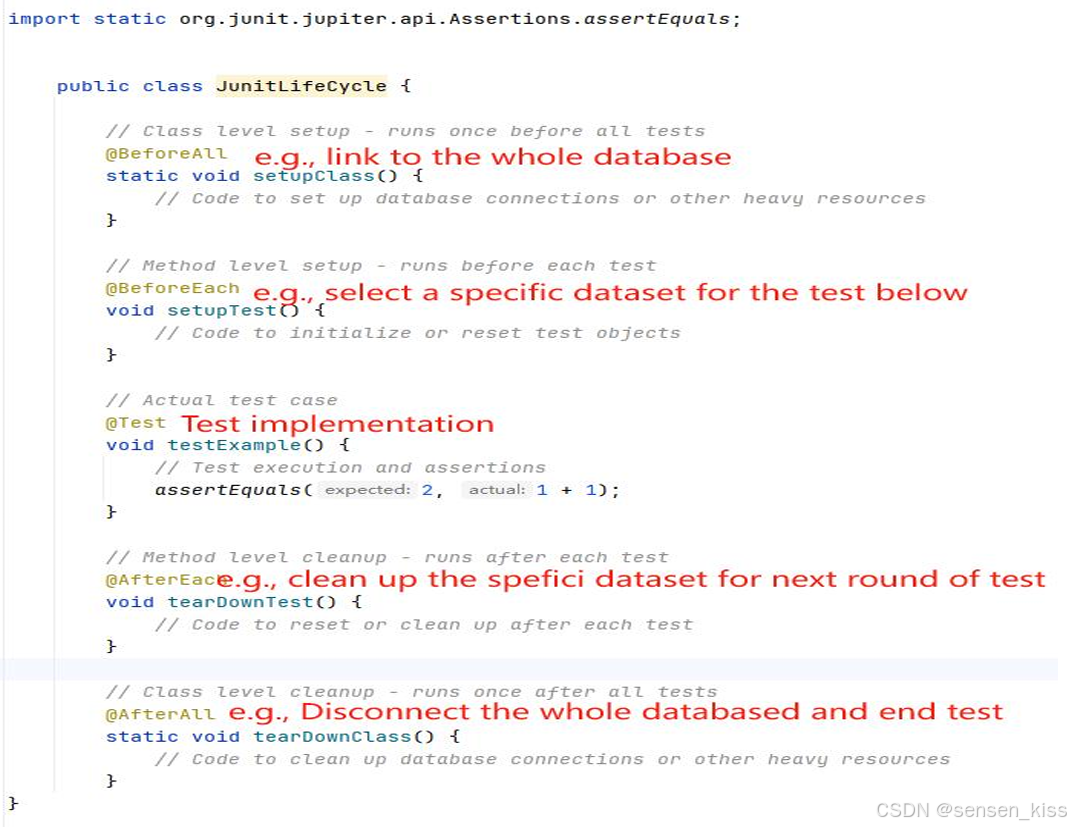
@BeforeAll是一个类级别的设置方法,它在所有测试方法执行之前只运行一次,所以后面跟的是setUpClass()是static的。
@BeforeEach是一个方法级别的设置方法,它在每个测试方法执行之前运行。
@Test是实际的测试用例。
@AfterEach是一个方法级别的清理方法,它在每个测试方法执行之后运行。
@AfterAll是一个类级别的清理方法,它在所有测试方法执行之后只运行一次,所以后面跟的tearDownClass()也是static的。
9.3.2 Annotations(注释)
下图展示了JUnit常见的annotations(注释)。
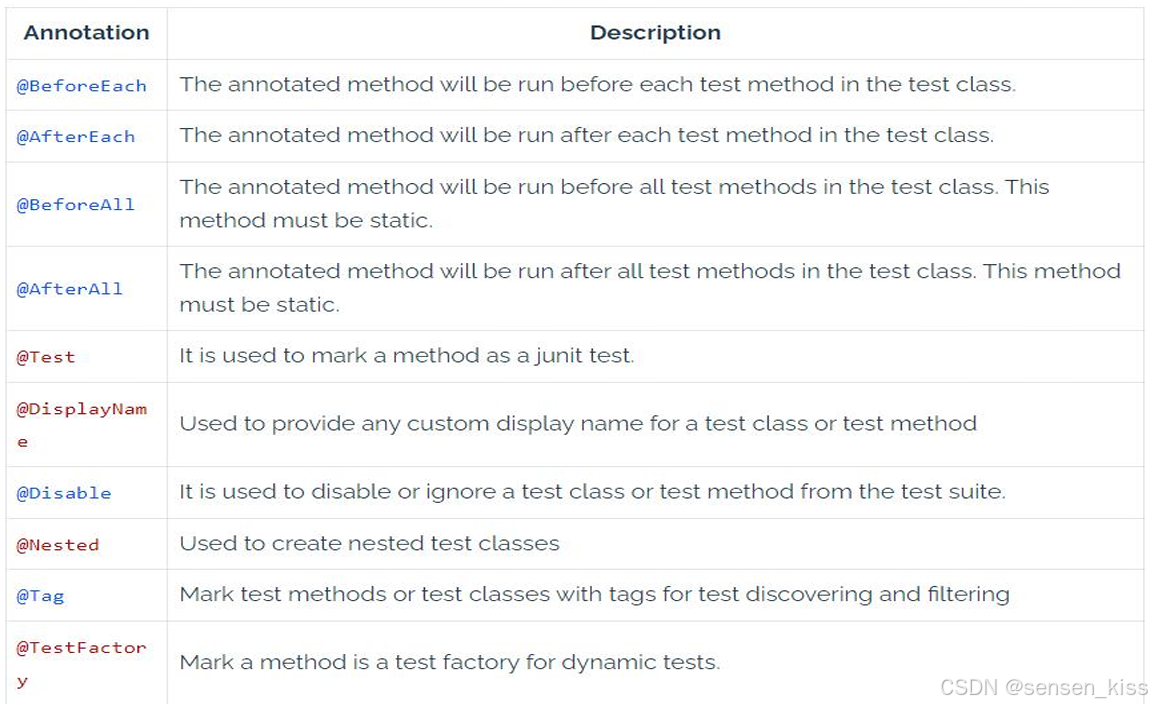
@DisplayName:为测试方法提供自定义名称。
@Disabled:禁用某个测试方法或测试类。
@Tag:为测试方法或测试类添加标签,用于筛选测试。
@TestFactory:用于动态创建测试实例的测试工厂方法。
9.3.2.1 @DisplayName
@DisplayName:为测试方法提供自定义名称。
如图所示。

9.3.2.2 @Timeout
@Timeout用于简单性能测试,如网络通信或复杂计算。
它允许你为测试方法设置一个超时时间限制。如果测试方法在指定时间内未完成,测试将失败。
默认时间单位是秒 (@Timeout (1)),但可以通过参数配置为毫秒(MILLISECONDS)或其他时间单位。
如图所示。

test1 方法被标记为重复执行3次,并且有一个超时限制为1毫秒。
最后测试显示失败,失败的原因是test1方法在1毫秒内没有完成,它使用了16毫秒完成。
9.3.2.3 @RepeatedTest
@RepeatedTest用于标记一个测试方法,该方法应该重复执行指定的次数。
在前面的示例中,测试方法使用了@RepeatedTest(3),这意味着测试将执行3次。
如果使用@RepeatedTest,则不需要@Test,因为@RepeatedTest本身就表明这是一个测试方法。
如图所示。

如果重复使用测试方法会如下图所示。
