1.简介
随着人工智能技术的飞速发展,文本到语音(TTS)合成技术已经从简单的机械式朗读进化到了能够生成几乎与人类无法区分的自然语音的高级阶段。在这一领域中,CosyVoice 2模型以其卓越的生成效果和质量,成为了一个引人注目的里程碑。CosyVoice 2是由阿里巴巴集团开发的先进流式语音合成模型,它不仅继承了前代模型的优秀基因,更通过一系列创新性的技术优化,实现了在保持极低延迟的同时,生成质量几乎与人类发音无异的语音。
CosyVoice 2模型的核心优势在于其能够提供接近人类发音自然度的合成语音。它通过采用最新的大型语言模型(LLMs)和流式处理技术,显著提升了语音合成的实时性和互动性。在实际应用中,这意味着用户可以体验到几乎无延迟的语音反馈,无论是在虚拟助手、在线客服还是语音聊天应用中,都能享受到流畅且自然的交流体验。
在质量方面,CosyVoice 2通过有限标量量化(FSQ)技术和预训练的大型语言模型作为骨干网络,极大地提高了语音编码的效率和准确性。这使得模型能够精确捕捉和再现语音信号的细节,从而生成清晰、自然且富有表现力的语音。此外,CosyVoice 2还支持多语言和多说话人,使其能够跨越语言障碍,为全球用户提供定制化的语音合成服务。
总的来说,CosyVoice 2模型以其高质量的语音合成效果和卓越的性能,不仅推动了TTS技术的发展,也为未来的人机交互提供了新的可能性。在这篇博客中,我们将深入探讨CosyVoice 2的技术细节,并评估其在实际应用中的表现,以展现这一模型如何引领语音合成技术的潮流。

目录
Supervised Semantic Speech Tokenizer
-
项目主页:CosyVoice2.0
github地址:https://github.com/FunAudioLLM/CosyVoice
权重地址(hugging face):https://huggingface.co/FunAudioLLM/CosyVoice2-0.5B
权重地址(魔搭):魔搭社区
在线使用:魔搭社区
-
-
2.实测
CSDN无法上传音频,读者可点击链接查看官方示例
除此之外,还可以在线使用:魔搭社区
-
-
3.论文解读
简介与摘要
近年来,文本到语音(TTS)合成模型已经获得了显着的关注,这些模型在预定义的特定声线上实现了高保真度和自然度。最近的研究表明,以zero-shot为特色的TTS模型能够通过模仿参考语音的音色、韵律和风格来合成任何说话者的语音。
目前的zero-shot TTS模型大致可以分为三类:编解码器语言模型,特征扩散模型和它们的混合系统。
- 编解码器语言模型:利用语音编解码器模型来提取离散语音表示,并采用自回归或掩码语言模型来预测语音令牌,然后通过编解码器声码器将其合成为波形。
- 扩散模型:早期基于扩散的TTS模型需要对每个文本(语音)进行持续时间预测,以解决文本和语音特征之间的长度差异。然而,这种僵硬的对齐会影响自然度,从而导致单调的韵律。为了缓解这个问题,交叉注意和DiT已被引入NAR TTS模型。最近的研究表明,NAR TTS模型中的文本语音对齐方法更简单实用。
- 混合系统:结合了语言模型和扩散模型。语言模型解决了文本和语音之间的对齐以及话-语持续时间预测,而编解码器到特征扩散模型基于生成的编解码器和其他条件合成语音特征(Mel谱)。通过利用两种生成模型的优势,混合系统实现了高多样性、韵律一致性和语音质量。
-
在CosyVoice成功的基础上,作者引入了CosyVoice 2,这是一种流模式zero-shot TTS模型,具有更好的韵律自然度,内容一致性和说话人相似性。
作者的贡献包括:
- 将流模式合成和非流模式合成统一在一个框架中,提出了统一的文本-语音语言模型和块感知的因果流匹配模型(chunk-aware causal flow matching model),实现了与离线模式相比的无损流模式合成。
- 通过删除文本编码器和语音嵌入来简化LM架构,允许预先训练的文本大语言模型(LLM)作为骨干,增强上下文理解。
- 用有限标量量化(FSQ)代替语音标记器中的矢量量化(VQ),提高了码本利用率,捕获了更多的语音信息。
- 支持更多指令,包括情感、口音、角色风格和细粒度控制。在CosyVoice 2中,指令和zero-shot能力被集成到一个模型中,从而实现更灵活和生动的合成。
-
模型结构
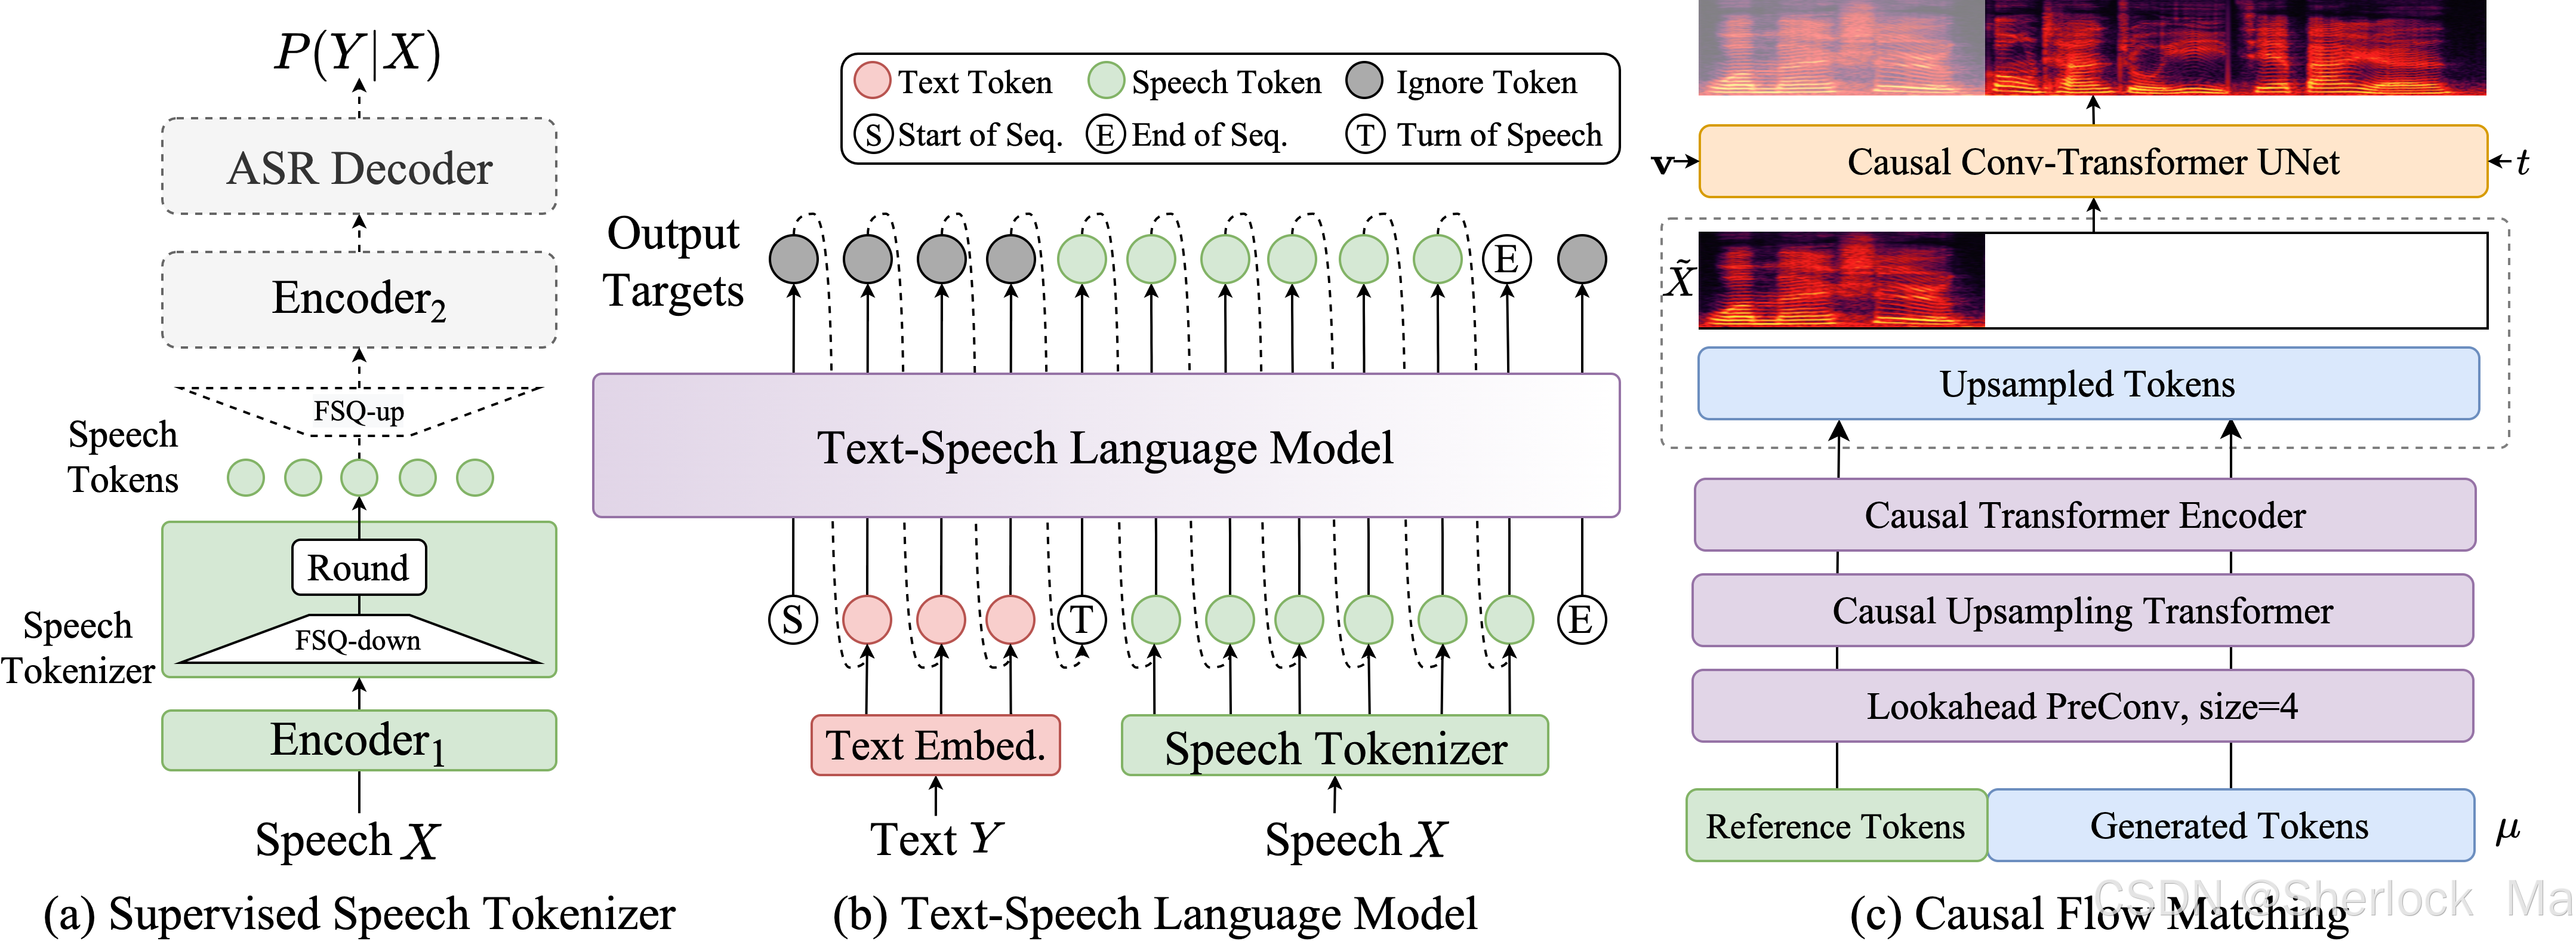
CosyVoice 2与其前身CosyVoice类似,分离语音信号的语义和声学信息并独立建模。语音生成过程被重新定义为一个渐进的语义解码过程,条件信息是逐步纳入的。具体而言:
- 文本-语音语言模型(LM)只关注语义信息,将高级文本令牌解码为有监督的语义语音令牌。
- 在流匹配模型中,通过Speaker Embedding和参考语音音频引入声学细节,例如音色,然后将语音令牌转换为给定Speaker的Mel频谱。
- 最后,预先训练的声码器模型恢复相位,将Mel频谱转换回原始音频信号。
“Speaker”(发音者或说话人)指的是发出语音的个体。每个Speaker的语音都有独特的特征,包括但不限于音调、音色(Timbre)、语调(Intonation)、节奏(Rhythm)和发音方式(Articulation)。这些特征共同构成了个体的语音指纹。
Speaker指的是语音合成系统试图模仿或生成的特定语音的目标。
-
Text Tokenizer
CosyVoice 2直接使用原始文本作为输入,使用基于BPE的文本tokenizer进行分词。这消除了以前模型对前端模型的依赖,它们通过字素到音素(grapheme-to-phoneme,g2p)转换获得音素。
注:BPE(Byte Pair Encoding)是一种用于文本分词(tokenization)的算法,它在自然语言处理(NLP)任务中非常流行,尤其是在处理那些没有明显单词边界的语言(如中文、日文)时。BPE的基本思想是通过迭代地合并最频繁出现的字节对(在文本中连续出现的字节序列)来构建词汇表,从而对文本进行编码。
这种方法不仅简化了数据预处理工作流程,而且使模型能够以端到端的方式学习发音。与文本LLM中常用的tokenizer不同,CosyVoice 2删除了了一对多tokens。这使得令牌的发音不会变得过长,并减少了由数据稀疏引起的边缘效应。具体地说,如果一个BPE令牌编码了多个汉字,它将被屏蔽,并且每个字符将在令牌化过程中单独编码。其他语言,如英语,日语和韩语,不受特殊处理。
注:如果一个BPE(Byte Pair Encoding)分词单元编码了多个字符(例如中文字符),那么这个分词单元会被遮蔽(mask out),即不会被直接使用。相反,每个字符会被单独编码。这样做的目的是为了防止一个分词单元对应过长的发音,减少因数据稀疏性引起的边缘情况。简而言之,就是为了保证模型能够更准确地学习和预测每个字符的发音,而不是将多个字符作为一个整体来处理。这种处理方式有助于提高模型对不同上下文中单词发音的学习效果,并简化数据预处理工作流程。
-
Supervised Semantic Speech Tokenizer
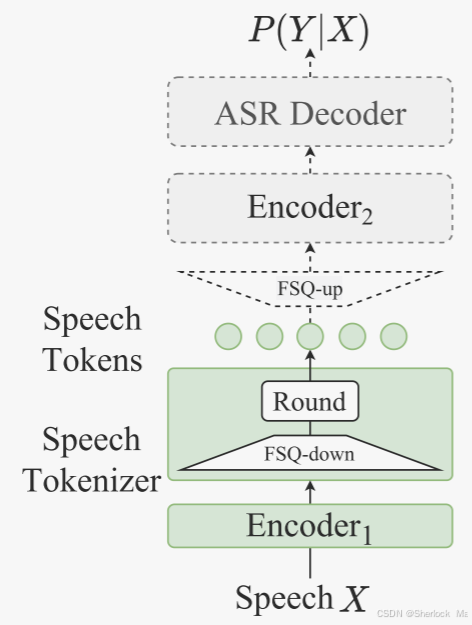
如图(a)所示,作者将有限标量量化(finite scalar quantization,FSQ)模块插入到SenseVoice-Large ASR模型的编码器中。
在训练阶段,输入语音X经过Encoder1以获得中间表示H,其中Encoder1由具有旋转位置编码的六个Transformer块组成。然后,中间表示被送入FSQ模块进行量化,量化后的表示通过其余的SenseVoice-Large模块(包括Encoder 2和ASR Decoder),以预测相应文本令牌的后验概率。
在FSQ模块中,中间表示H首先被投影到D维低秩空间中,并且使用有界舍入操作ROUND将每个值量化为[-K,K]。然后,量化的低秩表示H '被投影回原始维度H'中:


另外在训练阶段,使用直通估计(straight-through estimation)来近似FSQ模块和Encoder1的梯度。
ROUND函数通常指的是将一个数值舍入到最近的整数(如数学上常见的四舍五入)。在数学和计算机科学中,ROUND操作将一个实数映射到最近的整数。如果实数正好位于两个整数的中间,那么通常会根据某种规则(如四舍五入到最近的偶数)来决定是向上还是向下取整。
在推理时,可以通过计算公式来获得最终语音令牌 :
:
 表示第i个语音token的第j个维度的量化值。这些值在FSQ模块中被量化到[-K, K]的范围内。
- μi 是通过将量化后的低秩表示
 的每个维度的值乘以
,然后求和得到的。这个计算过程实际上是在将量化后的低秩表示转换回原始的高维空间中的一个特定的token。
这个公式的作用是将量化后的低秩表示重新映射到一个更大的空间中,以从量化后的低秩表示中得到最终的语音token。
Encoder1、FSQ模块的低秩投影器、有界Round运算和索引计算组成了CosyVoice 2的语音tokenizer。作者的语音tokenier以25 Hz的标记速率工作,即,每秒25个语音token。
-
统一的文本-音频语言模型
在CosyVoice 2中,作者使用预训练的文本LLM Qwen2.5-0.5B 用作文本-语音语言模型,以输入文本作为提示自回归生成语音令牌。与其他LM类似,文本-语音LM也在next-token预测方案中训练,如图所示。
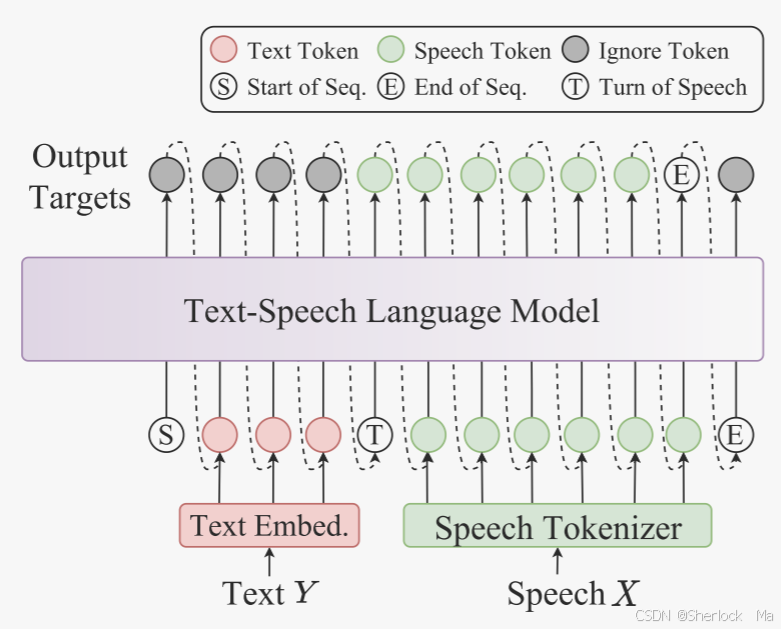
与以往的CosyVoice不同的是,作者去除了Speaker Embedding,以避免信息泄露。更重要的是,作者发现Speaker Embedding还包含语言和非语言信息,这损害了文本-语音LM的韵律自然度和跨语言能力。此外,作者还放弃了以前的CosyVoice的文本编码器,因为Qwen2.5-0.5B模型足够强大,可以对齐文本和语音标记,不再需要文本编码器。
得益于文本-语音LM的简单性,作者可以为流和非流合成建立一个统一的模型。这里,“流模式”意味着输入文本是以连续流的方式接收的,而不是预先被称为完整的句子。
“Streaming mode”(流式模式)是指一种语音合成模式,它允许模型在接收到输入文本的连续流时即时生成语音,而不是等待整个文本输入完成才开始。这种模式对于实时应用(如语音聊天应用)非常重要,因为它可以显著减少响应延迟,提升用户体验。
在流式模式下,CosyVoice 2模型能够处理部分可见的输入文本,并实时生成对应的语音输出。这意味着模型可以在不等待整个句子完全输入的情况下开始语音合成过程,从而实现更快的语音输出。这种能力对于需要快速响应的应用场景特别有用,例如在线客服、虚拟助手或者实时翻译服务。
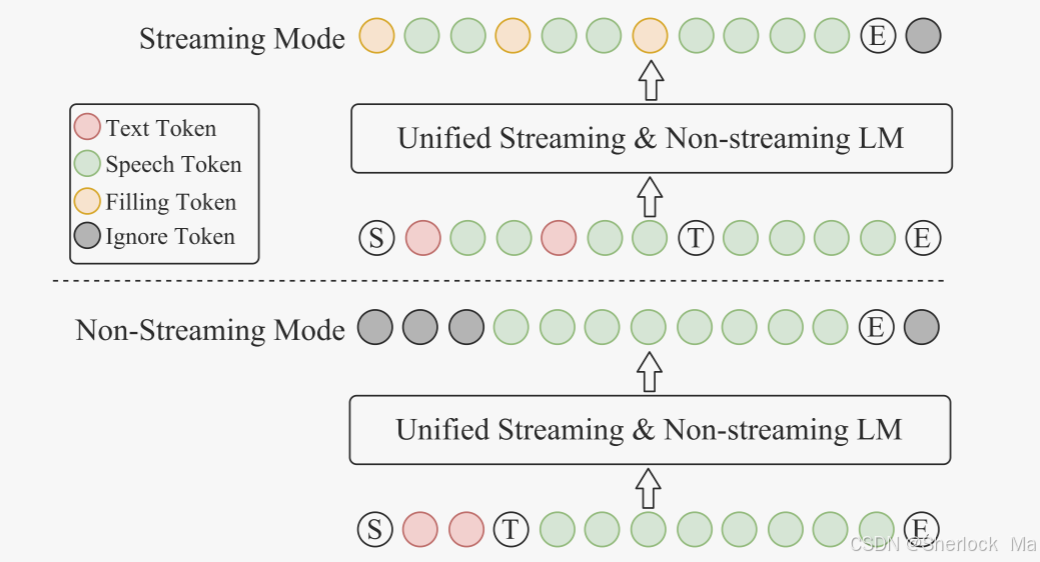
在CosyVoice 2中,流媒体和非流媒体模式的区别只是LM的序列构造方式:
- 对于非流模式,如图的底部所示,“序列开始”S、所有文本标记、“语音转折”标记T、所有语音标记和“序列结束”E全部被顺序地连接。Ignore token意味着忽略它们的损失,同时最小化交叉熵目标函数。
- 对于流模式,作者以预定义的N:M的比例混合文本和语音令牌,即每N个文本令牌后面跟着M个语音令牌,如图顶部所示。如果下一个标记是文本标记,则期望模型预测填充标记(而不是文本标记)。一旦文本令牌用完,“语音回合”令牌T和剩余的语音令牌就被顺序地连接,从而形成流模式中的混合文本-语音令牌序列。
通过同时在上述两个序列上训练文本语音LM,作者可以在单个统一模型内执行流式和非流式语音生成。
在现实生活中的场景中,如说话人微调(SFT)和上下文学习(ICL),推理序列的不同如下:
- ICL,非流式:
- 在ICL中,LM需要来自参考音频的提示文本和语音标记来模仿口音,韵律,情感和风格。
- 在非流模式中,提示词和要合成的文本标记被连接为整体实体,并且提示语音标记被视为预生成的结果并且被固定:“S,提示词,文本,T,参考语音”。
- LM的自回归生成从这样的序列开始,直到检测到“序列结束”令牌E。
- ICL,流式:
- 在这种情况下,假设要生成的文本是已知的,并且应当以流的方式生成语音令牌。类似地,将提示文本和要合成的文本标记视为一个整体。
- 然后,作者将其与提示语音标记按N:M的比例混合:“S,混合文本语音,T,剩余语音”。
- 如果文本长度大于语音标记长度,LM将生成“填充标记”。在这种情况下,作者手动填充N个文本标记。如果文本标记用完,则将添加语音转折标记T。在流模式中,每M个令牌返回一次生成结果,直到检测到E。
- SFT,非流式:
- 在SFT场景中,LM不再需要提示文本和语音。
- 因此,初始序列非常简单:“S,文本,T”。
- 由此开始,文本-语音LM可以自回归地生成语音令牌,直到T。
- SFT,流式:
- 在SFT的流模式下,作者从以下顺序开始语音生成:“S,前N个文本”。然后,LM将生成M个语音标记,手动填充接下来的N个文本标记。
- 作者重复上述过程,直到所有的文本标记用完,然后添加T。
- 请注意,语音到语音多模态大型语言模型也可以采用这种模式,以获得极低的延迟。
-
Chunk-aware Flow Matching
在CosyVoice 2中,作者采用Mel谱图作为声学特征,帧率为50Hz,采样率为24000。由于语音特征与Mel特征之间存在帧率不匹配的问题,本文采用2倍的比例对语音特征进行上采样,以匹配Mel谱图的帧率。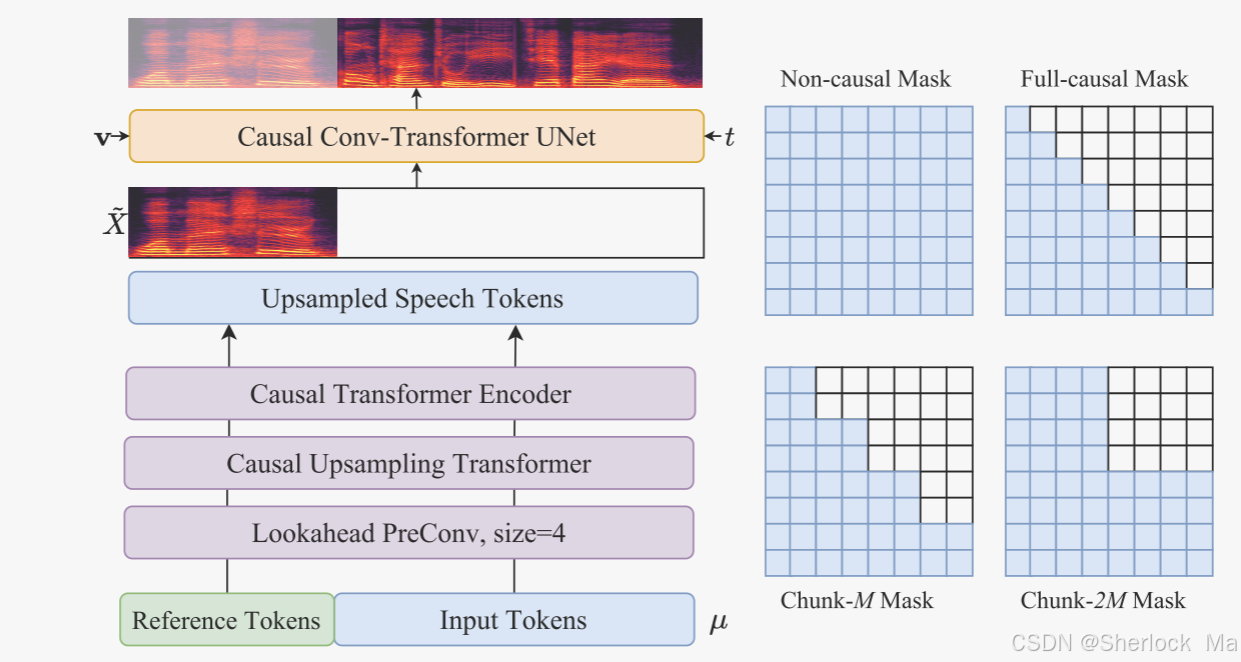
在上采样操作之前,作者添加了一个额外的前瞻卷积层(look-ahead convolution),为后续因果模块提供未来信息。前瞻层由右填充的一维卷积实现,填充大小为P,内核大小为P+1。在这些之后,几个chunk-aware causal Transformer块用来对齐语音token的表示空间以匹配声学特征。
然后,作者的目标是进一步将语音token解码为Speaker Embedding和参考语音指定的Mel谱图。为了实现这一目标,作者采用条件流匹配(CFM)模型对Mel谱图进行采样,以给定的语音标记、参考语音和Speaker Embedding作为条件。
在CFM模型中,目标Mel谱图的分布由先验分布p0(X)和数据分布q(X)的概率密度路径来描述。概率密度路径可以由时间相关的向量场来定义。为了提高采样效率,作者采用最优传输(OT)流来匹配矢量场ωt,该矢量场由常微分方程(ODE)给出
作者采用因果卷积Transformer UNet来学习ODE,其中上采样的令牌μ、掩蔽的Mel频谱图 、Speaker Embedding v和时间步长t作为条件:

在训练阶段,通过随机掩蔽X1中70%至100%的最终帧来获得掩蔽的Mel谱图。至于训练,它是由从参考语音中提取的Mel谱图提供的。通过最小化预测和真实ODE之间的L1损失,我们可以优化UNet参数θ,如下所示:

在训练阶段,时间步长遵循均匀分布U[0,1]。然而,在推理过程中,作者使用余弦调度器(cosine scheduler)为初始生成阶段提供更多步骤:
此外,作者还在条件和非条件情况下训练模型,以在推理阶段启用无分类器指导(classifier-free guidance ,CFG):

当前的流匹配模型总是在离线模式下工作,即,只有生成所有的语音标记后,才能对Mel谱图进行采样,这对于流式合成是不友好的。为了克服这个问题,作者将多步流估计视为一个堆叠的更深层次的神经网络,将它重复UNet十次。因此,通过使展开的神经网络具有因果性,可以将其应用于流合成。我们构造了四个掩码来满足不同的应用情况:
- Non-causal Mask:用于离线模式,它可以通过处理所有帧的条件来获得最佳性能。非因果掩码适用于对延迟不敏感的情况。
- Full-causal Mask是为需要极低延迟的场景而设计的,在这种场景中,只能关注过去的帧。
- Chunk-M Mask是延迟和性能之间的权衡,它可以利用过去和M个未来帧的信息。该掩码更适合于具有低延迟的第一生成块。
- Chunk-2M Mask可以通过牺牲更多的延迟来获得近似离线模式的性能,这可以用于级联生成块以获得更好的性能。
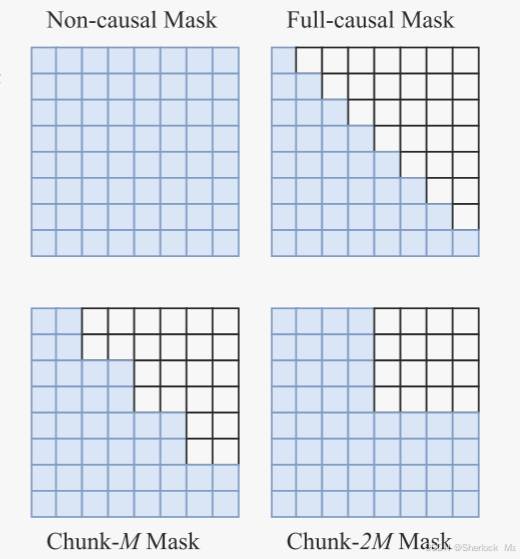
对于mini-batch中的每个训练案例,作者从均匀分布的上述四个掩码中随机抽取一个掩码。通过这种方式,一个流匹配模型可以兼容不同的场景,降低了部署复杂度。
-
流模式的延迟分析
第一个包的延迟是流合成模型的重要指标,它会显著影响用户体验。在TTS背景下,合成文本是事先已知的,延迟来自语音标记生成、Mel谱图重构和波形合成(speech token generation, Mel spectrogram reconstruction and waveform synthesis)等方面。因此,可以如下获得CosyVoice 2的第一个包的延迟 :
:

其中 表示LM生成一个语音令牌的计算时间,
 表示流匹配模型生成一个语音令牌的Mel频谱图的帧的计算时间,并且
 表示vocoder合成对应于一个语音令牌的波形的计算时间。
在基于LLM的语音聊天的上下文中,还应考虑第一个包所需文本的长度,并且第一个包延迟 变为如下:
变为如下:
 。
。
这个公式指出了在语音聊天应用中,第一个包的延迟的上限。公式12的意义在于,它提供了一个评估和优化流式语音合成系统性能的框架。通过减少LLM生成文本token的时间( )和TTS模型生成音频的时间(
 ),可以降低整个系统的延迟,从而改善用户体验。
-
指令构建
为了增强CosyVoice 2的可控性,作者将指令数据集集成到基础训练集中。
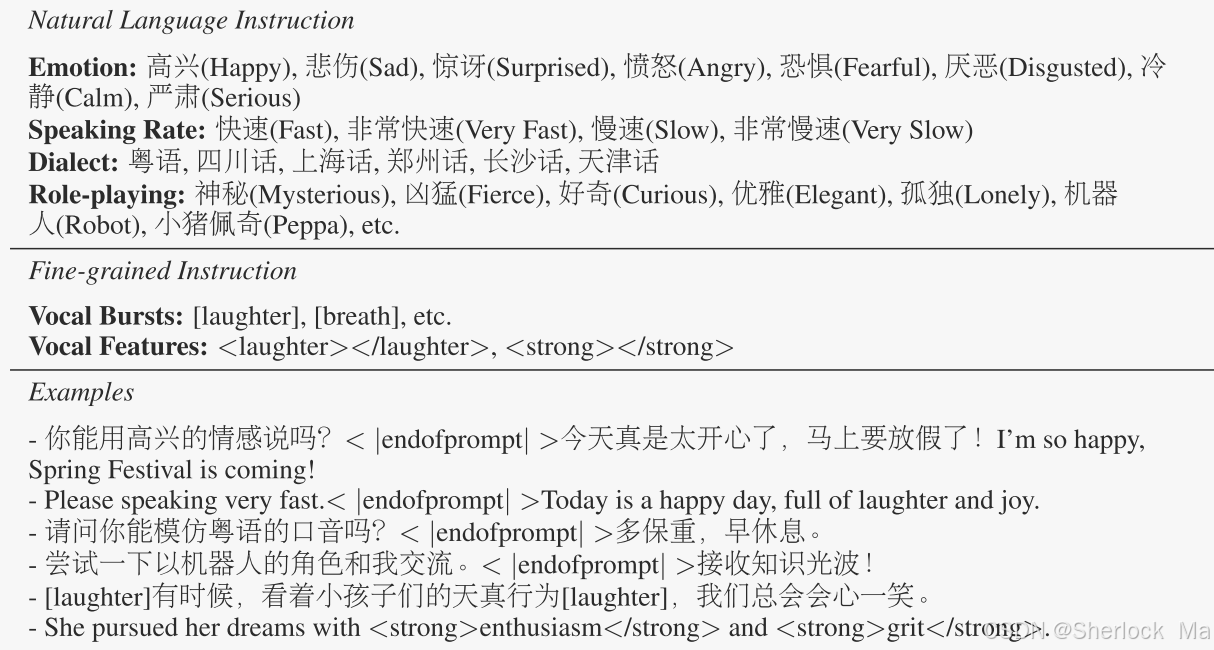
作者已经收集了1500小时的指令训练数据,其中包括自然语言指令和细粒度指令,如下表所示。
- 对于自然语言指令,作者预先在合成输入文本之前添加自然语言描述和特殊的结束标记“<|endofprompt|>”。这些描述涵盖了情感、语速、角色扮演和方言等方面。
- 对于细粒度的指令,作者在文本标记之间插入声音爆破符,使用像“[laughter]”和“[breath]”这样的标记。
- 此外,作者还将语气特征标记应用于短语;例如,“<strong>XXX</strong>”表示对某些单词的强调,而“<laughter>XXX</laughter>“表示笑着说话。
-
多-Speaker微调
对预训练模型在特定Speaker(SFT)上进行微调可以进一步提高生成质量和说话人相似性。
在这份报告中,作者介绍了多Speaker微调(mSFT),其中预训练模型同时对多个Speaker进行微调,而不是单个Speaker。这种方法确保了跨多个Speaker的全面韵律和发音覆盖,并减轻了预训练模型的潜在灾难性遗忘。
为了避免不同Speaker之间的音色混淆,作者预先添加了Speaker提示标记“Speaker
A<|endofprompt|>”添加到特定Speaker的输入文本。如果训练样本没有标记给Speaker,则使用特殊标记“unknown<|endofprompt|>”。
-
SFT的强化学习
在CosyVoice 2中,作者采用ASR系统中的说话人相似度(speaker similarity,SS)和识别词错误率(recognition word error rate,WER)作为奖励函数。作者使用WER和SS来区分首选样本 和拒绝样本
和拒绝样本 ,并使用直接偏好优化(DPO)优化TTS系统,如下所示:

其中 和
和 是从优选样本
 和拒绝样本
和拒绝样本 中提取的语音令牌。
然而,这种方法耗时且计算量大,因为它需要通过TTS系统重复合成音频以获得可区分的偏好和拒绝样本。在训练过程中,一个训练步骤需要四个向前操作。
为了简化该过程,作者恢复LM预测的令牌μi ∈ {0,1,...,(2K + 1)D-1}转换为量化的低秩表示H ′,并直接使用语音分词器的ASR后端来重新预测输入文本。然后将预测的对数后验概率作为ASR的奖励函数,对文本-语音语言模型进行优化。在训练期间,ASR后端参数被冻结。
-
实验设置
训练数据来自三种不同的资源:开源ASR数据集、内部工业数据集和TTS生成数据集。
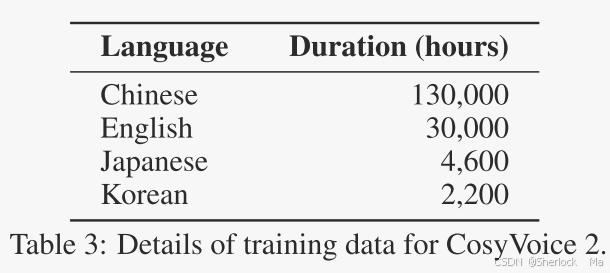
尽管作者在训练语音标记器时只使用了中文和英文数据,如表所示,但随后的实验表明,该语音标记器对其他语言具有zero-shot能力。它还可运用于日语和韩语等语言的语音合成。
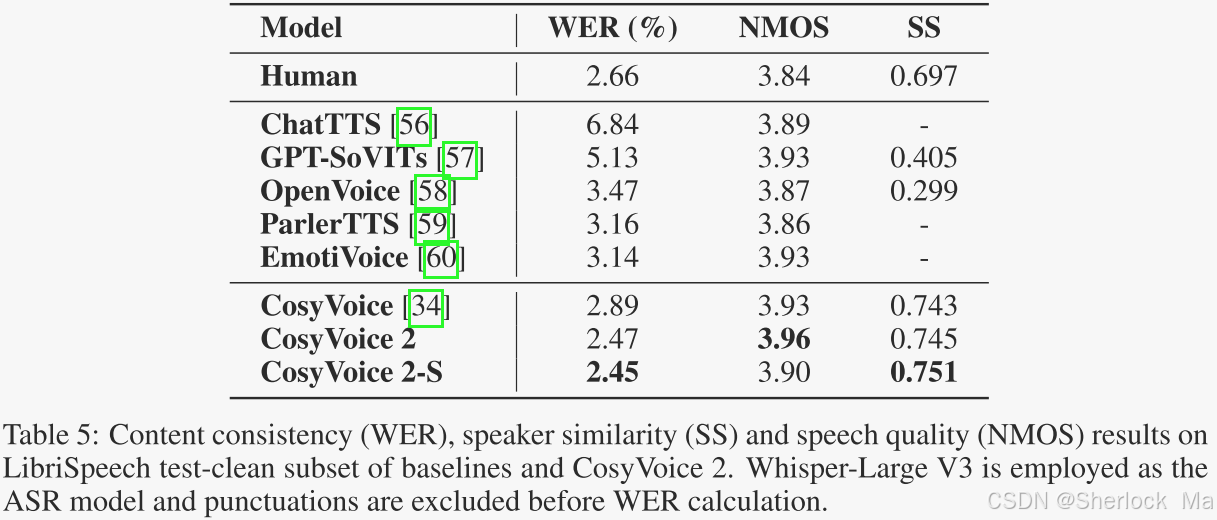
作者首先在有限的英语文本域上评估了CosyVoice 2模型,并将其与几个开源模型进行了比较,例如ChatTTS,GPT-SoVITs,OpenVoice,ParlerTTS,PartiVoice及其前身CosyVoice。客观结果如表所示,包括内容一致性(WER)、语音质量(NMOS)和说话人相似性(SS)。
从表中,我们可以看到,CosyVoice 2在Librispeech测试干净集上实现了最先进的性能,在所有评估指标上超过了所有基线模型。值得注意的是,CosyVoice 2甚至表现出比人类话语更高的内容一致性,语音质量和说话者相似性,表明其合成质量接近人类。
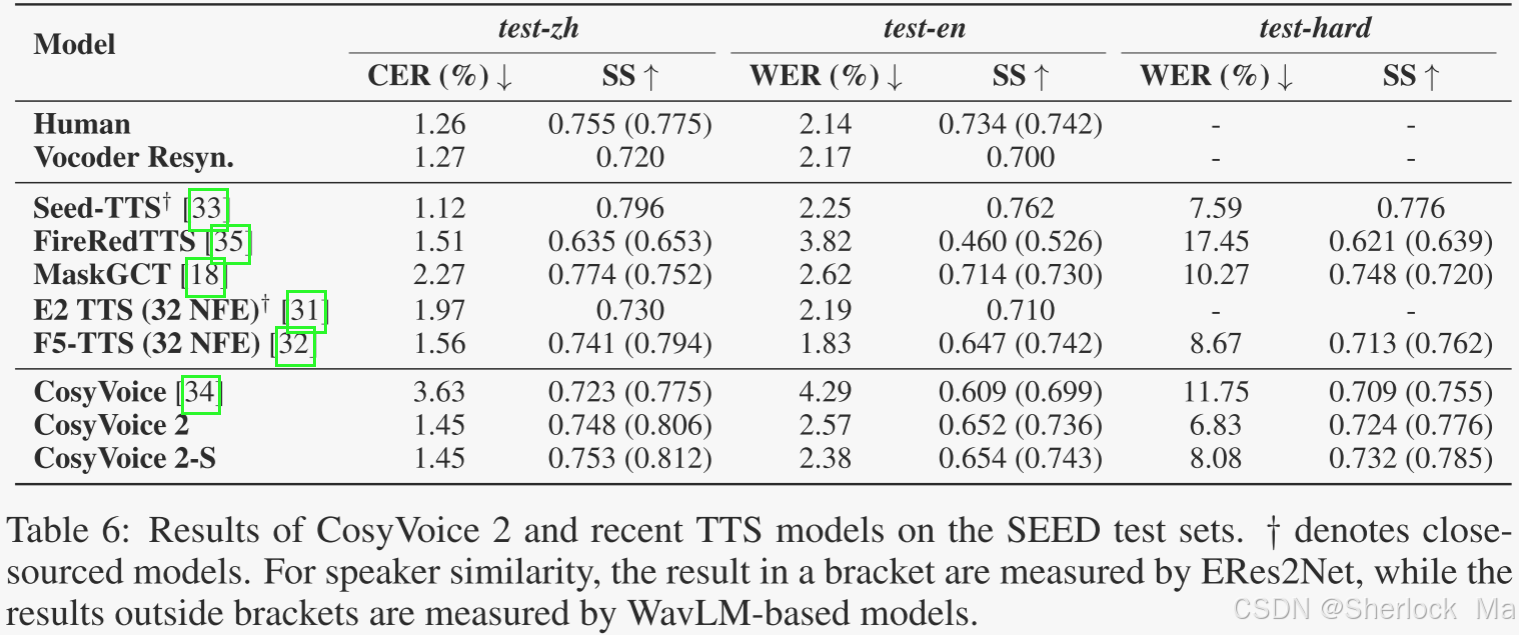
作者还在常用的测试集上对CosyVoice 2进行了评估:SEED test-zh,test-en和test-hard,其中包括来自各个领域的各种输入文本和参考语音。CosyVoice 2和基线模型的实验结果见下表。
-
-
4.代码解读
环境配置
首先下载官方代码,需要注意,如果使用zip下载的方法,还要额外下载third_party下面的Matcha-TTS项目。使用git下载的读者请使用以下命令:
git clone --recursive https://github.com/FunAudioLLM/CosyVoice.git
# If you failed to clone submodule due to network failures, please run following command until success
cd CosyVoice
git submodule update --init --recursive
然后配置conda环境
conda install -y -c conda-forge pynini==2.1.5
pip install -r requirements.txt -i https://mirrors.aliyun.com/pypi/simple/ --trusted-host=mirrors.aliyun.com

# If you encounter sox compatibility issues
# ubuntu
sudo apt-get install sox libsox-dev
# centos
sudo yum install sox sox-devel然后下载模型权重:https://huggingface.co/FunAudioLLM/CosyVoice2-0.5B
官方代码里保存在主目录下/pretrain/CosyVoice-XX
如果使用ttsfrd版本,请额外参考下面步骤安装依赖:
cd pretrained_models/CosyVoice-ttsfrd/
unzip resource.zip -d .
pip install ttsfrd_dependency-0.1-py3-none-any.whl
pip install ttsfrd-0.4.2-cp310-cp310-linux_x86_64.whl
然后配置环境变量:
export PYTHONPATH=third_party/Matcha-TTS不过这个步骤亲测,可以通过pycharm将Matcha-TTS文件夹标记为源代码根目录代替。
-
使用方法
cli
新建一个Python文件,我命名为inference.py。
模型支持3种模式:
- zero-shot合成:根据要生成的文本和提示音频,模拟音频的音色等,并生成新的音频zero_shot_XX.wav
- fine grained control:细粒度控制,可以添加笑声、喘气声等,并生成新的音频fine_grained_control_XX.wav
- instruct usage:指令控制,可以以文本的形式输入音色等信息,并生成新的音频instruct_XX.wav。
然后通过以下代码分别调用:
from cosyvoice.cli.cosyvoice import CosyVoice, CosyVoice2
from cosyvoice.utils.file_utils import load_wav
import torchaudio


cosyvoice = CosyVoice2('CosyVoice2-0.5B', load_jit=True, load_onnx=False, load_trt=False)   # 导入模型

prompt_speech_16k = load_wav('zero_shot_prompt.wav', 16000)     # 载入参考音频
# zero-shot生成,其中第一个文本是要生成的文本,第二个文本是参考音频的文本
for i, j in enumerate(cosyvoice.inference_zero_shot('收到好友从远方寄来的生日礼物,那份意外的惊喜与深深的祝福让我心中充满了甜蜜的快乐,笑容如花儿般绽放。', '希望你以后能够做的比我还好呦。', prompt_speech_16k, stream=False)):
    torchaudio.save('zero_shot_{}.wav'.format(i), j['tts_speech'], cosyvoice.sample_rate)

# fine grained control, 细粒度控制 如笑声
for i, j in enumerate(cosyvoice.inference_cross_lingual('在他讲述那个荒诞故事的过程中,他突然[laughter]停下来,因为他自己也被逗笑了[laughter]。', prompt_speech_16k, stream=False)):
    torchaudio.save('fine_grained_control_{}.wav'.format(i), j['tts_speech'], cosyvoice.sample_rate)

# instruct usage 指令控制,如使用四川话
for i, j in enumerate(cosyvoice.inference_instruct2('收到好友从远方寄来的生日礼物,那份意外的惊喜与深深的祝福让我心中充满了甜蜜的快乐,笑容如花儿般绽放。', '用四川话说这句话', prompt_speech_16k, stream=False)):
    torchaudio.save('instruct_{}.wav'.format(i), j['tts_speech'], cosyvoice.sample_rate)
支持的细粒度控制如下:
[breath]', 呼吸声
'<strong>', '</strong>', 强调
'[noise]',噪声
'[laughter]', 笑声
'[cough]', 咳嗽
'[clucking]', 咯咯声
'[accent]',重音
'[quick_breath]',快速呼吸声
"<laughter>", "</laughter>",
"[hissing]", 嘶嘶声
"[sigh]", 叹气
"[vocalized-noise]",发声噪音
"[lipsmack]", 咂嘴
"[mn]"
使用Gradio构建网页
或者使用Gradio构建网页:
# change iic/CosyVoice-300M-SFT for sft inference, or iic/CosyVoice-300M-Instruct for instruct inference
python3 webui.py --port 50000 --model_dir pretrained_models/CosyVoice-300M--
load_wav()
这段代码的功能是加载并处理音频文件,确保其采样率符合目标采样率。具体步骤为使用 torchaudio.load 加载音频文件,获取音频数据和采样率。并对音频数据进行通道平均处理,确保其为单声道。
def load_wav(wav, target_sr):
    speech, sample_rate = torchaudio.load(wav)
    speech = speech.mean(dim=0, keepdim=True)   # 对音频数据进行通道平均处理,确保其为单声道
    if sample_rate != target_sr:
        assert sample_rate > target_sr, 'wav sample rate {} must be greater than {}'.format(sample_rate, target_sr)     # 如果当前采样率不大于目标采样率,抛出异常。
        speech = torchaudio.transforms.Resample(orig_freq=sample_rate, new_freq=target_sr)(speech)      # 如果当前采样率大于目标采样率,使用 Resample 进行重采样,然后返回处理后的音频数据。
    return speech
-
inference_zero_shot()
因为3种模式的代码流程基本一样,这里我们以inference_zero_shot()为例进行讲解。
-
位于cosyvoice/cli/cosyvoice.py下cosyvoice类下的inference_zero_shot()函数。这段代码实现了零样本语音合成的功能,具体步骤如下:
- 规范化提示词:使用text_normalize()对输入的 prompt_text 进行规范化处理。
- 生成输入:使用self.frontend.frontend_zero_shot()生成输入,包括文本tokenizer处理、音频处理、音频转tokenizer等。
- 调用模型合成语音:self.model.tts()调用 TTS 模型生成语音片段,并记录合成时间和实时率(RTF)。
- 返回生成结果:逐段返回生成的语音片段。
整体代码如下:
class CosyVoice:
    def inference_zero_shot(self, tts_text, prompt_text, prompt_speech_16k, stream=False, speed=1.0, text_frontend=True):
        prompt_text = self.frontend.text_normalize(prompt_text, split=False, text_frontend=text_frontend)   # 对提示词进行规范化处理。
        for i in tqdm(self.frontend.text_normalize(tts_text, split=True, text_frontend=text_frontend)):
            if len(i) < 0.5 * len(prompt_text):
                logging.warning('synthesis text {} too short than prompt text {}, this may lead to bad performance'.format(i, prompt_text))
            model_input = self.frontend.frontend_zero_shot(i, prompt_text, prompt_speech_16k, self.sample_rate)
            start_time = time.time()
            logging.info('synthesis text {}'.format(i))
            for model_output in self.model.tts(**model_input, stream=stream, speed=speed):      # 语音合成。
                speech_len = model_output['tts_speech'].shape[1] / self.sample_rate     # 语音的长度。
                logging.info('yield speech len {}, rtf {}'.format(speech_len, (time.time() - start_time) / speech_len))
                yield model_output
                start_time = time.time()
首先来看text_normalize()方法,用于对输入文本进行规范化处理。包括:
- 去除文本首尾的空白字符
- 替换空白、角标、标点符号,并移除括号。
- 按段落分割文本。
class CosyVoiceFrontEnd:
    def text_normalize(self, text, split=True, text_frontend=True):
        if text_frontend is False:
            return [text] if split is True else text
        text = text.strip()
        # When generating text that contains only punctuation marks or whitespace characters
        # - Returning empty texts ensures consistent processing logic.
        if is_only_punctuation(text):
            return []
        if contains_chinese(text):
            if self.use_ttsfrd:
                texts = [i["text"] for i in json.loads(self.frd.do_voicegen_frd(text))["sentences"]]
                text = ''.join(texts)
            else:
                text = self.zh_tn_model.normalize(text)
                text = text.replace("\n", "")
                text = replace_blank(text)
                text = replace_corner_mark(text)
                text = text.replace(".", "。")
                text = text.replace(" - ", ",")
                text = remove_bracket(text)
                text = re.sub(r'[,,、]+$', '。', text)
                texts = list(split_paragraph(text, partial(self.tokenizer.encode, allowed_special=self.allowed_special), "zh", token_max_n=80,
                                             token_min_n=60, merge_len=20, comma_split=False))
        else:
            if self.use_ttsfrd:
                texts = [i["text"] for i in json.loads(self.frd.do_voicegen_frd(text))["sentences"]]
                text = ''.join(texts)
            else:
                text = self.en_tn_model.normalize(text)
                text = spell_out_number(text, self.inflect_parser)
                texts = list(split_paragraph(text, partial(self.tokenizer.encode, allowed_special=self.allowed_special), "en", token_max_n=80,
                                             token_min_n=60, merge_len=20, comma_split=False))
        if split is False:
            return text
        return texts
其次是self.frontend.frontend_zero_shot()的主要作用是调整输入,使输入更符合模型输入,包括使用tokenizer处理文本和音频并生成对应的token,以及使用Matcha-TTS处理音频。
class CosyVoiceFrontEnd:
    def frontend_zero_shot(self, tts_text, prompt_text, prompt_speech_16k, resample_rate):
        tts_text_token, tts_text_token_len = self._extract_text_token(tts_text)     # tokenizer 将文本转换为token [b,len]
        prompt_text_token, prompt_text_token_len = self._extract_text_token(prompt_text)
        prompt_speech_resample = torchaudio.transforms.Resample(orig_freq=16000, new_freq=resample_rate)(prompt_speech_16k)     # 重采样语音:将 prompt_speech_16k 从 16kHz 重采样到指定的 resample_rate,即24khz。
        speech_feat, speech_feat_len = self._extract_speech_feat(prompt_speech_resample)    # Matcha-TTS 提取重采样的语音特征。[b,len,80]
        speech_token, speech_token_len = self._extract_speech_token(prompt_speech_16k)      # 提取原语音token。    [b,len]
        if resample_rate == 24000:
            # cosyvoice2, force speech_feat % speech_token = 2    调整特征长度。
            token_len = min(int(speech_feat.shape[1] / 2), speech_token.shape[1])
            speech_feat, speech_feat_len[:] = speech_feat[:, :2 * token_len], 2 * token_len
            speech_token, speech_token_len[:] = speech_token[:, :token_len], token_len
        embedding = self._extract_spk_embedding(prompt_speech_16k)
        model_input = {'text': tts_text_token, 'text_len': tts_text_token_len,
                       'prompt_text': prompt_text_token, 'prompt_text_len': prompt_text_token_len,
                       'llm_prompt_speech_token': speech_token, 'llm_prompt_speech_token_len': speech_token_len,
                       'flow_prompt_speech_token': speech_token, 'flow_prompt_speech_token_len': speech_token_len,
                       'prompt_speech_feat': speech_feat, 'prompt_speech_feat_len': speech_feat_len,
                       'llm_embedding': embedding, 'flow_embedding': embedding}
        return model_input
其中,_extract_speech_feat()、_extract_speech_token()的代码如下,其主要功能是使用Matcha-TTS提取语音特征和将语音数据转换为token。
class CosyVoiceFrontEnd:
    def _extract_speech_token(self, speech):
        assert speech.shape[1] / 16000 <= 30, 'do not support extract speech token for audio longer than 30s'
        feat = whisper.log_mel_spectrogram(speech, n_mels=128)      # 计算梅尔频谱图
        speech_token = self.speech_tokenizer_session.run(None,      # 调用模型推理
                                                         {self.speech_tokenizer_session.get_inputs()[0].name:
                                                          feat.detach().cpu().numpy(),
                                                          self.speech_tokenizer_session.get_inputs()[1].name:
                                                          np.array([feat.shape[2]], dtype=np.int32)})[0].flatten().tolist()
        speech_token = torch.tensor([speech_token], dtype=torch.int32).to(self.device)      # 将推理结果转换为PyTorch张量
        speech_token_len = torch.tensor([speech_token.shape[1]], dtype=torch.int32).to(self.device)
        return speech_token, speech_token_len

    def _extract_speech_feat(self, speech):
        speech_feat = self.feat_extractor(speech).squeeze(dim=0).transpose(0, 1).to(self.device)    # Matcha-TTS提取语音特征
        speech_feat = speech_feat.unsqueeze(dim=0)
        speech_feat_len = torch.tensor([speech_feat.shape[1]], dtype=torch.int32).to(self.device)   # 语音特征长度
        return speech_feat, speech_feat_len
-
model.tts()
接着我们进入model.tts(),这里是整个代码的核心部分,用于进行语音合成。实现了文本到语音(TTS)的转换,支持流式和非流式处理。具体功能如下:
- 初始化:
- 生成唯一标识符 this_uuid 并初始化相关字典。
- 使用锁机制确保线程安全地初始化。
- 启动线程:
- 启动一个线程p,并执行 llm_job 方法,处理输入文本并生成 TTS 语音标记。
- 流式处理:
- 如果 stream=True,通过循环逐步生成语音片段并实时返回。
- 检查是否有足够的 token 用于生成语音片段,如果有则调用 token2wav 方法生成语音并实时返回。
- 非流式处理:
- 如果 stream=False,等待线程结束,一次性生成完整的语音并返回。
- 清理:
- 清理与 this_uuid 相关的字典条目
整体代码如下:
class CosyVoice2Model:
    def tts(self, text, flow_embedding, llm_embedding=torch.zeros(0, 192),
            prompt_text=torch.zeros(1, 0, dtype=torch.int32),
            llm_prompt_speech_token=torch.zeros(1, 0, dtype=torch.int32),
            flow_prompt_speech_token=torch.zeros(1, 0, dtype=torch.int32),
            prompt_speech_feat=torch.zeros(1, 0, 80), stream=False, speed=1.0, **kwargs):
        # this_uuid is used to track variables related to this inference thread
        this_uuid = str(uuid.uuid1())       # 生成唯一标识符 this_uuid 并初始化相关字典。
        with self.lock:         # 使用锁机制确保线程安全地初始化
            self.tts_speech_token_dict[this_uuid], self.llm_end_dict[this_uuid] = [], False
            self.hift_cache_dict[this_uuid] = None
        p = threading.Thread(target=self.llm_job, args=(text, prompt_text, llm_prompt_speech_token, llm_embedding, this_uuid))
        p.start()        # 启动线程
        if stream is True:      # True:流式处理
            token_offset = 0
            while True:         # 通过循环逐步生成语音片段并返回。
                time.sleep(0.1)
                if len(self.tts_speech_token_dict[this_uuid]) - token_offset >= self.token_hop_len + self.flow.pre_lookahead_len:   # 检查是否有足够的token用于生成语音片段。
                    # 如果有足够token,则生成语音片段。
                    this_tts_speech_token = torch.tensor(self.tts_speech_token_dict[this_uuid][:token_offset + self.token_hop_len + self.flow.pre_lookahead_len]).unsqueeze(dim=0)   # 将this_uuid对应的TTS语音标记转换为张量,并增加一个维度。
                    this_tts_speech = self.token2wav(token=this_tts_speech_token,       # 调用 token2wav 方法生成语音
                                                     prompt_token=flow_prompt_speech_token,
                                                     prompt_feat=prompt_speech_feat,
                                                     embedding=flow_embedding,
                                                     uuid=this_uuid,
                                                     token_offset=token_offset,
                                                     finalize=False)
                    token_offset += self.token_hop_len
                    yield {'tts_speech': this_tts_speech.cpu()}     # 实时返回
                if self.llm_end_dict[this_uuid] is True and len(self.tts_speech_token_dict[this_uuid]) - token_offset < self.token_hop_len + self.flow.pre_lookahead_len:
                    break

            # 处理剩余token:确保所有剩余的token都被处理。
            p.join()
            this_tts_speech_token = torch.tensor(self.tts_speech_token_dict[this_uuid]).unsqueeze(dim=0)
            this_tts_speech = self.token2wav(token=this_tts_speech_token,
                                             prompt_token=flow_prompt_speech_token,
                                             prompt_feat=prompt_speech_feat,
                                             embedding=flow_embedding,
                                             uuid=this_uuid,
                                             token_offset=token_offset,
                                             finalize=True)
            yield {'tts_speech': this_tts_speech.cpu()}
        else:       # 非流式处理:等待线程结束,一次性生成完整的语音并返回。
            # deal with all tokens
            p.join()
            this_tts_speech_token = torch.tensor(self.tts_speech_token_dict[this_uuid]).unsqueeze(dim=0)    # 将 this_uuid 对应的 TTS 语音标记转换为张量,并增加一个维度。
            this_tts_speech = self.token2wav(token=this_tts_speech_token,       # 调用 token2wav 方法生成语音
                                             prompt_token=flow_prompt_speech_token,
                                             prompt_feat=prompt_speech_feat,
                                             embedding=flow_embedding,
                                             uuid=this_uuid,
                                             token_offset=0,
                                             finalize=True,
                                             speed=speed)
            yield {'tts_speech': this_tts_speech.cpu()}     # 返回生成的语音数据。
        with self.lock:
            self.tts_speech_token_dict.pop(this_uuid)
            self.llm_end_dict.pop(this_uuid)
接下来,我们逐行细看代码:
首先是线程相关:这段代码的功能是启动一个新的线程来执行 self.llm_job 方法。
- 创建一个线程对象 p,目标函数为 self.llm_job,传递参数 (text, prompt_text, llm_prompt_speech_token, llm_embedding, this_uuid)。
线程的好处当然是可以允许程序在同一时间内执行多个任务,提高资源利用率。也就是说,主程序在运行的同时,线程也在运行,大模型的自回归生成过程是通过线程运行得到的。
this_uuid = str(uuid.uuid1())       # 生成唯一标识符 this_uuid 并初始化相关字典。
with self.lock:         # 使用锁机制确保线程安全地初始化
    self.tts_speech_token_dict[this_uuid], self.llm_end_dict[this_uuid] = [], False
    self.hift_cache_dict[this_uuid] = None
p = threading.Thread(target=self.llm_job, args=(text, prompt_text, llm_prompt_speech_token, llm_embedding, this_uuid))
p.start()        # 启动线程
其中线程的目标是self.llm_job,用于将文本、音频等内容的token送入大模型进行自回归生成。
class CosyVoice2Model:
    def llm_job(self, text, prompt_text, llm_prompt_speech_token, llm_embedding, uuid):
        with self.llm_context:
            for i in self.llm.inference(text=text.to(self.device),
                                        text_len=torch.tensor([text.shape[1]], dtype=torch.int32).to(self.device),
                                        prompt_text=prompt_text.to(self.device),
                                        prompt_text_len=torch.tensor([prompt_text.shape[1]], dtype=torch.int32).to(self.device),
                                        prompt_speech_token=llm_prompt_speech_token.to(self.device),
                                        prompt_speech_token_len=torch.tensor([llm_prompt_speech_token.shape[1]], dtype=torch.int32).to(self.device),
                                        embedding=llm_embedding.to(self.device)):
                self.tts_speech_token_dict[uuid].append(i)
self.llm_end_dict[uuid] = True这里需要注意的是:实际上,当调用p.start()的时候,就已经启动llm_job,即调用大模型进行自回归生成了。后面的流式和非流式是主程序把线程生成的token转换为音频。其中流式处理是在线程运行的同时,主程序进行转换;而非流式处理是子线程处理完后,主程序进行转换。
其中,llm.inference()如下:其主要目的是调用qwen模型自回归地生成token
class Qwen2LM(torch.nn.Module):

    @torch.inference_mode()
    def inference(
            self,
            text: torch.Tensor,
            text_len: torch.Tensor,
            prompt_text: torch.Tensor,
            prompt_text_len: torch.Tensor,
            prompt_speech_token: torch.Tensor,
            prompt_speech_token_len: torch.Tensor,
            embedding: torch.Tensor,
            sampling: int = 25,
            max_token_text_ratio: float = 20,
            min_token_text_ratio: float = 2,
    ) -> Generator[torch.Tensor, None, None]:
        device = text.device
        text = torch.concat([prompt_text, text], dim=1)
        text_len += prompt_text_len
        text = self.llm.model.model.embed_tokens(text)

        # 2. encode embedding   编码嵌入:初始化嵌入向量
        embedding = torch.zeros(1, 0, self.llm_input_size, dtype=text.dtype).to(device)

        # 3. concat llm_input   构建模型输入
        sos_eos_emb = self.llm_embedding.weight[self.sos_eos].reshape(1, 1, -1)     # 拼接起始/结束标记
        task_id_emb = self.llm_embedding.weight[self.task_id].reshape(1, 1, -1)     # 任务ID
        if prompt_speech_token_len != 0:    # 拼接prompt_speech_token
            prompt_speech_token_emb = self.speech_embedding(prompt_speech_token)
        else:
            prompt_speech_token_emb = torch.zeros(1, 0, self.llm_input_size, dtype=text.dtype).to(device)
        lm_input = torch.concat([sos_eos_emb, embedding, text, task_id_emb, prompt_speech_token_emb], dim=1)

        # 4. cal min/max_length     计算最小最大长度:根据输入文本长度计算生成文本的最小和最大长度。
        min_len = int((text_len - prompt_text_len) * min_token_text_ratio)
        max_len = int((text_len - prompt_text_len) * max_token_text_ratio)

        # 5. step by step decode    逐步解码
        out_tokens = []
        cache = None
        for i in range(max_len):
            y_pred, cache = self.llm.forward_one_step(lm_input,     # 传入当前输入和缓存,获取预测结果和更新后的缓存。
                                                      masks=torch.tril(torch.ones((1, lm_input.shape[1], lm_input.shape[1]), device=lm_input.device)).to(torch.bool),
                                                      cache=cache)
            logp = self.llm_decoder(y_pred[:, -1]).log_softmax(dim=-1)  # 计算对数概率
            top_ids = self.sampling_ids(logp.squeeze(dim=0), out_tokens, sampling, ignore_eos=True if i < min_len else False).item()    # 根据对数概率分布采样得到下一个token ID
            if top_ids == self.speech_token_size:
                break
            if top_ids > self.speech_token_size:
                continue
            # in stream mode, yield token one by one
            yield top_ids       # 在流模式下逐个输出token
            out_tokens.append(top_ids)
            lm_input = self.speech_embedding.weight[top_ids].reshape(1, 1, -1)
-
流式处理
这段代码实现了流式语音合成的功能,具体如下:
- 循环生成语音片段:通过 while True 循环逐步生成并返回语音片段,每次生成的语音片段基于当前可用的 token。
- 检查 token 数量:每次循环中检查子进程 self.tts_speech_token_dict[this_uuid] 是否有足够的 token 用于生成语音片段。如果有,则调用 token2wav() 方法将token转化为语音并实时返回语音片段,并更新 token_offset。
- 结束条件:当所有 token 处理完毕或接收到结束信号时,退出循环。
- 处理剩余 token:确保所有剩余的 token 都被处理,并生成最终的语音片段,然后返回。
需要注意的是:这里流式处理时循环里不需要阻塞线程,因为主程序循环在线程未结束前不会终止;因此只有最后处理剩余token时才使用了p.join()处理线程。
- p.join():阻塞当前线程,直到进程 p 执行完毕。这确保了主程序不会在子进程未完成时提前结束。
if stream is True:      # True:流式处理
    token_offset = 0
    while True:         # 通过循环逐步生成语音片段并返回。
        time.sleep(0.1)
        if len(self.tts_speech_token_dict[this_uuid]) - token_offset >= self.token_hop_len + self.flow.pre_lookahead_len:   # 检查是否有足够的token用于生成语音片段。
            # 如果有足够token,则生成语音片段。
            this_tts_speech_token = torch.tensor(self.tts_speech_token_dict[this_uuid][:token_offset + self.token_hop_len + self.flow.pre_lookahead_len]).unsqueeze(dim=0)   # 将this_uuid对应的TTS语音标记转换为张量,并增加一个维度。
            this_tts_speech = self.token2wav(token=this_tts_speech_token,       # 调用 token2wav 方法将token转化为语音
                                             prompt_token=flow_prompt_speech_token,
                                             prompt_feat=prompt_speech_feat,
                                             embedding=flow_embedding,
                                             uuid=this_uuid,
                                             token_offset=token_offset,
                                             finalize=False)
            token_offset += self.token_hop_len
            yield {'tts_speech': this_tts_speech.cpu()}     # 实时返回
        if self.llm_end_dict[this_uuid] is True and len(self.tts_speech_token_dict[this_uuid]) - token_offset < self.token_hop_len + self.flow.pre_lookahead_len:
            break

    # 处理剩余token:确保所有剩余的token都被处理。
    p.join()    # 阻塞线程
    this_tts_speech_token = torch.tensor(self.tts_speech_token_dict[this_uuid]).unsqueeze(dim=0)
    this_tts_speech = self.token2wav(token=this_tts_speech_token,    # 调用 token2wav 方法将token转化为语音
                                     prompt_token=flow_prompt_speech_token,
                                     prompt_feat=prompt_speech_feat,
                                     embedding=flow_embedding,
                                     uuid=this_uuid,
                                     token_offset=token_offset,
                                     finalize=True)
    yield {'tts_speech': this_tts_speech.cpu()}    # 返回最后的结果
-
非流式处理
需要注意的是:这里非流式处理时需要阻塞线程,确保了主程序不会在子进程未完成时提前结束。
else:       # 非流式处理:等待线程结束,一次性生成完整的语音并返回。
    # deal with all tokens
    p.join()
    this_tts_speech_token = torch.tensor(self.tts_speech_token_dict[this_uuid]).unsqueeze(dim=0)    # 将 this_uuid 对应的 TTS 语音标记转换为张量,并增加一个维度。
    this_tts_speech = self.token2wav(token=this_tts_speech_token,       # 调用 token2wav 方法将token转化为语音
                                     prompt_token=flow_prompt_speech_token,
                                     prompt_feat=prompt_speech_feat,
                                     embedding=flow_embedding,
                                     uuid=this_uuid,
                                     token_offset=0,
                                     finalize=True,
                                     speed=speed)
    yield {'tts_speech': this_tts_speech.cpu()}     # 返回生成的语音数据。
-
token2wav
这段代码是 CosyVoice2Model 类中的 token2wav 方法,用于将文本标记转换为音频。主要步骤如下:
- 生成梅尔频谱图:调用 self.flow.inference 方法生成梅尔频谱图 tts_mel。
- 处理缓存:如果存在缓存(hift_cache_dict[uuid]),则将缓存的梅尔频谱图与新生成的拼接起来。
- 处理音频片段:
- 如果 finalize 为 False,则进行音频合成并更新缓存。
- 如果 finalize 为 True,则根据速度调整梅尔频谱图,并进行音频合成。
- 淡入淡出处理:使用 fade_in_out 方法对音频片段进行平滑过渡。
class CosyVoice2Model:
    def token2wav(self, token, prompt_token, prompt_feat, embedding, uuid, token_offset, finalize=False, speed=1.0):
        tts_mel, _ = self.flow.inference(token=token.to(self.device),       # 生成梅尔频谱图 tts_mel
                                         token_len=torch.tensor([token.shape[1]], dtype=torch.int32).to(self.device),
                                         prompt_token=prompt_token.to(self.device),
                                         prompt_token_len=torch.tensor([prompt_token.shape[1]], dtype=torch.int32).to(self.device),
                                         prompt_feat=prompt_feat.to(self.device),
                                         prompt_feat_len=torch.tensor([prompt_feat.shape[1]], dtype=torch.int32).to(self.device),
                                         embedding=embedding.to(self.device),
                                         finalize=finalize)
        tts_mel = tts_mel[:, :, token_offset * self.flow.token_mel_ratio:]
        # append hift cache
        if self.hift_cache_dict[uuid] is not None:      # 如果存在缓存,则将缓存的梅尔频谱图与新生成的拼接起来
            hift_cache_mel, hift_cache_source = self.hift_cache_dict[uuid]['mel'], self.hift_cache_dict[uuid]['source']
            tts_mel = torch.concat([hift_cache_mel, tts_mel], dim=2)
        else:
            hift_cache_source = torch.zeros(1, 1, 0)
        # keep overlap mel and hift cache
        if finalize is False:
            tts_speech, tts_source = self.hift.inference(speech_feat=tts_mel, cache_source=hift_cache_source)   # 合成音频片段 tts_speech。
            if self.hift_cache_dict[uuid] is not None:      # 如果存在缓存,则对音频片段进行淡入淡出处理。
                tts_speech = fade_in_out(tts_speech, self.hift_cache_dict[uuid]['speech'], self.speech_window)
            self.hift_cache_dict[uuid] = {'mel': tts_mel[:, :, -self.mel_cache_len:],
                                          'source': tts_source[:, :, -self.source_cache_len:],
                                          'speech': tts_speech[:, -self.source_cache_len:]}
            tts_speech = tts_speech[:, :-self.source_cache_len]
        else:
            if speed != 1.0:        # 调整音频速度
                assert self.hift_cache_dict[uuid] is None, 'speed change only support non-stream inference mode'
                tts_mel = F.interpolate(tts_mel, size=int(tts_mel.shape[2] / speed), mode='linear')
            tts_speech, tts_source = self.hift.inference(speech_feat=tts_mel, cache_source=hift_cache_source)
            if self.hift_cache_dict[uuid] is not None:
                tts_speech = fade_in_out(tts_speech, self.hift_cache_dict[uuid]['speech'], self.speech_window)
        return tts_speech
其中self.flow.inference()如下:
这段代码定义了 CausalMaskedDiffWithXvec 类的 inference 方法,用于推理生成音频特征。主要步骤如下:
- 输入验证和预处理:
- 对输入的 embedding 进行归一化和线性变换。
- 拼接文本和提示文本:
- 创建掩码并应用于拼接后的 token。
- 文本编码:使用编码器对拼接后的 token 进行编码。
- 条件准备:创建条件张量 conds 并填充 prompt_feat。
- 创建新的掩码并应用于解码器输入。
- 解码生成音频特征:使用解码器生成音频特征 feat。
- 返回生成的音频特征。
class CausalMaskedDiffWithXvec(torch.nn.Module):
    @torch.inference_mode()
    def inference(self,
                  token,
                  token_len,
                  prompt_token,
                  prompt_token_len,
                  prompt_feat,
                  prompt_feat_len,
                  embedding,
                  finalize):
        assert token.shape[0] == 1
        # xvec projection
        embedding = F.normalize(embedding, dim=1)       # 原音频的特征向量
        embedding = self.spk_embed_affine_layer(embedding)  # 192->80

        # concat text and prompt_text 拼接文本和提示文本
        token, token_len = torch.concat([prompt_token, token], dim=1), prompt_token_len + token_len
        mask = (~make_pad_mask(token_len)).unsqueeze(-1).to(embedding)
        token = self.input_embedding(torch.clamp(token, min=0)) * mask

        # text encode   使用编码器对拼接后的 token 进行编码。
        h, h_lengths = self.encoder(token, token_len)
        if finalize is False:
            h = h[:, :-self.pre_lookahead_len * self.token_mel_ratio]
        mel_len1, mel_len2 = prompt_feat.shape[1], h.shape[1] - prompt_feat.shape[1]
        h = self.encoder_proj(h)

        # get conditions    创建条件张量 conds
        conds = torch.zeros([1, mel_len1 + mel_len2, self.output_size], device=token.device)
        conds[:, :mel_len1] = prompt_feat
        conds = conds.transpose(1, 2)

        mask = (~make_pad_mask(torch.tensor([mel_len1 + mel_len2]))).to(h)
        feat, _ = self.decoder(     # 解码生成音频特征
            mu=h.transpose(1, 2).contiguous(),
            mask=mask.unsqueeze(1),
            spks=embedding,
            cond=conds,
            n_timesteps=10
        )
        feat = feat[:, :, mel_len1:]
        assert feat.shape[2] == mel_len2
        return feat, None
-
其中self.hift.inference如下:
这段代码定义了 HiFTGenerator 类中的 inference 方法,用于从输入的语音特征生成语音。具体功能如下:
- 预测基频(f0):通过 f0_predictor 模型从 speech_feat 中预测基频 f0。
- 生成声源信号:将 f0 上采样并转换为适合模型处理的格式,然后通过 m_source 模块生成声源信号 s。
- 使用缓存避免间断:如果 cache_source 不为空,则用其覆盖部分 s,以避免生成语音时出现间断。
- 解码生成语音:通过 decode 方法生成最终的语音信号 generated_speech。
class HiFTGenerator(nn.Module):
    @torch.inference_mode()
    def inference(self, speech_feat: torch.Tensor, cache_source: torch.Tensor = torch.zeros(1, 1, 0)) -> torch.Tensor:
        # mel->f0
        f0 = self.f0_predictor(speech_feat)     # 预测基频(f0):通过 f0_predictor 模型从 speech_feat 中预测基频 f0。
        # f0->source
        s = self.f0_upsamp(f0[:, None]).transpose(1, 2)  # bs,n,t  生成声源信号:将 f0 上采样并转换为适合模型处理的格式,然后通过 m_source 模块生成声源信号 s
        s, _, _ = self.m_source(s)
        s = s.transpose(1, 2)
        # use cache_source to avoid glitch
        if cache_source.shape[2] != 0:      # 使用缓存避免间断:如果 cache_source 不为空,则用其覆盖部分 s,以避免生成语音时出现间断。
            s[:, :, :cache_source.shape[2]] = cache_source
            generated_speech = self.decode(x=speech_feat, s=s)  # 解码生成语音
        return generated_speech, s
-
inference_cross_lingual()
这段代码的整体代码和之前一样,故不多解释,主要的不同在使用了frontend_cross_lingual()进行模型输入model_input生成
def inference_cross_lingual(self, tts_text, prompt_speech_16k, stream=False, speed=1.0, text_frontend=True):
    if self.frontend.instruct is True and isinstance(self.model, CosyVoiceModel):
        raise ValueError('{} do not support cross_lingual inference'.format(self.model_dir))
    for i in tqdm(self.frontend.text_normalize(tts_text, split=True, text_frontend=text_frontend)):
        model_input = self.frontend.frontend_cross_lingual(i, prompt_speech_16k, self.sample_rate)
        start_time = time.time()
        logging.info('synthesis text {}'.format(i))
        for model_output in self.model.tts(**model_input, stream=stream, speed=speed):
            speech_len = model_output['tts_speech'].shape[1] / self.sample_rate
            logging.info('yield speech len {}, rtf {}'.format(speech_len, (time.time() - start_time) / speech_len))
            yield model_output
            start_time = time.time()
其中frontend_cross_lingual()如下:其中删除了提示词文本prompt_text和音频提示的信息llm_prompt_speech_token
def frontend_cross_lingual(self, tts_text, prompt_speech_16k, resample_rate):
    model_input = self.frontend_zero_shot(tts_text, '', prompt_speech_16k, resample_rate)
    # in cross lingual mode, we remove prompt in llm
    del model_input['prompt_text']
    del model_input['prompt_text_len']
    del model_input['llm_prompt_speech_token']
    del model_input['llm_prompt_speech_token_len']
    return model_input
-
inference_instruct2()
这段代码的整体代码和之前一样,故不多解释,主要的不同在使用了frontend_instruct2()进行模型输入model_input生成
def inference_instruct2(self, tts_text, instruct_text, prompt_speech_16k, stream=False, speed=1.0, text_frontend=True):
    assert isinstance(self.model, CosyVoice2Model)
    for i in tqdm(self.frontend.text_normalize(tts_text, split=True, text_frontend=text_frontend)):
        model_input = self.frontend.frontend_instruct2(i, instruct_text, prompt_speech_16k, self.sample_rate)
        start_time = time.time()
        logging.info('synthesis text {}'.format(i))
        for model_output in self.model.tts(**model_input, stream=stream, speed=speed):
            speech_len = model_output['tts_speech'].shape[1] / self.sample_rate
            logging.info('yield speech len {}, rtf {}'.format(speech_len, (time.time() - start_time) / speech_len))
            yield model_output
            start_time = time.time()
其中frontend_instruct2()如下:
这里唯一的区别在于输入到_extract_text_token里面的是instruct_text + '<|endofprompt|>'
def frontend_instruct2(self, tts_text, instruct_text, prompt_speech_16k, resample_rate):
    tts_text_token, tts_text_token_len = self._extract_text_token(tts_text)
    prompt_text_token, prompt_text_token_len = self._extract_text_token(instruct_text + '<|endofprompt|>')    # 和frontend_zero_shot唯一的区别
    prompt_speech_resample = torchaudio.transforms.Resample(orig_freq=16000, new_freq=resample_rate)(prompt_speech_16k)
    speech_feat, speech_feat_len = self._extract_speech_feat(prompt_speech_resample)
    speech_token, speech_token_len = self._extract_speech_token(prompt_speech_16k)
    if resample_rate == 24000:
        # cosyvoice2, force speech_feat % speech_token = 2
        token_len = min(int(speech_feat.shape[1] / 2), speech_token.shape[1])
        speech_feat, speech_feat_len[:] = speech_feat[:, :2 * token_len], 2 * token_len
        speech_token, speech_token_len[:] = speech_token[:, :token_len], token_len
    embedding = self._extract_spk_embedding(prompt_speech_16k)
    model_input = {'text': tts_text_token, 'text_len': tts_text_token_len,
                   'prompt_text': prompt_text_token, 'prompt_text_len': prompt_text_token_len,
                   'flow_prompt_speech_token': speech_token, 'flow_prompt_speech_token_len': speech_token_len,
                   'prompt_speech_feat': speech_feat, 'prompt_speech_feat_len': speech_feat_len,
                   'llm_embedding': embedding, 'flow_embedding': embedding}
    return model_input
-
-
5.总结
在这篇博客中,我们深入探讨了CosyVoice 2这一革命性的语音合成模型。从技术实现到实际效果,CosyVoice 2展现了其在流式语音合成领域的领先地位。通过整合最新的大型语言模型和有限标量量化技术,CosyVoice 2不仅在语音的自然度和清晰度上达到了新的高度,还在实时响应和多语言支持方面取得了显著的进展。
总结来说,CosyVoice 2模型以其人类同等的自然度、极低的延迟、多语言和多说话人的支持以及精细的控制能力,已经成为语音合成技术的一个重要里程碑。它不仅推动了语音合成技术的发展,也为未来的人机交互提供了新的可能性。尽管如此,语音合成领域仍然充满挑战,技术的改进空间依然广阔。未来,我们期待CosyVoice 2能够扩展对更多语言的支持,尤其是那些资源较少的语言,同时继续提升语音的自然度和清晰度,减少合成语音中的人工痕迹。此外,提高模型对复杂情感和语调的理解和表达能力,使其能够更加精准地模拟人类说话的细微差别,也是技术发展的重要方向。CosyVoice 2在新闻播报、有声读物、语言学习等新领域的应用,将进一步满足更广泛的市场需求。同时,随着技术的发展,确保用户隐私和数据安全,以及负责任地使用合成语音技术,也是我们必须面对的伦理和隐私问题。
随着人工智能技术的不断进步,我们有理由相信CosyVoice 2及其后续模型将继续推动语音合成技术的边界,为用户带来更加丰富和真实的语音交互体验。未来,我们期待看到更多创新的解决方案,以应对这些挑战,并解锁语音合成技术的新可能性。
-
亲爱的读者朋友们,如果您在阅读这篇博客时,感受到了知识的乐趣,或是觉得内容对您有所启发,我诚挚地希望您能花一秒钟时间,用点赞来表达您的认可和支持。您的每一个赞都是对我莫大的鼓励,也是我持续创作优质内容的动力源泉。
如果您渴望探索更多类似的话题,或是期待更多精彩内容的更新,不妨点击关注,让我们的连接更加紧密。我会定期分享最新的行业动态、技术洞见和实用技巧,让您在知识的海洋中乘风破浪。
而对于那些真正珍视这篇内容,希望随时回顾的朋友们,收藏这篇文章将是您智慧的选择。它将作为您个人知识库中的宝贵财富,随时等待您的挖掘和探索。
感谢您的每一次互动,它们不仅温暖了我的心,也为这个世界增添了一抹色彩。让我们携手前行,在知识的旅途中共同成长。